Javascript Notes part-1 (NodeJS,Node-fetch,Axios)
Useful :
1] JS engines - https://youtu.be/BMKWdLX9w3M
2] Check if node and npm are installed in terminal :
- node -v
- npm -v
3] If you run the below command in the folder which has the package.json file,then npm will read the package.json file and install all the packages at once.
npm install
4] Open Vscode in current directory
code .
---------------------------------------------------------------------------------------------------------------
JavaScript was initially created to “make web pages alive”.The programs in this language are called scripts.They can be written right in a web page’s HTML and run automatically as the page loads.Javascript is a interpreted language ,JavaScript is not a class-based object-oriented language instead it is a Proto-type based language.
History of Javascript (Useful : 1] Click)
In 1989 the world wide web (WWW) was invented with the purpose to improve information sharing between universities and science institutes. One year later the first web-browser emerged simply named: ‘WorldWideWeb’. However, the first commercial-like browser was introduced a few years later — in 1993 — by the Netscape Communications Corporation. In the beginning of 1995 Netscape was one of the most popular web-browsers out there.
Web pages before the existence of JavaScript were very static. Lists, dates, and links were all hard-coded into your HTML, and any sort of dynamic functionality was encoded in the head of the HTML document as a header. To expand and further develop the WWW Netscape Communications Corporation created JavaScript (at that time called "Mocha"). The goal of JS was to enable the creation of dynamic websites and making the web more dynamic with interactions. In the later versions when it was commercially shipped with Netscape Navigator browser, it was renamed to "Livescript" and then eventually "Javascript".
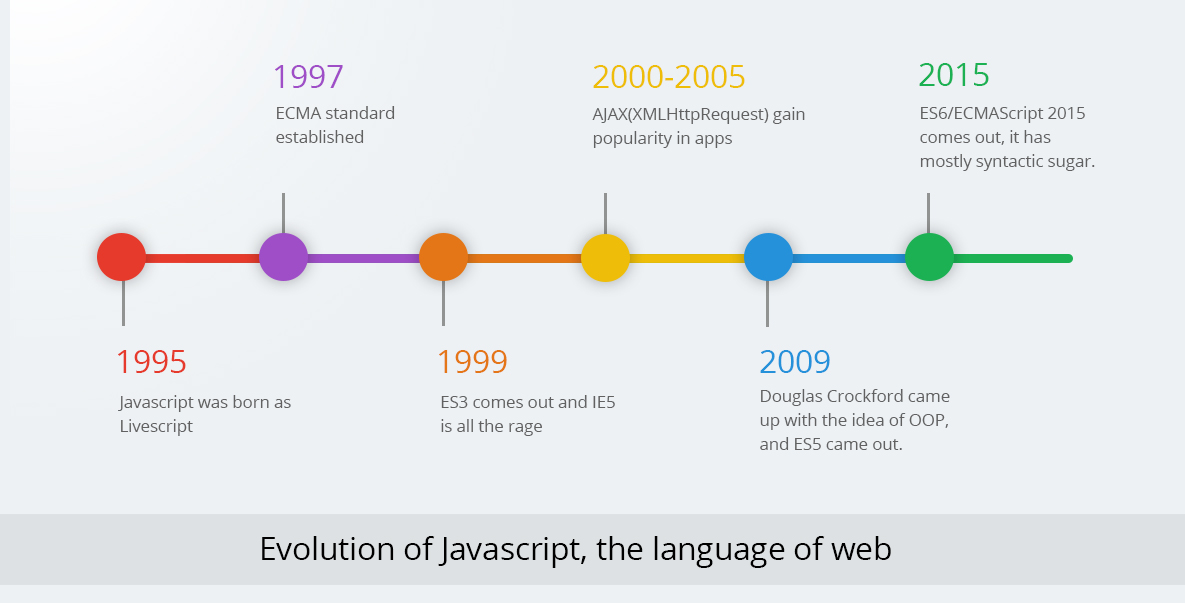
The first Javascript Engine/Interpreter was created by Netscape. Before Netscape went out of business they submitted to ECMA International Organisation the creation of a Javascript Standard or Specification. The standardization of JS would provide a pre-defined specification that one needs to follow when creating any Javascript based Interpreters.
The standard for Javascript that was created, is now called the "ECMAscript". The term "Javascript" does'nt represent a single open source language but rather various implementation of ECMAscript,which we also call as "JS Engines".
ECMAScript provides the rules, details, and guidelines that a scripting language must observe to be considered ECMAScript compliant. The ECMAscript basically standardizes the features that these various Implementations need to follow.
JavaScript engines are commonly found in web browsers, including V8 in Chrome, SpiderMonkey in Firefox, and Chakra in Edge. Each engine is like a language module for its application, allowing it to support a certain subset of the JavaScript language.
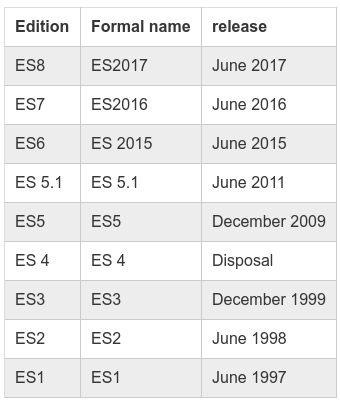
Since its inception in 1995, the language that has ultimately come to be known as JavaScript has gone through several iterations and versions. More updates and language features are also added to the ECMAscript every few years. In such cases these various Implementations of JS are also updated by their vendors to keep upto-date with the ECMAscript, providing developers more JS features.
NOTE : The ES6 version i.e sixth edition of ECMAscript provided major changes and modern features to the specification. It basically added features like promises,destructuring,Let,Const etc to the Javascript Language.
NOTE : In 2015 Ecma International decided to switch to annual releases of ECMAScript providing updates every year. Accordingly, Ecma International also started to name new editions of the ECMAScript specification based on the year they are released. In short, ES6 and ES2015 are two different names for the same thing.
ECMAScript is a specification for what a scripting language could look like. Releasing a new edition of ECMAScript does not mean that all JavaScript engines in existence suddenly have those new features. It is up to the groups or organizations who are responsible for JavaScript engines to be up-to-date about the latest ECMAScript specification, and to adopt its changes.
Therefore, developers tend to ask questions like, “What version of ECMAScript does this browser support?” or “Which ECMAScript features does this browser support?” They want to know if Google, Mozilla, and Microsoft have gotten around to updating their browsers’ JavaScript engines — for example V8, SpiderMonkey, and Chakra, respectively — with the features described in the latest ECMAScript.
NOTE : This blog here explains which features were added to in various ECMAscript versions.
NOTE : Today Javascript is so popular that every year new updates are added to the ECMAscript specification. Due to this we often need to use transcompilers like "Babel" to support/run new ES features in older browsers which have'nt upgraded to latest ECMAscript version.
Chicken or the egg ?
A confusing bit of history is that JavaScript was created in 1996. It was then submitted to Ecma International in 1997 for standardization, which resulted in ECMAScript. At the same time, because JavaScript conformed to the ECMAScript specification, JavaScript is an example of an ECMAScript implementation. That leaves us with this fun fact: ECMAScript is based on JavaScript, and JavaScript is based on ECMAScript.
--------------------------------------------------------------------------------------------------------------
Useful : 1] Click here
Javascript Engines
There are 2 ways you can run javascript :
1] Inside HTML of a Web-page using <script> tag on a web browser
2] Using Js as a stand-alone language without HTML or a web browser
In both cases we use a Javascript Engine which is a computer program that executes JavaScript code.JavaScript engines are typically developed by web browser vendors, and every major browser has one.
But the use of Js engines is not limited to wen browsers,we can use these engines on our pc to run javascript as a standalone language (just like python or java).
The first JavaScript engines were mere interpreters, but all relevant modern engines use just-in-time compilation for improved performance.The first JavaScript engine was created by Brendan Eich in 1995 for the Netscape Navigator web browser. It was a rudimentary interpreter for the nascent language Eich invented. (This evolved into the SpiderMonkey engine, still used by the Firefox browser.)
The first modern JavaScript engine was V8, created by Google for its Chrome browser. V8 debuted as part of Chrome in 2008, and its performance was much better than any prior engine.The key innovation was just-in-time compilation, which can significantly improve execution times.
Node.JS
https://www.freecodecamp.org/news/what-exactly-is-node-js-ae36e97449f5/
Node.js is an open-source, cross-platform, back-end JavaScript runtime environment that runs on the V8 engine and executes JavaScript code outside a web browser.
It is one of the most popular javascript engines built on top of chrome's v8 engine.
It also comes with "npm" or "node package manager" which is a default package manager that comes with node js.It is kind of similar to pip in python.
Nodejs also enables developers to use Js for backend rather than other backend languages like php.
(Running JS in visual studio code using NodeJS - Click here)
-------------------------------------------------------------------------------------------------------------
Javascript Syntax
JavaScript ignores spaces, tabs, and newlines that appear in JavaScript programs. You can use spaces, tabs, and newlines freely in your program.
Semicolons are Optional
Simple statements in JavaScript are generally followed by a semicolon character, just as they are in C, C++, and Java. JavaScript, however, allows you to omit this semicolon if each of your statements are placed on a separate line. For example, the following code could be written without semicolons.
<script language = "javascript" type = "text/javascript">
   <!--
      var1 = 10
      var2 = 20
   //-->
</script>
But when formatted in a single line as follows, you must use semicolons −
<script language = "javascript" type = "text/javascript">
   <!--
      var1 = 10; var2 = 20;
   //-->
</script>
Note − It is a good programming practice to use semicolons.
Case Sensitivity
JavaScript is a case-sensitive language. This means that the language keywords, variables, function names, and any other identifiers must always be typed with a consistent capitalization of letters.
-------------------------------------------------------------------------------------------------------------
console.log()
It is used to log information into the console.It is mostly used during testing purposes.
-------------------------------------------------------------------------------------------------------------
Variables
Use the "var" keyword to declare or initialise a variable.JavaScript is untyped language. This means that a JavaScript variable can hold a value of any data type. Unlike many other languages, you don't have to tell JavaScript during variable declaration what type of value the variable will hold.
Variables can be declared and initialize without the var keyword. However, a value must be assigned to a variable declared without the var keyword.
The variables declared without the var keyword becomes global variables, irrespective of where they are declared.
It is Not Recommended to declare a variable without var keyword because it can accidentally overwrite an existing global variable.
-------------------------------------------------------------------------------------------------------------
Before ES6 (2015), JavaScript had only Global Scope and Function Scope.
ES6 introduced two important new JavaScript keywords: let and const.
These two keywords provide Block Scope in JavaScript.
Variables declared inside a { } block cannot be accessed from outside the block:
-------------------------------------------------------------------------------------------------------------
Let in javascript
The let keyword was introduced in ES6 (2015).
Cannot be Redeclared
Variables defined with let cannot be redeclared. Variables defined with var can be.
You cannot accidentally redeclare a variable.
With let you can not do this:
Example
let x = "John Doe";
var x = 0;
// SyntaxError: 'x' has already been declaredBlock Scope
Variables declared inside a { } block cannot be accessed from outside the block:
Example
{
let x = 2;
}
// x can NOT be used hereVariables declared with the var keyword can NOT have block scope.
-------------------------------------------------------------------------------------------------------------
const in javascript
Variables defined with const cannot be Redeclared.
Variables defined with const cannot be Reassigned.
Variables defined with const have Block Scope.
It is used to declare constant variables
const PI = 3.14159265359;
// You can create a constant array:
const cars = ["Saab", "Volvo", "BMW"];
-------------------------------------------------------------------------------------------------------------
If...else
-------------------------------------------------------------------------------------------------------------
switch statement
-------------------------------------------------------------------------------------------------------------
While loop & For loop
-------------------------------------------------------------------------------------------------------------
Functions in Javascript
The most common way to define a function in JavaScript is by using the function keyword, followed by a unique function name, a list of parameters (that might be empty), and a statement block surrounded by curly braces.
Arrow Functions
Arrow functions were introduced in ES6.Arrow functions allow us to write shorter function syntax:
Note: This works only if the function has only one statement.
-------------------------------------------------------------------------------------------------------------
Arrays
The Array object lets you store multiple values in a single variable. It stores a fixed-size sequential collection of elements of the same type.
Array Functions
1] The JavaScript method toString() converts an array to a string of (comma separated) array values.
2] The pop() method removes the last element from an array
3] Shifting is equivalent to popping, working on the first element instead of the last.The shift() method removes the first array element and "shifts" all other elements to a lower index.
4] The concat() method creates a new array by merging (concatenating) existing arrays.
5] The forEach() method calls a function (a callback function) once for each array element.
Syntax
// Arrow function
forEach((element) => { ... } )
forEach((element, index) => { ... } )
forEach((element, index, array) => { ... } )

// Callback function
forEach(callbackFn)
forEach(callbackFn, thisArg)

// Inline callback function
forEach(function(element) { ... })
forEach(function(element, index) { ... })
forEach(function(element, index, array){ ... })
forEach(function(element, index, array) { ... }, thisArg)6] The map() method creates a new array by performing a function on each array element. The map() method does not change the original array.
7] The filter() method creates a new array with array elements that passes a test. The filter() method takes each element in an array and it applies a conditional statement against it. If this conditional returns true, the element gets pushed to the output array. If the condition returns false, the element does not get pushed to the output array.
The syntax for filter is similar to map, except the callback function should return true to keep the element, or false otherwise.
8] The reduce() method executes a reducer/ function for each value of an array & returns a single value which is the function's accumulated result,but it does not change the original array.
array.reduce(function(total, currentValue), initialValue)| function() | Required. A function to be run for each element in the array. |
| total | Required. The initialValue, or the previously returned value of the function. |
| currentValue | Required. The value of the current element. |
9] The indexOf() method searches an array for an element value and returns its position.
-------------------------------------------------------------------------------------------------------------
Try...Catch
try {
         // Code to run
         [break;]
      }

      catch ( e ) {
         // Code to run if an exception occurs
         [break;]
      }
-------------------------------------------------------------------------------------------------------------
"this" keyword in javascript
The JavaScript this keyword refers to the object it belongs to.

-------------------------------------------------------------------------------------------------------------
(Useful : Click here)
OBJECTS in Javascript
JavaScript variables can contain one or many values.Objects are variables too. But objects can contain many values.Object values are written as name : value pairs (name and value separated by a colon).
Actually there is no ‘dictionary’ type in JavaScript but we can create key-value pairs by using JavaScript Objects.
It is a common practice to declare objects with the const keyword.
A JavaScript object is a collection of named values.JavaScript objects are containers for named values, called properties and methods.
Objects written as name value pairs are similar to:
- Dictionaries in Python
- Hash maps in Java
Object Constructors
Sometimes we need a "blueprint" for creating many objects of the same "type".The way to create an "object type", is to use an object constructor function.
In the example above, function Person() is an object constructor function.Objects of the same type are created by calling the constructor function with the new keyword.
JavaScript has built-in constructors for native objects:
new String() // A new String object
new Number() // A new Number object
new Boolean() // A new Boolean object
new Object() // A new Object object
new Array() // A new Array object
new RegExp() // A new RegExp object
new Function() // A new Function object
new Date() // A new Date objectJavascript Prototypes
All JavaScript objects inherit properties and methods from a prototype. If you want to add a new property or method to an existing object constructor you cannot add it dynamically,you'll have to add it to the constructor function itself.
Example
function Person(first, last, age, eyecolor) {
this.firstName = first;
this.lastName = last;
this.age = age;
this.eyeColor = eyecolor;
this.nationality = "Indian"; // new property
}The JavaScript prototype property allows you to add new properties to object constructors:
-------------------------------------------------------------------------------------------------------------
OBJECT ORIENTED PROGRAMMING
(Useful : Click here)
CLASSES (Pre-ES6)
Before ES6 we used the object constructors to create classes in javascript.
Example 1]
Example 2]
INHERITANCE (Pre-ES6)
https://www.tutorialsteacher.com/javascript/inheritance-in-javascript
CLASSES using "class" keyword (POST-ES6)
ECMAScript 2015, also known as ES6 introduced JavaScript Classes.JavaScript Classes are templates for JavaScript Objects.
Use the keyword class to create a class. Always add a method named constructor()
class Car {
constructor(name, year) {
this.name = name;
this.year = year;
}
}The constructor method is a special method:
- It has to have the exact name "constructor"
- It is executed automatically when a new object is created
- It is used to initialize object properties
Syntax
class ClassName {
constructor() { ... }
method_1() { ... }
method_2() { ... }
method_3() { ... }
}-------------------------------------------------------------------------------------------------------------
INHERITANCE
To create a class inheritance, use the extends keyword.
-------------------------------------------------------------------------------------------------------------
GETTERS & SETTERS
It can be smart to use getters and setters for your properties, especially if you want to do something special with the value before returning them, or before you set them.
To add getters and setters in the class, use the get and set keywords.
Example
Create a getter and a setter for the "carname" property:
class Car {
constructor(brand) {
this.carname = brand;
}
get cnam() {
return this.carname;
}
set cnam(x) {
this.carname = x;
}
}
let myCar = new Car("Ford");
document.getElementById("demo").innerHTML = myCar.cnam;The name of the getter/setter method cannot be the same as the name of the property, in this case carname.
Many programmers use an underscore character _ before the property name to separate the getter/setter from the actual property:
-------------------------------------------------------------------------------------------------------------
STATIC METHODS
Static class methods are defined on the class itself.You cannot call a static method on an object, only on an object class.
-------------------------------------------------------------------------------------------------------------
MAP data structure in Javascript
A Map object holds key-value pairs where the keys can be any datatype.A Map object remembers the original insertion order of the keys.
Actually there is no ‘dictionary’ type in JavaScript but we can create key-value pairs by using JavaScript Objects.
Essensial Methods
| Method | Description |
|---|---|
| new Map() | Creates a new Map object |
| set() | Sets a value for a key in a Map object |
| get() | Gets a value for a key in a Map object |
| entries() | Returns an array of the key/value pairs in a Map object |
| keys() | Returns an array of the keys in a Map object |
| values() | Returns an array of the values in a Map object |
NOTE : Being able to use an Object as a key is an important Map feature. Useful : Click here
-------------------------------------------------------------------------------------------------------------
SET data structure in Javascript
A Set is a collection of unique values.Each value may occur only once in a Set.A Set can hold any values of any data type.
Set Object Methods and Properties
| new Set() | Creates a new Set object |
| add() | Adds a new element to the Set |
| clear() | Removes all elements from a Set |
| delete() | Removes an element specified by its value. |
| entries() | Returns an array of the values in a Set object |
| has() | Returns true if a value exists |
| forEach() | Invokes a callback for each element |
| keys() | Returns an array of the values in a Set object |
| values() | Same as keys() |
| size | Returns the element count |
-------------------------------------------------------------------------------------------------------------
Singly Linkedlist in Javascript
-------------------------------------------------------------------------------------------------------------
Javascript Modules
A module in JavaScript is just a file containing related code. Modules are small units of independent, reusable code that is desired to be used as the building blocks in creating a non-trivial Javascript application.
Unlike other programming languages where we can directly import the functions from other files,in Javascript we need to first export the required things before we import them into other files.
In Javascript, we have 2 main conventions to create and import modules :
- CommonJS Modules
- ES Modules
CommonJs Modules
The CommonJS is one of the many conventions to create modules in javascript. It has not been accepted as a standard way of creating modules in javascript, but many JS engines like NodeJS support it.
In CommonJs format we export things using the "moduls.exports" and then import then into another file using the "require()" function.
One of the main features of using CommonJs modules is that we can call "require()" from anywhere inside conditions and functions, because 'require' is a function i.e plain javascript.
Example] Below we demonstrate to create CommonJS modules.
1] Exporting a single function
2] Exporting a multiple functions
Or we can also do this to avoid writing the module name everytime we need to use a function.
3] We can use either module.exports or exports.FunctionName
4] Calling 'require' from inside a condition or function
ES Modules
In ES2015 of the ECMAscript a new standard for creating and importing modules in javascript was introduced. The features like "import" and "export" keywords were introduced. The ES module format is the official standard format to package JavaScript code for reuse and most modern web browsers natively support the modules.
The 'export' keyword is used to export things like objects, functions, variables from the module, whereas the 'import' keywod is used to import those things into another files.
There are 2 types of exports :
- Named exports - These help us export multiple things at once. We can export things with a specific name, but we need to then import them using the same name.
- Default exports - We are able to export only a single function, objects, or primitive values but we can use the different name to import them.During the import, we are able to ommit the curly bares and use any name.
Example] Below we demonstrate to create ES modules using both named and default exports.
1] Create some named exports.
2] Create some default exports.
ES Modules in NodeJs (Useful : 1] Click)
The ES module format is the official standard format to package JavaScript code for reuse and most modern web browsers natively support the modules. Node.js, however only supports the CommonJS module format by default, since most of the codebase of NodeJs is written using the commonJs modules.
The ES module format was introduced in Node.js v8.5.0 as the JavaScript module system was standardized. However, starting with version 13.2.0, Node.js has stable support of ES modules.
If you try to create ES modules in Nodejs you may get errors as its treats all modules as CommonJs modules. Below are some of the ways we can enable the use of ES Modules in NodeJs :
1] We can also simply enable ES modules in a Node.js package by changing the file extensions from .js to .mjs.
NOTE : The file which is importing and also the file exporting the programs must have ".mjs" extensions.
2] Another way to enable ES modules in your project can be done by adding a "type: module" field inside the Package.Json file. If it does'nt exist then create one using 'npm init' command.
3] Alternatively, you can install and set up a transpiler like Babel to compile your ES module syntax down to CommonJS syntax. Projects like React and Vue support ES modules because they use Babel under the hood to compile the code.
-------------------------------------------------------------------------------------------------------------
Useful : 1] Click here
NPM (node package manager)
NPM is a package manager for Node.js packages, or modules if you like.
www.npmjs.com hosts thousands of free packages to download and use.The NPM program is installed on your computer when you install Node.js
Installing External Packages
To install a public package, on the command line, run
npm install <package_name>ORnpm install <package_name>@<version> (Install specific pakage version)
There are 2 ways to install packages in node :
- Global Install
- Local Install

Generally we would install packages locally into the project directory,this ensures that when we deploy our project it includes all the necessary modues. Also installing packages locally means they will only be acessable from that folder.
Most packages are installed locally but some projects need to be installed gobally,which means that the package will be acessable from any directory.
To download and install packages globally, on the command line, run the following command :
npm install -g <package_name>
Package.json
The package.json file is the heart of Node.js system. It is the manifest file of any Node.js project and contains the metadata of the project. It also keeps track of what all packages are installed in the project.
This file is super useful,especially if other people want to clone your project and install all the packages you used. Using package.json, you can install all those packages at once.
If you run the below command in the folder which has the package.json file,then npm will read the package.json file and install all the packages at once.
npm install
(This also comes handy during deployment since the the server can install all packages directly by looking at package.json file)
If there is a package.json file in the directory in which npm install is run, npm installs the latest version of the package that satisfies the semantic versioning rule declared in package.json.If there is no package.json file, the latest version of the package is installed.
Creating "package.json" file
A package.json file can be created in two ways :
1] Using npm init : Running this command, system expects user to fill the vital information required as discussed above. It provides users with default values which are editable by the user.
npm initornpm init -y (Automatically create boilerplate file)
2] Writing directly to file : One can directly write into file with all the required information and can include it in the Node project.
Example: A demo package.json file with the required information.
{
  "name": "GeeksForGeeks",
  "version": "1.0.0",
  "description": "GeeksForGeeks",
  "main": "index.js",
  "scripts": {
    "test": "echo \"Error: no test specified\" && exit 1",
    "start": "node start.js",
  },
  "engines": {
    "node": ">=7.6.0",
    "npm": ">=4.1.2"
  },
  "author": "GeeksForGeeks",
  "license": "ISC",
  "dependencies": {
    "body-parser": "^1.17.1",
    "express": "^4.15.2",
    "express-validator": "^3.1.2",
    "mongoose": "^4.8.7",
    "nodemon": "^1.14.12",
  },
  "devDependencies": {},
  "repository": {
    "type": "git",
    "url": "https://github.com/gfg/gfg.git" //sample git repo url
  },
  "bugs": {
    "url": "https://github.com/gfg/gfg/issues"
  },
  "homepage": "https://github.com/gfg/gfg#readme"
}
Explanation of Package.json :
(See this link to learn about package.json in detail : Click)
- name: The name of the application/project.
- version: The version of application. The version should follow semantic versioning rules.
- description: The description about the application, purpose of the application, technology used like React, MongoDB, etc.
- main: This is the entry/starting point of the app. It specifies the main file of the application that triggers when the application starts. Application can be started using npm start.
- scripts: The scripts which needs to be included in the application to run properly. You can run thee scripts using "npm run <script-name>"
- engines: The versions of the node and npm used. These versions are specified in case the application is deployed on cloud like heroku or google-cloud.
- keywords: It specifies the array of strings that characterizes the application.
- author: It consist of the information about the author like name, email and other author related information.
- license: The license to which the application confirms are mentioned in this key-value pair.
- dependencies: The third party package or modules installed using npm are specified in this segment.
- devDependencies: The dependencies that are used only in the development part of the application are specified in this segment. These dependencies do not get rolled out when the application is in production stage.
- repository: It contain the information about the type and url of the repository where the code of the application lives is mentioned here in this segment.
- bugs: The url and email where the bugs in the application should be reported are mentioned in this segment.
Here, “body-parser”, “express”, “express validator”, “mongoose” and “nodemon” are the modules/packages installed using npm
------------------------------------------------------------------------------------------------------------
Nodes-Modules Directory
Whenever you install a package using "npm install",a new directory named "node_modules" is created in your project directory. This folder is where npm stores all the packages installed.
When you npm install them, they are downloaded from the web and copied into the node_modules folder and nodejs is trained to look for them there when you import them.
To confirm that npm install worked correctly, in your module directory, check that a node_modules directory exists and that it contains a directory for the package(s) you installed,to list all installed packages run the command from project folder:
npm list
NOTE : Just like PyPi in python,we also have a npm repository for dependencies , you can check it out here : https://www.npmjs.com/package/repository
NOTE : When uploading project to github,you must include a ".gitignore" file,this file includes names of files to ignore during github upload. You must always gitignore the node_modules folder before uploading to github.
Updating Installed Packages (useful - link)
Below command will update all the packages in package.json
npm update
Npm packages follow "semantic versioning",which is a system of software versioning. Each version is a 3 digit number where 1st digit is called "Major",2nd digit is caled "Minor" and the final digit is called "Patch".

Major version updates occur when the changes to the module/software are big and not backwards compatible,which also means that updating our npm package will most likely break our code which depends on the old version.
Minor and Patch updates include small fixes and new features which likely will not break our code since these version are safe to update.
NOTE : When you first install a package ,npm will install the latest version of that package,overtime we may need to update these packages for bug fixes and new features. However we need to make sure that we do not accidently update to a new major version which may break our code. Fortunately npm have some safety features by default toavoid this.
In our package.json file npm will display all installed packages with their specific version numbers. If you look closely you'll see a carrot (^) symbol, npm uses this symbol as an indicator to limit which versions it'll update the packages .
The carrot symbol indicates that npm will update the packages to the latest 'minor' and 'patch' versions for the currently installed 'major' version.

Package-lock.json :
When you install a package using npm, it will also generate another file called "package-lock.json". This file records the actual specific version of package and dependency that you have installed locally.
package-lock. json is automatically generated for any operations where npm modifies either the node_modules tree, or package. json . It describes the exact tree that was generated, such that subsequent installs are able to generate identical trees, regardless of intermediate dependency updates.
The goal of package-lock. json file is to keep track of the exact version of every package that is installed so that a product is 100% reproducible in the same way even if packages are updated by their maintainers.
The main reason this file exist is to solve compatibility issues which can arise when using a package.json file from a different environment (like github repository).
NOTE : So in simple words if you have a package.json and package-lack.json file,then npm will install the exact 'major','minor','patch' versions of that packages recorded in package-lock.json file.
-------------------------------------------------------------------------------------------------------------
Asynchronous Javascript
JavaScript is a single-threaded programming language which means only one thing can happen at a time. That is, the JavaScript engine can only process one statement at a time in a single thread,this also means you can’t perform long operations such as network access without blocking the main thread which can make the web page unresponsive.
That’s where asynchronous JavaScript comes into play. Using asynchronous JavaScript (such as callbacks, promises, and async/await), you can perform long network requests without blocking the main thread.
CallBack Functions
A callback function is a function which is passed as an argument to another function. Callbacks make sure that a function is not going to run before a task is completed but will run right after the task has completed. It helps us develop asynchronous JavaScript code.
There is a built-in method in JavaScript called “setTimeout()”, which calls a function or evaluates an expression after a given period of time
When using the JavaScript function setInterval(), you can specify a callback function to be executed for each interval:
Callback Hell
Callback Hell, also known as Pyramid of Doom, is an anti-pattern seen in code of asynchronous programming. It is a slang term used to describe and unwieldy number of nested “if” statements or functions.
If you are not expecting your application logic to get too complex, a few callbacks seem harmless. But once your project requirements start to swell, you will quickly find yourself piling layers of nested callbacks.

Before promises were inroduced to javascript, it was very common to get into the callback-hell. This usually happens when you want to execute a series of functions which depend on the output of their previous function.
NOTE : The easiest way to avoid callback hell is to use javascript promises or async/await functions.
Promises
Promises are one of the ways to deal with asynchronous operations in javascript. The main difference between Callback Functions and Promises is that we attach a callback to a Promise rather than passing it. So we still use callback functions with Promises, but in a different way called "chaining".
A promise has 2 possible outcomes: it will either be kept when the time comes, or it won’t.This is also the same for promises in JavaScript. When we define a promise in JavaScript, it will be resolved when the time comes, or it will get rejected.
NOTE : Most of the times you'll be consuming promises , rather than creating promises.
A Promise is an object. There are 3 states of the Promise object :
- Pending: Initial State, before the Promise succeeds or fails
- Resolved: Completed Promise
- Rejected: Failed Promise

Creating Promise Step by Step :
1] Firstly, we use a constructor to create a Promise object,It takes two parameters, one for success (resolve) and one for fail (reject). Here 'reject' and 'resolve' are both functions. Resolve() changes the state of promise from pending to fullfilled and Reject() changes the state of promise from pending to rejected.
Finally, there will be a condition. If the condition is met, the Promise will be resolved, otherwise it will be rejected. We call resolve/reject as per our conditions.

// Promise is resolved successfully.
The then( ) method is called if the Promise is resolved. Then we can decide what to do with the resolved Promise.What if the Promise fails? Then, we need to use the catch( ) method. The finally() method is called regardless the prpmise is completed or not,it takes a callback function which is executed.
NOTE : When you resolve a promise using the resolve(), then the callback function passed to then() is moved to the Microtask Queue of Event loop where it waits for its execution.
You can also pass callback functions to reject/resolve functions to be called after the promise is fullfilled or rejected.
Promise Chaining (useful : 1] Click)
Promise chaining is a syntax that allows you to chain together multiple asynchronous tasks in a specific order. This is great for complex code where one asynchronous task needs to be performed after the completion of a different asynchronous task.The idea is that the result is passed through the chain of .then handlers.

The whole thing works, because every call to a .then returns a new promise, so that we can call the next .then on it.When a handler returns a value, it becomes the result of that promise, so the next .then is called with it.
A classic newbie error: technically we can also add many .then to a single promise. This is not chaining.
What we did here is just several handlers to one promise. They don’t pass the result to each other; instead they process it independently.

.then on the same promise get the same result – the result of that promise. So in the code above all alert show the same: 1You can also directly resolve a promise, thereby pushing the given callback function into the Microtask Queue, which wil be executed at the end when all the synchronous code has been executed. This is also one way we can perform long running tasks by simply pushing them through the event loop.
Async & Await
The async/await were added to the Javascript language right after the introduction of promises. This is supposed to be the better way to write promises and it helps us keep our code simple and clean.
The async/await feature just provides a syntactic sugar to make the code for promises more readable. It makes your asynchronous code look like synchronous code but in reality it'll do same thing as promises.
The "async" keyword before a function means that the function will always return a promised automatically. If we dont explicitly return a promise, then the returned values are automatically wrapped around a resolved promise. If the returned promise is resolved then .then() is called, else the .catch() is executed.
NOTE : We dont need to use the resolve() or reject() inside an async function. The promise is considered resolved if we return a value, else its unresolved if we return an error.
The returned value is passed to the ".then()" method,you can acess it just like in promises, while the errors are passed to ".catch()" method.
NOTE : Throwing errors manually is not a good practice, so we must always wrap the function code inside try/catch blocks.
Await keyword
The "await" keyword is used inside the async function. The await keyword is used to wait for a promise to be resolved. When Js encounters an await keyword it literally pauses the execution at that point and resumes execution only when the promise is fullfilled i.e resolved or rejected.
NOTE : The "await" keyword can only be used inside the async function.
Basically we can create promises and wait for them to complete execution without disturbing the main thread or making web page unresponsive. In the below example you can see how the execution stops and then continues again when the promise is fullfilled.
Example] Below is an example of how we can run a blocking code using await and promises.
-------------------------------------------------------------------------------------------------------------
Useful : 1] Click
Destructuring assignment
The destructuring assignment syntax is a JavaScript expression that makes it possible to unpack values from arrays, or properties from objects, into distinct variables.
It allows us to extract data from arrays, objects, and maps and set them into new, distinct variables. Destructuring allows us to extract multiple properties, or items, from an array at a time.
Object Destructuring
Before ES6:
// assigning object attributes to variables
const person = {
    name: 'Sara',
    age: 25,
    gender: 'female'
}

let name = person.name;
let age = person.age;
let gender = person.gender;

console.log(name); // Sara
console.log(age); // 25
console.log(gender); // female
From ES6:
// assigning object attributes to variables
const person = {
    name: 'Sara',
    age: 25,
    gender: 'female'
}

// destructuring assignment
let { name, age, gender } = person;

console.log(name); // Sara
console.log(age); // 25
console.log(gender); // femaleNote: When destructuring objects, you should use the same name for the variable as the corresponding object key.
Note: The order of the name does not matter in object destructuring.
If you want to assign different variable names for the object key, you can use:
const person = {
    name: 'Sara',
    age: 25,
    gender: 'female'
}

// destructuring assignment
// using different variable names
let { name: name1, age: age1, gender:gender1 } = person;

console.log(name1); // Sara
console.log(age1); // 25
console.log(gender1); // female
Array Destructuring
You can also perform array destructuring in a similar way. For example,
const arrValue = ['one', 'two', 'three'];

// destructuring assignment in arrays
const [x, y, z] = arrValue;

console.log(x); // one
console.log(y); // two
console.log(z); // three-------------------------------------------------------------------------------------------------------------
Javascript Json
`
The JSON format is syntactically similar to the code for creating JavaScript objects. Because of this, a JavaScript program can easily convert JSON data into JS objects.Since the format is text only, JSON data can easily be sent between computers, and used by any programming language.
- JSON.parse() : It is a built-in function which converts JSON strings into JS objects.
- JSON.stringify() : It is a built in function for converting an object into a JSON string.
When using the JSON.parse() on a JSON derived from an array, the method will return a JavaScript array, instead of a JavaScript object.
NOTE : A common use of JSON is to exchange data to/from a web server. When sending data to a web server, the data has to be a string.Convert a JavaScript object into a string with JSON.stringify().
-------------------------------------------------------------------------------------------------------------
CORS POLICY ERROR
NOTE : When sending API requests from the browser, you'll likely get a "CORS" error. To solve the CORS error,you'll have to add some code on your backend to enable CORS.
The code is different for each technology , eg - The code to enable cors is different for Flask and FastAPI.
Check this link to get the code for different backend technologies for enabling CORS : https://enable-cors.org/server.html
For FASTAPI check this : https://fastapi.tiangolo.com/tutorial/cors/
-------------------------------------------------------------------------------------------------------------
Useful : 1] Click
GET/POST Request with Javascript Fetch()
The fetch() method in JavaScript is used to request to the server and load the information in the webpages. The request can be of any APIs that returns the data of the format JSON or XML.
fetch() is a mechanism that lets you make simple AJAX (Asynchronous JavaScript and XML) calls with JavaScript.
Asynchronous means that you can use fetch to make a call to an external API without halting the execution of other instructions. That way, other functions on the site will continue to run even when an API call has not been resolved.
NOTE : fetch() is not part of the JavaScript spec, but the WWTAG. As a result, you will not be able to use it in a Node.js environment (unless you install a special module).You can use the async import() function from CommonJS to load node-fetch asynchronously.
npm install node-fetchconst fetch = (...args) => import('node-fetch').then(({default: fetch}) => fetch(...args));
NOTE : fetch() method returns a promise, so you need to nest a .then() method to handle the resolution
GET Request
This method accept two parameters as mentioned above and described below:
- URL: It is the URL to which the request is to be made.
- Options: It is an array of properties. It is an optional parameter.
It returns a promises whether it is resolved or not. The return data can be of the format JSON or XML.It can be the array of objects or simply a single object.
The data returned from the API is not usually in a useable form. So you'll need to convert the data to a form which your JavaScript can operate with. Thankfully, you can use the json() method to do just that.
NOTE : fetch() method will always suceed no matter what response,so we have to manually check if our response is sucessful or not.
POST Request
For a post request, you'll need to pass an object of configuration options as a second argument. The optional object can take a lot of different parameters. In this case, include only the most necessary information.
Because you're sending a POST request, you'll need to declare that you're using the POST method.
You'll also need to pass some data to actually create the new blog post. Since you're sending JSON data, you'll need to set a header of Content-Type set to application/json. Finally, you'll need the body, which will be a single string of JSON data.
-------------------------------------------------------------------------------------------------------------
Useful : 1] Click
AXIOS
Axios is a Promise-based HTTP client for JavaScript which can be used in your front-end application and in your Node. js backend. By using Axios it's easy to send asynchronous HTTP request to REST endpoints and perform CRUD operations.
Fetch() uses a two-step process when dealing with JSON data; after making an initial request you’ll then need to call the .json() method on the response in order to receive the actual data object. Also fetch() method does'nt have proper error handling features,Axios improves upon this things.
These are basic methods for generating requests in axios :
- axios.request(config)
- axios.get(url[, config])
- axios.delete(url[, config])
- axios.head(url[, config])
- axios.options(url[, config])
- axios.post(url[, data[, config]])
- axios.put(url[, data[, config]])
- axios.patch(url[, data[, config]])
Axios Response object
When we send a request to a server, it returns a response. The Axios response object consists of the following attributes :
- data - the payload returned from the server
- status - the HTTP code returned from the server
- statusText - the HTTP status message returned by the server
- headers - headers sent by server
- config - the original request configuration
- request - the request object
GET Request
We can also write the above code using async/await keyword like this...
POST Request
Unlike fetch() method where we had to manually create the 'options' and also convert data to json string,here axios automatically does that for us.
Or we can also create asyc function like this...
---------------------------------------------------------------------------------------------------------------
Optional Chaining Operator
Optional chaining is a feature in JavaScript that allows you to safely access nested properties of an object without worrying about whether any of those properties are null or undefined. It uses the question mark (?.) operator to check if a property exists before attempting to access it's nested properties.
Without optional chaining, if we try to access a nested property of an object that is 'null' or 'undefined', we would get a runtime 'TypeError' and the program would stop executing. This can be especially problematic when dealing with deeply nested objects or objects that may have optional properties. Without optional chaining, we would need to manually use a lot of "if" statements to check for the existence of nested properties in an object.
By using optional chaining, we can safely access nested properties without worrying about whether they are 'null' or 'undefined'. If a property does not exist, the expression simply returns undefined and the program continues executing.
NOTE : If a property or method accessed using optional chaining is null or undefined, the expression will short circuit and return undefined without evaluating the rest of the expression.
Nullish Coalescing Operator
The Nullish Coalescing operator (??) is a new operator introduced in ECMAScript 2020, used to provide a fallback value for variables that may be null or undefined. If the value is either 'null' or 'undefined', the operator returns the fallback value. If the value is not 'null' or 'undefined' the operator returns the actual value.
NOTE : The Nullish Coalescing operator ?? is particularly useful when working with data fetched from an API because the API may not always return the data we expect. In cases where the data is missing or nullish, we can use the Nullish Coalescing operator to provide a default value.
---------------------------------------------------------------------------------------------------------------
Comments
Post a Comment