React Js + CSS Styling + React Router (part-1)
Useful : 1] Click 2] Click 3] React Roadmap
React is an open source, JavaScript library for developing user interface (UI) in web application. React is developed and released by Facebook in 2013.
React has a component based architecture i.e everything is a component ,this let you break-down your application into small parts which can then be composed to make complex interfaces.
In the past, when browsers were much less capable than today, and JavaScript performance was poor, every page was coming from a server. Every time you clicked something, a new request was made to the server and the browser subsequently loaded the new page.
Today, popularized by modern frontend JavaScript frameworks like React, an app is usually built as a single page application: you only load the application code (HTML, CSS, JavaScript) once, and when you interact with the application, what generally happens is that JavaScript intercepts the browser events and instead of making a new request to the server that then returns a new document, the client requests some JSON or performs an action on the server but the page that the user sees is never completely wiped away, and behaves more like a desktop application.
Build a ReactJs App :
1] Open terminal and git clone the repository
2] Run - npm install to install all dependencies in package.json file.
3] To Deploy the app on localhost by running npm start
-------------------------------------------------------------------------------------------------------------
REACT COMMANDS
The npx stands for Node Package Execute and it comes with the npm, when you installed npm above 5.2.0 version then automatically npx will installed. It is an npm package runner that can execute any package that you want from the npm registry without even installing that package.
1] Create new React App
Create a new react app and execute it on localhost
npx create-react-app myapp
cd my-app
npm start
or create a new react app and open it in Vs code directly
npx create-react-app myapp
cd my-app
code .
or you can install CRA globally and then create app whenever needed.
npm -g install create-react-app create-react-app myappcd my-app
code . The create-react-app will generate 2 main folders :
- Public - It stores your static files like HTML files and Images
- Src - It stores all your JS and CSS files here.
NOTE : Most react developers tend to store their images in "src/assets" folder.
-------------------------------------------------------------------------------------------------------------
React VirtualDOM
DOM stands for “Document Object Model”. The DOM in simple words represents the UI of your application. JavaScript interacts with HTML document indirectly by interacting with the DOM. With the document object model, JavaScript gets all the power it needs to create dynamic HTML. Everytime there is a change in the state of your application UI, the DOM gets updated to represent that change.
The DOM is represented as a tree data structure. Because of that, the changes and updates to the DOM are fast. But after the change, the updated element and it’s children have to be re-rendered to update the application UI. The re-rendering of the UI is what makes it slow. Therefore, the more UI components you have, the more expensive the DOM updates could be, since they would need to be re-rendered for every DOM update.

The problem in using Real Dom is that it is expensive for Browsers. For any change in UI, the browser has to search, check, and parse the number of nodes to reflect the changes. Its is easy for small change but as a number of changes in UI increases, efficiency decreases, making browser slower.
NOTE : Before react, in order for changes to reflect into the UI, the entire webpage had to be reloaded i.e entire DOM would re-rendered. React solved this problem by giving us the ability to re-render only the changed DOM nodes rather than entire DOM, this siginificantly increases performance.
This is made possible due to the Virtual DOM. The virtual DOM is only a virtual representation (or copy) of the real DOM. Everytime you change something in react or if the state of our application changes a new Virtual DOM is created and compared with the previous Virtual DOM to find which node was changed and only that node is re-rendered in the Real DOM. This ensures that there are minimal operations on the real DOM. Hence, reducing the performance cost of updating the real DOM.
 |
The red circles represent the nodes that have changed |
In React every UI piece is a component, and each component has a state. React follows the observable pattern and listens for state changes. When the state of a component changes, React updates the virtual DOM,then compares the current version of the virtual DOM with the previous version of the virtual DOM.Once React knows which virtual DOM objects have changed, then React updates only those objects/components, in the real DOM. This makes the performance far better and we also dont need to reload the entire page for updates.
NOTE : The Virtual DOM is not the same as the shadow DOM. Rather, the virtual DOM stores a representation of the UI in memory and is synced with the actual DOM with the help of React DOM.
How Virtual DOM works ?
A virtual DOM object has the same properties as a real DOM object, but it lacks the real thing’s power to directly change what’s on the screen. Manipulating the real DOM is slow. Manipulating the virtual DOM is much faster, because nothing gets drawn onscreen. Think of manipulating the virtual DOM as editing a blueprint, as opposed to moving rooms in an actual house.

In React every UI piece is a component, and each component has a state. When the state of a component changes, React updates the virtual DOM tree. Once the virtual DOM has been updated, React then compares the current version of the virtual DOM with the previous version of the virtual DOM. This process is called “diffing”.
In summary, here’s what happens when you try to update the DOM in React:
- The entire virtual DOM gets updated.
- The virtual DOM gets compared to what it looked like before you updated it. React figures out which objects have changed.
- The changed objects, and the changed objects only, get updated on the real DOM.
- Changes on the real DOM cause the screen to change.
ReactDOM.Render() method
The ReactDOM is a package that comes with DOM specific APIs. The render() is used to render JSX components into the browser. It creates a VirtualDOM tree component and attach it to a given point in the real DOM.
The render method can be called the primary gateway between React and the DOM. The render() method takes 2 arguments, the first argument is the element or component we want to render, and the second argument is the HTML element (the target node) to which we want to append it.
- JSX component (What to display ?)
- Container Reference (Where to display ?)
NOTE : In React 18 ReactDOM.render() is replaced with ReactDOM.createRoot() method to enable concurrent mode features.
NOTE : Generally, when we create our project with create-react-app, it gives us a div with the id of a root inside index.html, and we wrap our React application inside this root div.
You can also render components into multiple containers, below is an example.
React elements are defined in a tree structure. This means each element is essentially a child of another React element. However, for the root element, we need to create an element (DOM Node) in our HTML code to act as a container for our React element tree, which can be accessed via ReactDOM.render.

In the above diagram, we can see that <Calculator /> is our root React element, which is rendered into the container div within the HTML code. Breaking it down further, the <Calculator /> element has two children
This way we can use ReactDOM.render() to integrate React in any different Web application, where you just need to create a container and render react components into it. This is why we call React a library, not a framework. You can use it as little as possible or as much as possible, as it completely depends on your use-case.
NOTE : In June, the React team announced React 18, and with the new update, we will not be using ReactDOM.render() anymore. Instead, we will be using ReactDOM.createRoot.
With React 18, we will use ReactDOM.createRoot to create a root, and then pass the root to the render function. When you switch to createRoot, you’ll get all of the new features of React 18 by default:
-------------------------------------------------------------------------------------------------------------
Javascript XML (JSX)
JSX stands for JavaScript XML. JSX allows us to write HTML in React. JSX makes it easier to write and add HTML in React. JSX allows us to write HTML elements in JavaScript and place them in the DOM without any createElement() and/or appendChild() methods ,it converts HTML tags into react elements.
With JSX :
Without JSX :
As you can see in the first example, JSX allows us to write HTML directly within the JavaScript code.JSX is an extension of the JavaScript language based on ES6, and is translated into regular JavaScript at runtime.
Expressions in JSX
With JSX you can write expressions inside curly braces { }. The expression can be a React variable, or property, or any other valid JavaScript expression. JSX will execute the expression and return the result
Inserting Large Block of HTML
To write HTML on multiple lines, put the HTML inside parentheses.
NOTE : The HTML code must be wrapped in ONE top level element.
NOTE : JSX will throw an error if the HTML is not correct, or if the HTML misses a parent element.Alternatively, you can use a "fragment" to wrap multiple lines. This will prevent unnecessarily adding extra nodes to the DOM. A fragment looks like an empty HTML tag: <></>.
NOTE : JSX will throw an error if the HTML tag is not properly closed.
Attribute class = className
The class attribute is a much used attribute in HTML, but since JSX is rendered as JavaScript, and the class keyword is a reserved word in JavaScript, you are not allowed to use it in JSX. Use attribute className instead.
Conditions - if statements
React supports if statements, but not inside JSX. To be able to use conditional statements in JSX, you should put the if statements outside of the JSX, or you could use a ternary expression instead:
Option 1 :
Write if statements outside of the JSX code :
Option 2 :
Use ternary expressions instead :
NOTE : JavaScript engines don't understand JSX ,it needs to be transpiled and React uses the transpiled JavaScript code to interact with DOM and update UI. It's typically done using a transpiler like Babel. When you run your code through a transpiler like Babel, it converts the JSX code into regular JavaScript code, which can then be understood and executed by the JavaScript engine.
-------------------------------------------------------------------------------------------------------------
Components in React
Components are like functions that return HTML elements. Components are independent and reusable bits of code. They serve the same purpose as JavaScript functions, but work in isolation and return HTML.
In react the components can be created using either one :
- Classes
- Functions
In the world of React, there are two ways of writing a React component. One uses a function and the other uses a class. Using functional components is more common than classes.
NOTE : A Function component also returns JSX, and behaves much the same way as a Class component, but Function components can be written using much less code, are easier to understand
NOTE : Before React 16.8, Class components were the only way to track state and lifecycle on a React component. Function components were considered "state-less".With the addition of Hooks, Function components are now almost equivalent to Class components. The differences are so minor that you will probably never need to use a Class component in React.Even though Function components are preferred, there are no current plans on removing Class components from React.
Functional & Class Components
First of all, the clear difference is the syntax. Just like in their names, a functional component is just a plain JavaScript function that returns JSX.
import React from "react";

const FunctionalComponent = () => {
 return <h1>Hello, world</h1>;
};
As you can see, a functional component is a function that returns JSX. If you are not familiar with arrow functions introduced in ES6, you can also check out the example below without.
import React from "react";

function FunctionalComponent() {
 return <h1>Hello, world</h1>;
}
A class component must include the extends React.Component statement. This statement creates an inheritance to React.Component, and gives your component access to React.Component's functions.The component also requires a render() method, this method returns JSX.
import React, { Component } from "react";

class ClassComponent extends Component {
 render() {
   return <h1>Hello, world</h1>;
 }
}
Below is the same example but without using destructuring introduced in ES6!
import React from "react";

class ClassComponent extends React.Component {
 render() {
   return <h1>Hello, world</h1>;
 }
}
Components in Components
We can also refer to components inside other components to make complex components.
Components in Files
React is all about re-using code, and it is recommended to split your components into separate files.To do that, create a new file with a .js file extension and put the code inside it.
NOTE : THE FILENAME SHOULD START WITH UPPERCASE LETTER AND MAKE SURE THAT THE NAME OF FUNCTIONAL COMPONENT ALSO STARTS WITH UPPERCASE LETTER,ELSE YOU'LL GET AN ERROR.
NOTE : React component names should always start with a capital letter because React treats components starting with a lowercase letter as a built-in DOM element, such as a <div> or span>, while components starting with a capital letter are treated as a custom component. This is a convention in React to distinguish between the two types of elements.
Eg - Below if you change "Car" to "car",you'll get an error.
Also try to import and export components without destructuring.
--------------------------------------------------------------------------------------------------------------
React Props
props stands for properties. Props are arguments passed into React components. Props are passed to components via HTML attributes. It gives a way to pass data from one component to other components.
Props can be used to pass any kind of data such as :
- String
- Array
- Integer
- Boolean
- Objects
- Functions
NOTE : React Props are like function arguments in JavaScript and attributes in HTML. To send props into a component, use the same syntax as HTML attributes. The receiver component receives the argument as a props object.
NOTE : React Props are read-only! You will get an error if you try to change their value.
Eg - Send the "brand" property from the Garage component to the Car component.
If you have a variable to send, and not a string as in the example above, you just put the variable name inside curly brackets:
Or if it was an object :
Children Prop
Children is a special prop that allows us to pass in any type of element. It could be a number, a string, a boolean, an array of elements or even another component. Just like regular HTML elements, a React Element can also have child element inside its Opening and Closing tags (<> </>). The "props.children" is a special prop which helps us define the position of the child nodes inside the component when it's rendered.
NOTE : All the values or components defined inside the opening and closing tag of the react component will be rendered at "props.children" inside the component.

You can also pass the value of children prop just like a regular prop, but that method is not as readable as the above approach and defeats the whole point of having the special children prop.

If you try to apply both approaches at the same time then the priority will be given to our first apprach, see the below example.
-------------------------------------------------------------------------------------------------------------
Useful : 1] Click
Component State
While you can think of props as arguments you use to pass data and configure how components render, state is like a component’s personal data storage. State is useful for handling data that changes over time or that comes from user interaction. State gives your components memory!
Before React 16.8, we were'nt able to use/add the 'state' mechanism in functional components,but after 16.8 'Hooks' were introduced in react which allowed functional components to have access to state and other React features.
NOTE : The way we create a state-variable and update is different for Functional and Class components,in this section we'll discuss 'state' only for functional components.
Props Vs State
State is an special built-in object, which allows components to create and manage their own data. So unlike props, components cannot pass data with state, but they can create and manage it internally.
Props are used to pass data from parent to child or by the component itself. They are immutable and thus will not be changed. State is used for mutable data, or data that will change.
| Props | State | |
|---|---|---|
| 1. | Props are read-only,cannot be modified by component that is receiving it from outside | It can be modified by its own component, but is private (cannot be accessed from outside) |
| 2. | Props are immutable. | State is mutable. |
| 3. | Props allow you to pass data from one component to other components as an argument. | State holds information about the components. |
| 4. | Props can be accessed by the child component. | State cannot be accessed by child components. |
| 5. | Props are used to communicate between components. | States can be used for rendering dynamic changes with the component. |
| 6. | Stateless component can have Props. | Stateless components cannot have State. |
| 7. | Props make components reusable. | State cannot make components reusable. |
| 8. | Props are external and controlled by whatever renders the component. | The State is internal and controlled by the React Component itself. |
In the React sense, “state” is an object that represents the parts of the app that can change. Each component can maintain its own state. To access the state object of a component in React, you can use the this.state property within the class component. If you are using a functional component, you can use the useState hook to set the initial state and update the state as needed.
useState() Hook
We use useState() hook in Functional component to create and manage state. React components have a built-in state object. The state object is where you store property values that belongs to the component.
The main reason we use state in react is because,whenever the value of a state-variable changes,the entire component to which the state belongs re-renders. This is what allows you to create components that are dynamic and interactive.
NOTE : State changes happen asynchronously. You can also create multiple state variales inside single component.
Just like we store data in a variable,we store data inside the state,then you may ask "Why dont we use a simple variable instead of state ?" This is because if we update a variable our component does'nt update/re-render to show the change. But if we use state-variable then our components re-render to show the state change. Watch this to understand it well.
1] Example - Without using State
App.css
App.js
Now,if you click the button the data variable changes but the headline (h1) does'nt change,this is the problem that useState() will solve,whenever we change the state-variable the entire component re-renders to show the change.
2] Example - With useState()
Calling useState does 2 things : it creates a “state variable” with an initial value and it also creates a function to set that state variable’s value.It doesn’t matter what names you use. But it can be handy to think of the pattern as [<getter>, <setter>] = useState(<initialValue>). We use destructuring rather than defining a single variable.
App.js
Now whenever the button is clicked the state-variable is changes which then re-renders the entire component.
You might’ve noticed that although data is a const, it is seemingly reassignable! What is happening is when a state-setting function like setData is called, its component will re-render. In this case the App function will run again—and this time, useState will give us the next value of data.
3] Example - Multiple state hooks
The useState Hook can be used to keep track of strings, numbers, booleans, arrays, objects, and any combination of these! We could create multiple state Hooks to track individual values.
Updating Based on Previous Value
If we want to update or set the state value based on its previous value then we the optimal way is to use the functional way. In the below example, we use the functional way to update value in useState() hook, the hook automatically passes te previous value of the state which we can then use.
The reason we do it this way is to avoid overriding the state value rather than updating it, for example below we try to increment the count value 2 times but it won't since we are using the "count" state variable directly, it's simply override it not update it.
To increment or decrement the value 2 times, we simply use the functional way.
How state updating actually works
When you call:
You are not immediately changing the variable.
Instead:
-
You request a state update
-
React schedules it
-
React re-renders the component
-
The new state value appears in the next render
That’s why this happens:
➡️ State updates are asynchronous.
Why React forbids direct mutation
❌ Wrong:
React will:
-
NOT know the state changed
-
NOT re-render the UI
✅ Correct:
➡️ React tracks updates only through setter functions.
State is IMMUTABLE (key concept)
React treats state as read-only.
For objects/arrays:
-
Don’t change existing state
-
Create a new copy with changes
Example (object):
Why?
-
React compares old state vs new state
-
New reference = React detects change
Updating state based on previous state
Sometimes the new state depends on the old one.
Example:
❌ Result: count increases by 1, not 2
Correct mental model:
React batches updates.
Correct way:
➡️ React gives you the latest state safely.
One-way data flow
State flows:
You don’t “change the UI”.
You change the state, and React updates the UI.
-------------------------------------------------------------------------------------------------------------
(Must know about hooks before this)
Lifecycle Methods
Every React Component has a lifecycle of its own, lifecycle of a component can be defined as the series of methods that are invoked in different stages of the component’s existence.Each component in React has a lifecycle which you can monitor and manipulate during its three main phases (Mounting, Updating, and Unmounting.)
You can think of React lifecycle methods as the series of events that happen from the birth of a React component to its death. Every component in React goes through a lifecycle of events. I like to think of them as going through a cycle of birth, growth, and death.
- Mounting – Birth of your component
- Update – Growth of your component
- Unmount – Death of your component

A React Component can go through four stages of its life as follows.
- Initialization: This is the stage where the component is constructed with the given Props and default state. This is done in the constructor of a Component .
- Mounting: Mounting is the stage of rendering the JSX returned by the render method itself.
- Updating: Updating is the stage when the state of a component is updated and the application is repainted.
- Unmounting: As the name suggests Unmounting is the final step of the component lifecycle where the component is removed from the page.
React provides the developers a set of predefined functions that if present is invoked around specific events in the lifetime of the component. Developers are supposed to override the functions with desired logic to execute accordingly.

Some common lifecycle methods include the following (each method is called in a respective lifecycle stage) :
1] Render()
2] ComponentWillMount() - As the name clearly suggests, this function is invoked right before the component is mounted on the DOM i.e. this function gets invoked once before the render() function is executed for the first time
3] ComponentDidMount() - Similarly as the previous one this function is invoked right after the component is mounted on the DOM i.e. this function gets invoked once after the render() function is executed for the first time
4] ComponentWillUpdate() - This function is invoked before the component is rerendered i.e. this function gets invoked once before the render() function is executed after the updation of State or Props.
5] ComponentDidUpdate() - This function is invoked after the component is rerendered i.e. this function gets invoked once after the render() function is executed after the updation of State or Props.
6] ComponentWillUnmount() - This function is invoked before the component is finally unmounted from the DOM i.e. this function gets invoked once before the component is removed from the page and this denotes the end of the lifecycle.
NOTE : In class components, you can directly extend from React Component to access the lifecycle methods, but to use them in the functional components you need React Hooks.
NOTE : The useEffect hook allows functional components to use something like lifecycle methods.however you will never use lifecycle methods like componentDidMount in a functional component.
In contrast, the next diagram shows how things work in the context of functional components.

This may sound strange at first, but effects defined with useEffect are invoked after render. To be more specific, it runs both after the first render and after every update. As an example, it is pretty common to “do something” when the component is first rendered. The difference with Hooks here is subtle: you do not do something after the component is mounted, you do something after the component is first presented to the user.
Component Lifecycle Methods (Useful : 1] Click)
1] Component did mount
It runs or executes after the component is mounted and rendered to the DOM. It is called only once during the component's lifecycle after the component mounting is done.Use an empty dependencies array to invoke a side-effect once after component mounting :
useEffect(..., []) was supplied with an empty array as the dependencies argument. When configured in such a way, the useEffect() executes the callback just once, after initial mounting.
2] Component did update
It is a lifecycle method that executes after an update in the component and checks if a specific prop or state has changed.Each time the side-effect uses props or state values, you must indicate these values as dependencies :
The useEffect(callback, [prop, state]) invokes the callback after the changes are being committed to DOM and if and only if any value in the dependencies array [prop, state] has changed.
Using the dependencies argument of useEffect() you control when to invoke the side-effect, independently from the rendering cycles of the component. Again, that's the essence of useEffect() hook.
3] Component will Unmount
If you add a return function inside the useEffect function, it is triggered when a component unmounts from the DOM.
-------------------------------------------------------------------------------------------------------------
React Events
Just like HTML DOM events, React can perform actions based on user events. React has the same events as HTML: click, change, mouseover etc.
Adding Events
React events are written in camelCase syntax : onClick instead of onclick. React event handlers are written inside curly braces : onClick={shoot} instead of onClick="shoot()".
React :
<button onClick={shoot}>Take the Shot!</button>
HTML :
<button onclick="shoot()">Take the Shot!</button>
Passing Arguments
To pass an argument to an event handler, use an arrow function.
-------------------------------------------------------------------------------------------------------------
Useful : 1] Click
React Conditional Rendering
In React, we can create multiple components which encapsulate behavior that we need. After that, we can render them depending on some conditions or the state of our application.
Consider an example of handling a login/logout button. The login and logout buttons will be separate components. If a user logged in, render the logout component to display the logout button. If a user not logged in, render the login component to display the login button. In React, this situation is called as conditional rendering.
We can implement conditional rendering using the following :
- if
- ternary operator
- logical && operator
- switch case operator
- Conditional Rendering with enums
Conditional rendering using " if "
It is the easiest way to have a conditional rendering in React in the render method. It is restricted to the total block of the component. IF the condition is true, it will return the element to be rendered. It can be understood in the below example.
Conditional rendering using " switch"
Sometimes it is possible to have multiple conditional renderings. In the switch case, conditional rendering is applied based on a different state.
-------------------------------------------------------------------------------------------------------------
React Lists
Lists are very useful when it comes to developing the UI of any website. Lists are mainly used for displaying menus in a website, for example, the navbar menu. To create an unordered-list we will traverse the list using the JavaScript map() function and updates elements to be enclosed between <li> </li> elements. Finally we will wrap this new list within <ul> </ul> elements and render it to the DOM.
OUTPUT :
- 20
- 30
- 40
- 50
- 60
In the above code in React, we had directly rendered the list to the DOM. But usually this not a good practice.Consider the example of a Navigation Menu. It is obvious that in any website the items in a navigation menu are not hard coded. This item is fetched from the database and then displayed as lists in the browser. We will pass a list to a component using props and then use this component to render the list to the DOM.
NOTE : When you run the above code in your, it will work but you will receive a warning in the console that there is no "key" provided for the list items. To solve this warning we'll provide each element in list a key.
Keys are used in React to identify which items in the list are changed, updated, or deleted. In other words, we can say that keys are used to give an identity to the elements in the lists.
-------------------------------------------------------------------------------------------------------------
React Forms
Forms are really important in any website for login, signup, or whatever. It is easy to make a form but forms in React work a little differently.
<form>
  <label>
    Name:
    <input type="text" name="name" />
  </label>
  <input type="submit" value="Submit" />
</form>
This above form has the default HTML form behavior of browsing to a new page when the user submits the form. If you want this behavior in React, it just works. But in most cases, it’s convenient to have a JavaScript function that handles the submission of the form and has access to the data that the user entered into the form. The standard way to achieve this in React is with technique called "controlled Inputs"or "Controlled components"Controlled-Inputs basically means using states and hooks to setup input fields in forms such that we can track their values as they change. For example - when a user types in an input field we can store that value inside a state.NOTE : To access the fields in the event handler use the event.target.name and event.target.value syntax
Example 1] Single Input fieldWe can control input changes by adding event handlers in the onChange attribute.
We can use the useState Hook to keep track of each inputs value and provide a "single source of truth" for the entire application.
We can control the submit action by adding an event handler in the onSubmit attribute for the <form>
import "./App.css";import { useState } from "react";
function App() {
  const [name, setName] = useState("");
  // onSubmit handler  const handleSubmit = (event) => {    event.preventDefault();    alert(`The name you entered was : ${name}`);  };
  return (    <form onSubmit={handleSubmit}>      <label> You are entering : {name} </label>      <br />      <br />      <label>        Enter your name:        <input type="text" onChange={(e) => setName(e.target.value)} />      </label>    </form>  );}
export default App;
Example 2] Select fields
A drop down list, or a select box, in React is also a bit different from HTML. In React, the selected value is defined with a value attribute on the select tag.
-------------------------------------------------------------------------------------------------------------
(Not a part of react but still useful in order to understand React.Memo)
Useful : 1] Click
React Memoization
Memoization is a top-down, depth-first, optimization technique of storing previously executed computations. Whenever the program needs the result of these computations, the program will not have to execute that computation again. Instead, it will reuse the result of the previously executed computation. This way the program will not have to repeat expensive computations. An expensive function is a function that takes some time to execute.
We can say that Memoization is a technique of caching results of expensive function calls to speed up computer programs by returning the cached result when the same input occurs again. This way, Memoization will remember and retrieve these results without recalculating these values every time.
NOTE : A memoized function should be a pure function. This means the function execution does not mutate. When called with a certain input, it should always returns the same value regardless of how many times the function will be called.When to use Memoization :
- When a function is pure. A pure function always returns the same value when called. If a function is impure, it returns different values whenever executed. Caching such values may result in unexpected return values.
- Heavy computing functions. Whenever a program has expensive computation, caching the results will significantly increase your program performance. With Memoization, the function doesn’t have to recalculate its values, yet it returns the same results whenever called.
- Remote API calls. When making an API call repeatedly, using Memoization will save you from making repetitive calls to the server. You already know the result when you made the first call, and thus there is no need to make the same call to get the same results.
- A function that recalls itself with recurring input values, i.e., recursive functions.
-------------------------------------------------------------------------------------------------------------
Useful : 1] "Click"
React.Memo()
To improve user interface performance, React offers a higher-order component React.memo(). When React.memo() wraps a component, React memoizes the rendered output of the wrapped component then skips unnecessary renderings.Using memo will cause React to skip rendering a component if its props have not changed.
IMPORTANT
By default, child components will re-render when their parent component re-renders, regardless of whether the props passed to the child component have changed or not. To avoid unnecessary rendering of child components, even when the props passed have not changed, we can use the React.memo() higher-order component (HOC) to add the comparison feature, where React will compare the previous props with new props and only re-render the component if any prop has changed.
React does not provide the props comparison feature by default, React.memo compares the previous props with the new props, and only re-renders the component if any prop has changed, this way it can help to improve performance by reducing unnecessary re-renders of the child component.
Example ] When you execute the below code,you'll see in the console that Memoized component renders only once (since the props remain the same). But the Non-memoized component renders everytime.
NOTE : The React.memo() is used to wrap functional components and only re-render them if their props have changed, while useMemo() is a Hook that can be used inside functional components to cache the result of expensive calculations and only re-run them if the dependencies have changed.
NOTE : The React.memo only compares the props by default, If you have a component with state or use hooks, the component will still re-render when the state or hooks change.
NOTE : check this out to compare different styling methods.
React CSS Stying
There are many ways to style React with CSS, the three common ways are :
- Inline styling (Worst approach for styling !)
- CSS stylesheets
- CSS Modules (Best of all 3 ways !)
NOTE : Whenever you want a css style to be available everywhere then apply it inside "index.css".
1] Inline Styling
To style an element with the inline style attribute, the value must be a JavaScript object.
NOTE : In JSX, JavaScript expressions are written inside curly braces, and since JavaScript objects also use curly braces, the styling in the example above is written inside two sets of curly braces {{}}.
camelCased Property Names
Since the inline CSS is written in a JavaScript object, properties with hyphen separators, like background-color, must be written with camel case syntax:
Eg - Use backgroundColor instead of background-color
JavaScript Object
You can also create an object with styling information, and refer to it in the style attribute:
2] CSS Stylesheet
You can write your CSS styling in a separate file, just save the file with the .css file extension, and import it in your application.
NOTE : Since CSS cascades to all children elements, if you apply a CSS stylesheet to a component it is not just scoped to that component. All its declared rules will be transferred to any elements that are children of your styled component.
App.js
App.css
3] CSS Modules
CSS modules make sure that all of the styles for a component are in one single place and apply only to that particular component. CSS Modules are convenient for components that are placed in separate files.
NOTE : The CSS inside a module is available only for the component that imported it, and you do not have to worry about name conflicts.
NOTE : You create a CSS module with the .module.css extension, example: my-style.module.css.
App.js
mystyle.module.css
If we look at the code above is that CSS modules are written just like normal CSS, but are imported and used as if it were created as objects (inline styles).
The benefit of CSS modules is that it helps avoid our problem of class conflicts with normal CSS. The properties that we are referencing turn into unique classnames that cannot conflict with one another when our project is built.
Our generated HTML elements will look like this :
Plus, CSS modules solve the problem of global scope in CSS. As compared to our normal CSS stylesheets, CSS declared using modules to individual components will not cascade to child components. Therefore, CSS modules are best to use over CSS and SASS to make sure classes don't conflict and to write predictable styles that only apply to one or another component.
-------------------------------------------------------------------------------------------------------------
React SAss Styling
SASS (Syntactically Awesome Style Sheets) is an extended version of CSS. Sass is a CSS pre-processor.Sass files are executed on the server and sends CSS to the browser. It enables a developer to create code in another language and translate it into CSS, and it compiles SASS to CSS at an incredible speed. It has introduced various new features which were'nt present in normal CSS :
- Variables
- Nesting
- Extending/Inheritance
- Mixin functions
- and much more....
A browser does not understand Sass code. Therefore, you will need a Sass pre-processor to convert Sass code into standard CSS.This process is called transpiling. So, you need to give a transpiler (some kind of program) some Sass code and then get some CSS code back.
TIP: Transpiling is a term for taking a source code written in one language and transform/translate it into another language.
NOTE : Two syntaxes are available for SASS; the newer one uses the .scss extension and the older one uses the .sass extension. SCSS styles are written in a similar syntax to normal CSS, however SASS styles do not require us to use open and closing brackets when writing style rules.
NOTE : In order to to start using .scss and .sass files in react, you need to install node-sass with npm : npm install node-sass
👎 Cons :
- Like plain CSS, styles are global and not scoped to any one component
- CSS stylesheets is starting to include a number of features that SASS had exclusively, such as CSS variables (not necessarily a con, but worth noting)
- SASS / SCSS often requires setup, such as installing the Node library
node-sass
( FULL SASS TUTORIAL : click the link )
1] Variables in SASS
Variables are a way to store information that you can re-use later. With Sass, you can store information in variables, like:
- strings
- numbers
- colors
- booleans
- lists
- nulls
Sass uses the $ symbol, followed by a name, to declare variables. Syntax:
$variablename: value;Sass variables are only available at the level of nesting where they are defined.The default behavior for variable scope can be overridden by using the !global switch.
App.js
App.scss
2] Nesting in SASS
Normally HTML is written in a clear nested and visual hierarchy while CSS is not. Sass facilitates you to nest your CSS selector in a way that follows the same visual hierarchy of your HTML. You should very careful while nesting because overly nested rules may cause complexity and it proves hard to maintain.
App.js
App.scss
3] SASS @Import
Sass keeps the CSS code DRY (Don't Repeat Yourself). One way to write DRY code is to keep related code in separate files.You can create small files with CSS snippets to include in other Sass files.
The @import directive allows you to include the content of one file in another.
TIP: You do not need to specify a file extension, Sass automatically assumes that you mean a .sass or .scss file. You can also import CSS files. The @import directive imports the file and any variables or mixins defined in the imported file can then be used in the main file.
App.js
App.scss
Content.scss
4] SASS @extend
The @extend directive lets you share a set of CSS properties from one selector to another. It is useful if you have almost identically styled elements that only differ in some small details.
App.js
App.scss
-------------------------------------------------------------------------------------------------------------
(Not a part of react but a general programming concept necessary to understand useEffect hook)
Pure / Impure Functions and Side-Effects
Pure functions and impure functions are two programming terms you will often see in functional programming.One core difference between these two types of functions is whether or not they have side effects. A function with one or more side-effects is called Impure and function with no side-effect is called Pure function.
A "side effect" is anything that affects something outside the scope of the function being executed. Some examples of side effects are , Changing the value of a closure-scoped variable is a side effect. Pushing a new item onto an array that was passed in as an argument is a side effect.
Pure Function
Functions that execute without side effects are called "pure" functions : they take in arguments, and they return values.Nothing else happens upon executing the function.Pure functions are Independent.Pure functions are deterministic (meaning that, given an input, they always return the same output), but that doesn't mean that all impure functions have side effects.Generating a random value within a function makes it impure, but isn't a side effect, for example.
In the snippet above, notice that updateMyName() does not depend on any external code to accomplish its duties. This makes it a pure function.
Impure Function
First, an impure function is a function that contains one or more side effects.Impure functions are non-deterministic.Also these functions depend on external code to perform their duties,if that is unavailable the function may throw errors.
In the snippet above, updateMyName() is an impure function because it contains code (myNames) that mutates an external state — which gives updateMyName() some side effects.
-------------------------------------------------------------------------------------------------------------
Useful : 1] Click
React Hooks
Hooks were added to React in version 16.8 in order to give functional components the state and lifecycle features of react. Hooks gives functional components to have access to state and other React features (just like class components). Because of this, class components are generally no longer needed and we can create React apps without using a single class component using hooks.
Hooks allow us (or functional components) to "hook" into React features such as state and lifecycle methods.We must import Hooks from reactin order to use them
Hook Rules
There are 2 main rules for using hooks :
1] Hooks can only be called inside React function components - You cannot call Hooks from regular JavaScript functions. Instead, you can call Hooks from React function components. Hooks can also be called from custom Hooks.2] Hooks can only be called at the top level of a component - Do not call Hooks inside loops, conditions, or nested functions. Hooks should always be used at the top level of the React functions. This rule ensures that Hooks are called in the same order each time a components renders.
Some common Built-In React Hooks are as follows :
- useState()
- useEffect()
- useContext()
- useRef()
- useReducer()
- useCallback()
- useMemo()
- useDebugValue()
- useLayoutEffect()
- We can also create Custom Hooks
---------------------------------------------------------------------------------------------------------------
Useful : 1] Click
useEffect() Hook
The useEffect Hook allows you to perform side effects in your components. Some examples of side effects are: fetching data, directly updating the DOM, and timers.useEffect accepts two arguments.The first argument is a callback function and the second argument is an dependencies array.The second argument is optional.
useEffect(<function>, <dependency>)We configure the useEffect hook to run some code automatically in one of three scenarios.
- When the compone nt is rendered for the first time only
- When the component is rendered for the first time and whenever it re-renders
- When the component is rendered for the first time and whenever it re-renders and some piece of data has changed

It's used when you need to do something on every render of the component. But you should be careful when use this form of useEffect if you don't want to mess up with infinity render or memory leak. You should avoid using this form of useEffect as much as possible
componentDidMount() lifecycle method. 3] An array with one or more elements inside of it :
useEffect are invoked after render. To be more specific, it runs both after the first render and after every update. As an example, it is pretty common to “do something” when the component is first rendered. The difference with Hooks here is subtle: you do not do something after the component is mounted, you do something after the component is first presented to the user. 
1. No dependency passed :
useEffect(() => {
  //Runs on every render
});
2. An empty array :
useEffect(() => {
  //Runs only on the initial render
}, []);
3. Props or state values :
useEffect(() => {
  //Runs on the initial render
  //And any time any dependency value changes
}, [prop,state,variable,...]);
Effect Cleanup
Some effects require cleanup before getting executed, to reduce memory leaks.Timeouts, subscriptions, event listeners, and other effects that are no longer needed should be disposed.We do this by including a "return" function at the end of the useEffect Hook.
NOTE : The clean up code (if provided) will be executed everytime before executing the side-effect code. This is done to remove or cleanup things from previous executin of the side-effect code.
Cleanup works the following way :
- A) After initial rendering,
useEffect()invokes the callback having the side-effect.cleanupfunction is not invoked. - B) On later renderings, before invoking the next side-effect callback,
useEffect()invokes thecleanupfunction from the previous side-effect execution (to clean up everything after the previous side-effect), then runs the current side-effect. - C) Finally, after unmounting the component,
useEffect()invokes the cleanup function from the latest side-effect.

Example 1] In the below code,when we click the button it changes the 'username_' variable and as a result also triggers the 'SideEffect' function,if you click the button again the function wont re-run because the value of 'username_' does'nt change (since we are updating the variable to same previous value of 'DeepeshDM' again)
(Open the browser tools to see the console.log() )
Example 2] In the below code the component re-renders everytime we click the button since we are incrementing the state-variable value. Since we have'nt passed any dependencies to useEffect(),the 'SideEffect' function is triggered everytime component re-renders. Even though the useEffect() has nothing to do with that state value, it'l still be executed everytime the component re-render due to change in state value.
CAUTION : When you don't pass any dependency array, the SideEffect function gets executed everytime the component renders when we update any state variables, this is Terrible way to use useEffect() hook.
Example 3] In the below code the cleanup function is executed everytime before the useEffect's side-effect function is triggered to cleanup the previous effects.
CAUTION : Updating state inside a useEffect() hook without a dependency array can lead to an infinite loop of re-renders. When you update state inside a useEffect() hook without a dependency array, the effect will run on every render of the component. This means that every time the component updates, the effect will run, updating the state, and causing the component to re-render again. This creates an infinite loop, where the component is constantly updating and re-rendering, without ever stopping. To avoid this issue, you should always pass a dependency array to your useEffect() hook.
---------------------------------------------------------------------------------------------------------------
useLayoutEffect() Hook
The useLayoutEffect() hook is exaclty similar to useEffect() hook, except that it executes the code Synchronously when any dependency changes, while useEffect does so Asynchronously. The useEffect() is more general-purpose and can be used for a wide variety of tasks, such as fetching data, setting up subscriptions, and updating the document title.
The useLayoutEffect(), on the other hand, is designed to be used when you need to make changes to the layout or visual appearance of elements on the screen.The main reason not to use useEffect() for layout updates is it runs after the browser has painted the updates to the screen. This means that there may be a delay between when your component updates and when the changes you made in the effect are visible to the user.
On the other hand, useLayoutEffect() runs before the browser updates the screen, so the changes it makes are visible in the same render cycle. This can be useful if you need to make changes to the layout or visual appearance of elements on the screen and you want those changes to be visible immediately, without any delay.
Example] In the beow example we increase the padding above the text synchronously when the button is clicked. The updating task is not put off for later and happens in the same render cycle.
NOTE : Use the useEffect() hook for most part but switch to useLayoutEffect() when updating anything visual on UI and you see any delay.
Example] In the beow example we add a cleanup function to the useLayoutEffect which gets executed everytime before the side-effect code is run.
CAUTION : The useLayoutEffect() hook will block the UI updates while our effect function is being executed, so avoid putting long running tasks here.
-------------------------------------------------------------------------------------------------------------
useContext() Hook
React Context is a way to manage state globally. It can be used together with the useState Hook to share state between deeply nested components more easily than with useState alone. React Context provides us with a way to pass data through to components in our tree, without manually having to pass props down at every level.
To do this without Context, we will need to pass the state as "props" through each nested component. This is called "prop drilling". useContext() hook helps us avoid using prop-drilling. The context can be used to avoid prop drilling and also used for other purposes like global state sharing and providing services to components.
NOTE : The React.createContext() is used to create a context and useContext() is used to consume the context.

In simple words , the useContext() hook allows us to pass state data from high level components to their child components.
Example ] Passing data between Components by prop-drilling.
Even though components 2-4 did not need the state, they had to pass the state along so that it could reach component 5.
Same code but with traditional props syntax
Example ] Passing data between Components by useContext() hook.
To create context, you must Import createContext and initialize it: Next we'll use the Context Provider to wrap the tree of components that need the state Context. Wrap child components in the Context Provider and supply the state value. Now, all components in this tree will have access to the user Context.
In order to use the Context in a child component, we need to access it using the useContext Hook.
NOTE : See how you can use the "createContext()" outside of a functional component, but you can only use the "useContext()" inside the component, maintaining the Hooks rule.
-------------------------------------------------------------------------------------------------------------
When your component re-renders ALL THE VARIABLES ARE RECREATED and will loose their previous value. Any variables declared inside the component will be recreated every time the component is rendered. This means that the values stored in those variables will be lost. To preserve state across renders in a functional component, you can use the useState() or useRef() hooks.
Example] Below when you click the button that increments the "counter with state", the entire component re-renders and the value of the "counter with state" is updated. Even though entire component re-renders, the value of "counter without state" is not updated on the UI but it's recreated on each render, and its value is reset to 0 again.
The useRef() hook is used to store mutable values that persists between re-renders which does not cause re-render when updated like useState() hook. It is commonly used for 2 main following things in ReactJs :
- DOM Reference
- Storing Mutable or Previous state value (Since variables loose value)
The useRef() hook takes an initial value and returns an object with a single property, current, which is initially set to the initial value passed to useRef. The current property can be used to access or update the stored value.
NOTE : The main difference between Refs and States is that updating a reference doesn't trigger re-rendering, while updating the state makes the component re-render. The reference update is synchronous, while the state update is asynchronous.
Example] Previously when we clicked the "counter with state", it would update the state and re-render entire component which would recreate all variables and loose their values. But now with useRef(), the values persist across renders and the variables never loose their values on re-renders.
NOTE : The useRef() value is like variables, but they don't lose their values on re-render. The value of someRef.current will persist across renders. And just like variables, when you update value of someRef.current it'll not be updated on UI (like it does on useState) since it does'nt trigger a re-render.
Using getElementById() or getElementsByClassName() to access elements in a React application can be problematic because React uses a virtual DOM, which is different from the actual DOM. This means that the elements you are trying to access with these methods may not exist in actual DOM yet, or may not exist at all.
Instead of using these traditional DOM methods to access elements, you can use the useRef() with "ref" attribute in elements to create a reference to a component's DOM node and then access it directly using the ".current" property of useRef() object. This allows you to directly access the element and manipulate it, even if it is not yet present in the actual DOM.
The ref attribute in React elements is a special attribute which allows you to store a reference to a DOM element or a JavaScript object. The ref attribute accepts a callback function that will be called with the DOM element as an argument. When you pass a callback function as the value of the ref attribute, React calls the function with the corresponding DOM element as the argument, and it's the responsibility of the callback function to assign the DOM element to the current property of the ref object.
Since the ref attribute accepts a callback function we can also pass our own custom callback function which is then passed the corresponding element's DOM reference as argument. When we pass the useRef() object to the ref attribute it sets the .current value of ref object to DOM element reference internally.
Example] Below is what happens internally when you pass the useRef() object to the Ref attribute.
NOTE : The ref attribute is not present in all elements, it is only present in React elements that are rendered to the DOM. Specifically in elements that are created using React's JSX syntax or in functional components that return JSX.
Example] Below we see how the ref attribute uses the callback function passed.
NOTE : The createRef() is an alternative to useRef() for creating refs, but it is intended for use in class-based components and now considered legacy.
-------------------------------------------------------------------------------------------------------------
useReducer() Hook
It is an hook for state management,it is an alternative to useState hook. Also the useState is built using useReducer. It is kind of similar to array method reduce() in javascript.

The useReducer(reducer, initialState) hook accept 2 arguments : the reducer function and the initial state value. useReducer returns an array that holds the current state value and a dispatch function, to which you can pass an action and later invoke.
Now, let's decipher what the terms of initial state, action object, dispatch, and reducer mean.
1] Initial state
The initial state is the value the state is initialized with. For example, in the case of a counter state, the initial value could be:
2] Action object
An action object is an object that describes how to update the state.
Typically, the action object would have a property 'type' — a string describing what kind of state update the reducer must do.
For example, an action object to increase the counter can look as follows:
If the action object must carry some useful information (aka payload) to be used by the reducer, then you can add additional properties to the action object.
NOTE : The "payload" along the action object is optional and is only passed when some information is required to execute the code inside the reducer function. The payload is generally defined by key "{ payload : '....' }" instead of "user" as in the below example.
For example, here's an action object to add a new user to an array of users state:
user is a property that hold the information about the user to add.
3] Dispatch function
The dispatch is a special function that dispatches an action object. The dispatch function is created for your by the useReducer() hook:
Whenever you want to update the state (usually from an event handler or after completing a fetch request), you simply call the dispatch function with the appropritate action object: dispatch(actionObject).
4] Reducer function
The reducer is a pure function that accepts 2 parameters: the current state and an action object. Depending on the action object, the reducer function must update the state in an immutable manner, and return the new state.
The following reducer function supports the increase and decrease of a counter state:
The reducer above doesn't modify directly the current state in the state variable, but rather creates a new state object stored in newState, then returns it.
React checks the difference between the new and the current state to determine whether the state has been updated, so do not mutate the current state directly.
Wiring everything
Wiring all these terms together, here's how the state update using a reducer works.

As a result of an event handler or after completing a fetch request, you call the dispatch function with the action object. Then React redirects the action object and the current state value to the reducer function. The reducer function uses the action object and performs a state update, returning the new state.
React then checks whether the new state differs from the previous one. If the state has been updated, React re-renders the component and useReducer() returns the new initial-state value : [newState, ...] = useReducer(...).
Note that useReducer() design is based on the Flux architecture.
Example 1]
You can see how clicking the button dispatches an action with a value of 1, which gets added to the current state, and then the component re-renders with the new (larger!) state. I’m intentionally showing an example where the “action” doesn’t have the form { type: "INCREMENT_BY", value: 1 } or some other such thing, because the reducers you create don’t have to follow the typical patterns from Redux.
Example 2]
Example 3]
The task is to implement a stopwatch. The stopwatch has 3 buttons: Start, Stop and Reset, and has a number displaying the passed seconds.
NOTE : The "initialState" is an object, which means you can store multiple values inside the same object unlike useState which store only a single value.
The click event handlers of the Start, Stop, and Reset buttons correspondingly use the dispatch() function to dispatch the necessary action object.
Inside the useEffect() callback, if state.isRunning is true, the setInterval() timer function dispatches the tick action object each second dispatch({type: 'tick'}).
Each time the reducer() function updates the state, the component re-renders as a result and receives the new state.
-------------------------------------------------------------------------------------------------------------
(Read about 'memoization' somewhere above before proceeding)
( Useful : 1] Click 2] Click )
useMemo() Hook
In React, whenever a component re-renders after the state update, all the variables are recreated and all functions are re-executed. This can lead to poor performance if a component contains expensive or slow functions that take along time to compute. To avoid unnecessary re-executions, we can use the useMemo() hook to memoize/cache the output of a function and only re-execute the function when one or more of its dependencies have changed.
The useMemo() hook takes 2 arguments : the first argument is the expensive function that you want to memoize, and the second argument is an array of dependencies. The expensive function that is executed only when one or more of its dependencies change.
The useMemo() hook returns the memoized value that is computed using the provided function ,which can be used like any other value in your component's JSX to display the result of the calculation or pass it as a prop to a child component.. The value is only recalculated when one or more of the dependencies passed to the hook have changed.
NOTE : The useMemo hook will execute the function you passed as an argument after the initial render by default. It is recommended to use this hook only on pure-functions which are deterministic and return same output for a single input.
Example] In the below example, the isEven() function is supposed to be associated only with Counter1, but it still gets executed everytime we update Counter2 since the entire component gets re-rendered which is unnecessary.

The above code is still kind of fine since the function gets executed quiclky it does'nt cause any delay in UI updates, below we convert the same function into an expensive function and it causes a 2 sec delay in UI updates. It gets executed everytime the Component re-renders when any of the counter is updated.
Below we wrapped our expensive function inside the useMemo() hook, now the expensive function will not be executed if the counter1 values is the same as previous render. When we update counter2, it'll not re-execute expensive function.
In Summary, we use the useMemo() hook whenever we want to prevent re-execution of expensive function during re-renders.
NOTE : We should only use the useMemo() for expensive functions because it does occupy a memory space to store values and using it for every variable or function inside the component will be inefficient.
-------------------------------------------------------------------------------------------------------------
Performance Optimizing Features or Hooks
We have React.Memo() to prevent re-renders when props are unchanged, we have useMemo() hook to prevent re-execution of expensive functions inside components on re-renders. We have useCallback() to prevent re-rending of child component when callback functions passed as props remain unchanged. All optimizations come at a certain memory cost, so thse should only be used when needed.
useCallback() Hook (Useful : 1] Click)
When a component re-renders, all of its variables and functions are recreated, including any callback functions that are passed as props to child components. This means that React thinks that a new callback function is being passed to the child component and therefore re-renders it, even if it is the same function as before. This can lead to unnecessary re-renders of the child component, which can negatively impact performance. This is because the child component is re-rendering even though the callback function has not changed and its logic is still the same.
When you pass a callback function as a prop to a child component, that child component will re-render every time the parent component re-renders, even if the callback function has not changed. This can lead to unnecessary re-renders and negatively impact performance. By memoizing the callback function with useCallback, you ensure that the same function instance is passed to the child component, and that the function is only recreated when its dependencies change, rather than on every re-render of the parent component. This can help to improve performance by reducing unnecessary re-renders of the child component.
The useCallback() returns a memoized version of the callback function that you pass to it as the first argument. You can use it like a regular function, but it is guaranteed to be the same function instance as long as its dependencies have not changed. When you pass the memoized function as a prop to a child component, React will compare the function references between renders and only re-render the child component if the function reference has changed. This can help to improve performance by reducing unnecessary re-renders of the child component.
NOTE : The main differrence betwen useMemo() and useCallback() is that useMemo() returns a memoized variable , whereas useCallback returns a memoized function. Both share similar feature but are used in different scenerios. The useMemo() is used to prevent re-execution of expensive functions on re-renders, while the useCallback() is used to prevent re-renders of child components when callback functions passed as props remain unchanged.
NOTE : Sometimes useCallback() alone memoizes the callback function and ensures that the same function instance is passed to the child component, but it does not compare the props passed to the child component to prevent unnecessary re-renders. To prevent unnecessary re-renders when the props passed to the child component have not changed, you would need to use both useCallback and React.memo(). In summary, useCallback() ensures that the same function instance is passed to the child component, and useMemo() adds the props comparison feature to prevent unnecessary re-execution of expensive functions or unnecessary re-renders of child components.
Example] In the below example, the incrementAge() and incrementSalary() functions get recreated everytime we update the state and component re-renders. Clicking AgeButton also unecessarily re-renders SalaryButton since incrementSalary() also gets recreated and react takes it as new value to props and re-renders the child component i.e SalaryButton.

If we wrap these callback functions inside the useCallback() hook it returns a memoized version of the actual function which we can use like a regular callback function. During re-render React does recreate the functions again if the given dependencies are unchanged hence callbacks passed as props remain same and does not cause the child-component to re-render. In below example, the incrementSalary() is'nt recreated during re-render after AgeButton is clicked.
NOTE : The useCallback() hook only ensures that the same instance of given function is being used and it is'nt recreated every re-render. To add the comparison feature where React will compare the callback passed as prop to child component, we use the useMemo() hook with useCallback() hook together.
-------------------------------------------------------------------------------------------------------------
Custom Hooks
Hooks are reusable functions.When you have component logic that needs to be used by multiple components, we can extract that logic to a custom Hook. Custom Hooks start with "use". Example : useFetch. Custom hooks can also call other hooks.
The main reason for which you should be using Custom hooks is to maintain the concept of DRY(Don’t Repeat Yourself) in your apps. For example, suppose you have some logic that makes use of some built-in hooks and you need to use the logic in multiple functional components. So,the best thing you can do is create a separate function that wraps the logic inside it and then call it from those components.Whenever you feel that you have a logic that is to be used in multiple functional components(hooks don’t work in class components), just create a separate custom hook for it and use it.
Unlike a React component, a custom Hook doesn’t need to have a specific signature. We can decide what it takes as arguments, and what, if anything, it should return. In other words, it’s just like a normal function. Its name should always start with "use". So that you can tell at a glance that the rules of Hooks apply to it.
NOTE : Because hooks are just Javascript functions, they don't need a React component to actually exist. React knows that a function is a custom hook because of the naming convention, it treats all functins that start with "use" as custom hooks and those that don't start with "use" are treated like regular JavaScript function
Example] Fetching data from Rest API Without creating new custom hook.
Below we create the new Custom Hook for same Fetch API.
// App.js
Here are the rules for building custom hooks in React :
- Name: Custom hooks must start with the word "use" to indicate that they are hooks.
- Call at the top level: Custom hooks should only be called at the top level of your component. They should not be called inside loops, conditions or nested functions.
- Call them only from React components: Custom hooks should only be called from React functions components and not from regular javascript functions
- Don't share state: Custom hooks should not share state or side-effects between multiple calls. Each call to a custom hook should act as a standalone unit.
- Don't use hooks inside loops or conditions: Custom hooks should not be used inside loops or conditions.
- Returning values: Custom hooks should return an array of values or an object of values, which can then be destructured and used in the component.
- Separate concerns: Custom hooks should only handle one specific concern. If a hook starts to handle multiple concerns, it should be split into multiple hooks.
NOTE : When creating complex custom hooks, use the useDebugValue() hook along with Chrome's React Dev Tools Extension.
Example] Below is a more robust custom hook for the fetch API.
NOTE : Custom hooks are great when you have a code that uses built-in hooks and want to access it throughout the application.
Example] Below we create a custom hook that can be used log values on change, we can use this throughout our application to log values.
-------------------------------------------------------------------------------------------------------------
useDebugValue() Hook
The useDebugValue() is a special hook meant only to be used with custom hooks for debugging purpose. It is a hook in React that allows you to display a custom label for a value in the "React Developer Tools" chrome extension. This can be useful when you are using a custom hook and want to see the value of a specific state or prop in the React Developer Tools.
It's useful when we want to debug and see the values of our custom hook while interacting with the application. The useDebugValue() hook takes one argument, which is the value that you want to display in the React Developer Tools. It also takes an optional second argument, which is a function that returns a string that will be used as the label for the value in the React Developer Tools.
Example] Below is an example of a custom hook named that takes a value as an argument and uses the useDebugValue() hook to display the custom label "COUNTVAL" for the value in the React Developer Tools.
-------------------------------------------------------------------------------------------------------------
(Useful : 1] Click)
React-Router (Version 6.0)
Routing is a process in which a user is directed to different pages based on their action or request. As we know ReactJS is a library and not a frameowork, so by default it does'nt have any routing mechanism,that's why we use external dependencies like React-router for page routing in React.
React Router is a standard library for routing in React. It enables the navigation among views of various components in a React Application, allows changing the browser URL, and keeps the UI in sync with the URL. Simply put react-router gives us the ability to map react components to URL paths.
The main elements that enable routing in react-router :
- BrowserRouter component
- Route component
- Routes component
- Link component
BrowserRouter Component
BrowserRouter is a router implementation that uses the HTML5 history API(pushState, replaceState and the popstate event) to keep your UI in sync with the URL. It adds the features of React-router to the entire React Application.
NOTE : We simply import the BrowserRouter component from react-router and then wrap the entire root component with it. This way React-router will become aware of all the routes of our app and will easily manage them.
Any router-specific data cannot be accessed outside of the Router component and we cannot create a Route outside of a Router component.
Once we have added react-router to our app, we need to create routes and map our react components to specific URL paths.
Route & Routes Component
In react-router, we create routes using the <Route> and <Routes> components. The <Routes> acts as a container/parent for all the individual routes that will be created in our app. The <Route> is used to create a single route, and map a URL path to a react component, put simply, it allows you to map your app's location to different React components.
The <Route> component taks 2 main attribute values :
path- It specifies the URL path of the desired component. You can call this pathname whatever you want.element- It specifies the component or the JSX the route should render when the browser URL matches the specified paths.
NOTE : The <Route> is responsible to define routes and map JSX to URLs, whereas the <Routes> is responsible to intelligently choose and render the best route from its childrens with respect to the current browser URL.
The <Routes> job is to understand all of its child <Route> elements, and intelligently choose which ones are the best to render. Though it's not shown in the simple example above, once we start adding more complex Routes to our application, Routes will start to do more work like enabling intelligent rendering and relative paths.
Link Component
Once we have defined all our routes, we can navigate to them using the <Link> component.The <Link> component is similar to the anchor element (<a>) in HTML, with one exception being that the <a> tag reloads the entire page. To tell <Link> what path to take the user to when clicked, you pass it a "to" prop.
Example] Below example shows how we can create links to navigate different URLs of the react application.
Navigate to URLs through Code & Redirects
If you dont want to use the <Link> component and want to navigate to specific URLs based on some events, then we can use the blow approach. React Router offers two different ways to programmatically navigate, depending on your preference. First is the imperative navigate method and second is the declarative Navigate component.
NOTE : It is common to use the <Navigate> for creating redirections.
URL parameters
Sometimes we may need to ceate dynamic urls, rather than creating only those fixed static Urls. The way you tell React Router that a certain portion of the URL is a placeholder (or URL Parameter), is by using a : in front of the url's variable.
We ca then acess the url param values passed in the url using the useParams() hook which returns an object of key/value pairs of the dynamic params from the current URL
Passing Props to Router Components
In previous versions of React Router (v4), this was non-trivial since React Router was in charge of creating the React element. However, with React Router v6, since you're in charge of creating the element, you just pass a prop to the component as you normally would.
Passing Props through Link
With the <Link> component you can now redirect users to any path when they click the links, but what if you want to also pass some data along with the it to the component. To do this all you have to do is include a state prop of <Link> with the data you want to pass along.
Anytime you pass data along via the state property, that data will be available on the location's state property, which you can get access to by using the custom useLocation Hook that comes with React Router.
To recap, if you need to pass data from Link through to the new component that's being rendered, pass Links a state prop with the data you want to pass through. Then, to access the Links state property from the component that's being rendered, use the useLocation Hook to get access to location.state.
NOTE : If the user were to use their browser's "Back" and "Forward" buttons to navigate through their route history, the state that we passed in would remain intact.
URL Query Strings
A query string is a part of a URL which assigns values to specified keys. It starts with a "?" and uses "&" to append further values. For acessing and managing the query strings, react-router comes with the useSearchParams() hook.
The useSearchParams hook is used to read and modify the query string in the URL for the current location. Like React's own useState hook, useSearchParams returns an array of 2 values : the current location's search params and a function that may be used to update them.
Nested Child Routes
The react-router also allows us to create nested routes where parent routes can have children routes. The below exaple shows the common way to include nested routes in react-router. In this we define the child routes inside the Parent component using the <Routes> component.
NOTE : By appending a /* to the end of our parent route path, we're essentially telling React Router that parent path has a nested Routes component.
The way we defined routes is the common way, but we can also declaratively define the child routes inside the parent route itself, like below. Using this approach react-router becomes aware of the nested routes, but we still need to tell the react-router where inside the parent route to render the child routes.
For this we use the <Outlet> component, when a child route is rendered by the parent, it'll be positioned at the place where the Outlet is placed.
Route Config
Instead of defining our routes using JSX, we can also use the useRoutes hook which was introducted in react-router version 6. The useRoutes takes in an array of JavaScript objects which represent the routes in your application. Similar to the React element API with <Route>, each route has a path, element, and an optional children property.
-------------------------------------------------------------------------------------------------------------
Production Build
Once you have run the command "npm run build" and your React app has been built for production, the resulting files will be located in a "build" folder at the root of your project. These files are the production-ready version of your app, and can be deployed to a web server.
There are different ways to deploy a React app, some of the common ones are:
Deployment on static file hosting service: Services like AWS S3, Firebase Hosting, GitHub Pages, and Surge allow you to easily deploy your build folder as a static website.
Deployment on a Node.js server: You can use a Node.js server like Express to serve your React app. You'll need to configure the server to serve the files from the build folder and handle routing.
Deployment on a PaaS (Platform as a Service) : Services like Heroku, Now, and Zeit allow you to easily deploy your React app by just pushing the code to their platform.
Regardless of how you choose to deploy your React app, make sure to test it thoroughly in a staging environment before deploying it to production. It's worth noting that the deployment process can differ depending on the hosting platform you choose, and the specific needs of your application.
NOTE : React typically use a module bundler, such as webpack, when running the command "npm run build" in order to bundle all of the application's JavaScript files into a single file that can be loaded by the browser.
-------------------------------------------------------------------------------------------------------------
Strict Mode
In React, "strict mode" is a feature that helps you find potential problems in your application. When a component is rendered in strict mode, React will run extra checks and warnings for potential issues. This can include things like detecting accidental state mutations, ensuring that components are correctly using the React API, and more.
To use strict mode for a component, you can wrap it with the React.StrictMode() component. It only runs on components that are specifically wrapped in the React.StrictMode() component. It also only runs in development mode, not in production builds. Some of the things that strict mode can catch include :
- Accidental state mutations: Strict mode can detect when you're accidentally mutating state directly, rather than using the setState method to update it.
- Unsafe lifecycle methods: Strict mode can detect when you're using lifecycle methods that have been deprecated or are considered unsafe, such as componentWillMount or componentWillUpdate.
- Context API usage: Strict mode can detect when you're using the new context API incorrectly, such as not providing a default value for a context or not updating context correctly.
- Scheduling issues: Strict mode can detect when you're using setTimeout or setInterval incorrectly, such as using them inside of a component's render method.
- Missing dependencies: Strict mode can detect when you're missing dependencies on a component, such as not providing a required prop or not importing a required module.
- Duplicate keys: Strict mode can detect when you're using duplicate keys on a list of elements, which can cause unexpected behavior.
- Miscellaneous: Strict mode can detect other miscellaneous issues such as not properly using the React API, or if you are using the new React feature in a wrong way.
Fragments
A common pattern in react is to group together multiple elements or components together and return them. A Fragment in React is a component that provides a container to wrap these multiple component elements into one without adding an additional DOM node.
They allow you to return multiple elements from a component's render() method without having to wrap them in an additional element, such as a div. The use of fragments can help to reduce unnecessary DOM nodes and improve the performance of a React application.
NOTE : Fragments are represented by the <> syntax or the React.Fragment() component.
You could use a div or a span element to group multiple children elements together, but using a fragment has some advantages over using a div or a span.
- Avoid unnecessary DOM nodes : When you use a
divor aspanto group elements together, it creates an extra node in the DOM. This can make your markup more complex and harder to read. Fragments, on the other hand, do not create extra nodes in the DOM, which keeps your markup clean and simple.
- Better Semantics : The <div> and
<span>might not always have the best semantic meaning for the use case you have, also it might not convey the context of the content it wraps. Using a fragment allows you to group elements together without adding any extra semantics.
- Avoiding CSS issues : Sometimes using a <div> or
<span>might cause unexpected styling issues, because those elements may have some default styles. Using a fragment avoids this problem as it does not have any default styles.
High-Order Components
A higher-order component (HOC) is a technique in React for reusing component logic. HOCs are not part of the React API, per se. They are a pattern that emerges from React’s compositional nature. A higher-order component is a function that takes a component and returns a new component with extra features.
If multiple components need to use same logic or features we can make use of HOC. A HOC is a distinctive element for reusing logic in React components. It takes one or more elements as arguments and return a new enhanced feature
Example] Below is an example of an HOC that adds a simple loading feature to a component that is passed to it.
NOTE : HOCs are commonly used to add more functionality like adding a spinner, handling errors, managing state, handling side-effects, etc. HOCs allow you to keep your component simple, reusable and testable.
Forwarding Refs
The React components by default only accept props and do not accept refs. The react.forwardRef() is a built-in higher-order component HOC in react that allows you to pass a ref to a component that is wrapped by another component. It's a way to modify the given component to accept a ref and access the underlying DOM node or the React instance of the wrapped component.
When you use React.forwardRef() to pass a ref from a parent component to a child component that is wrapped by another component, it is often referred to as "forwarding a ref" or "forwarding refs". This is because the ref is being passed through the component tree, from the parent to the child,
Passing refs as regular props is not recommended. Instead, use React's forwardRef() to pass refs to functional components, it allows to access underlying DOM node and improves understanding of component structure.
Portals in React (Useful : 1] Click)
The ReactDOM.createPortal() function is not a regular function, it is a method provided by React DOM that creates a portal and renders a component inside it. This method takes two arguments : the component to render and the DOM element where the component should be rendered.
The createPortal() is mainly used for cases when you want to render a component outside of the current React tree. This can be useful in situations where you need to render a component that is visually separate from the rest of the application, but still needs to be part of the React component hierarchy.
NOTE : It should be treated like any other React component that returns JSX, but unlike most components, it doesn't render that JSX inside the current React tree, but rather it renders it inside a DOM element outside of the current React tree.
Portals in React are mainly used for the following use cases :
- Modals : A modal component that covers the entire screen can be rendered inside a portal, so that it is visually separate from the rest of the application, but still interacts with the rest of the components.
- Tooltips and popovers : These components can be rendered inside a portal and positioned relative to the element that triggers their display, even if that element is not a direct child of the component that renders the tooltip or popover.
- Third-party Libraries : Third-party libraries like Google Maps or Chart.js, which can't be rendered as a React component, they can be rendered inside a portal and still be controlled by React components.
Example] In the below example we render the counter outside the default "root" tree hierarchy and into the "portal-root" container when button is clicked.
Since the createPortal() acts like a regular React component, we can use it with Conditional Rendering, except the JSX from createPortal() is rendered on a different given container or DOM node.
The ReactDOM.createportal() is'nt like a regular JS function and should'nt be used like one. It should be treated like any other React component that returns some JSX or component with a major difference being the JSX returned by the ReactDOM.createPortal() is rendered inside the given container, but outside the tree.
---------------------------------------------------------------------------------------------------------------
Code Splitting
As you develop your web application and add more JavaScript code, the size of your source code will increase and the total size of your final bundle will also increase along with the time it takes to create the bundle.
If your final bundle file amounts to 5 megabytes, then the execution of your JavaScript file happens after the 5 megabytes file has been downloaded by the browser. To solve the long load time caused by big JavaScript bundle files, module bundlers provide the code splitting feature.
Code splitting allows you to split your JavaScript bundle into several smaller bundles which are then served on-demand as the browser needs them. This increases initial load time since browser does'nt have to fetch or wait for the entire javascript bundle.
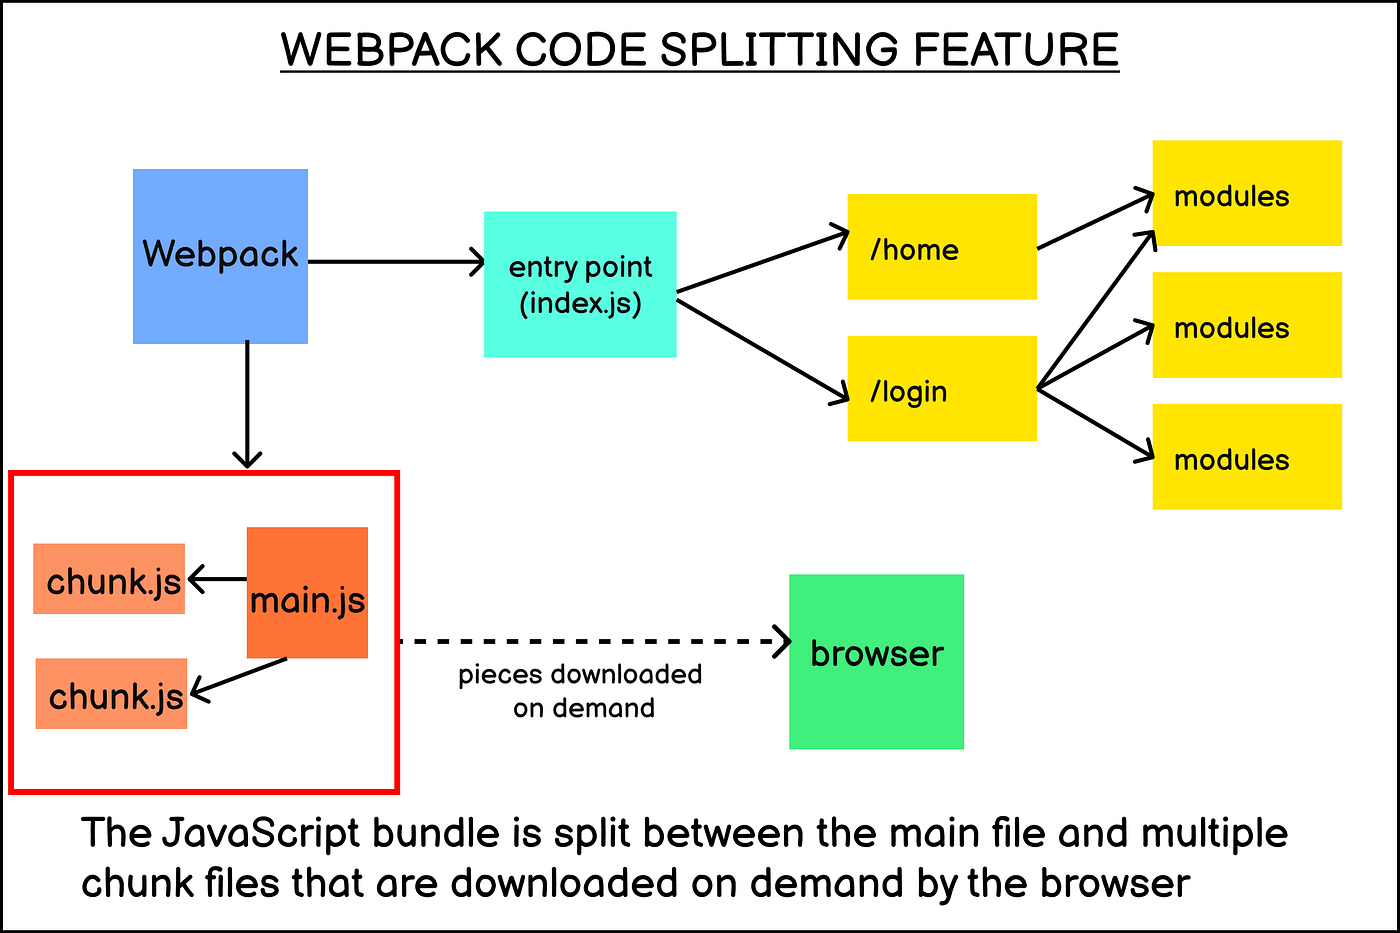
There are different ways to implement code splitting, which are as followed :
- Multiple Entry points : Specifying multiple entry points for the application, and the bundler will create a separate bundle for each entry point.
- Dynamic imports : Using the
import()syntax to dynamically import modules as needed.
- Pre-defined chunks : Using plugins or configuration options to define chunks and the modules that should be included in each chunk.
NOTE : Even though code splitting is supported by most module bundlers, it still requires some form of configuration or implementation to work. Without using any of the above mentioned methods, your bundler will not perform the code splitting and will generate one large bundle.
Code splitting can work together with HMR and Tree shaking to improve the performance of an application. Code splitting helps HMR by reducing the amount of code that needs to be updated.By dividing the code into smaller chunks, the browser only needs to update the chunks that have changed instead of the entire application. Code splitting helps tree shaking by reducing the amount of code that needs to be analyzed.
Dynamic Imports with Import() (Useful : 1] Click)
The import() is a JavaScript feature that allows you to dynamically load and import modules at runtime. The import() returns a promise that resolves to the exports of the imported module, you can use await keyword to wait for the promise to resolve and access the exports, then method or inside an if statement. You can also specify a fallback value to be used if the import fails.
When we use dynamic imports the module bundler we use like Webpack will create a new smaller bundle for that module and load it when needed. This is a way to divide a one single bundle we get after module bundling into multiple smaller chunks which can help improve the initial load time of your application by only loading the necessary code for the currently-active parts of the app rather one single giant bundle we get after module bundling.
NOTE : Dynamic imports, which are created using the import() syntax, are asynchronous and return a promise that resolves with the imported module, whereas regular imports, created using the import statement, are synchronous and execute immediately, they block the execution of the code until the module is loaded and available.
With the import() function, you can dynamically load and import modules at runtime, rather than importing them at the top of the file like with regular import statements. This allows for code splitting, where you can divide your final JS bundle into smaller chunks that can be loaded on demand, rather than loading everything at once with a single big bundle file during the initial load of the application. This can improve the performance of your application by reducing the initial load time and the amount of code that needs to be loaded in memory.
Below are some of the drawbacks of using dynamic imports and why they are not used everywhere :
- It can add complexity to your codebase, as you need to keep track of which modules are loaded dynamically and when. This can make the code harder to understand and maintain.
- It can add some overhead to your application, as the browser needs to make additional requests to load the chunks, which can add up if you are loading many small chunks.
- Not all browsers support dynamic imports, so you may need to add additional polyfills or fallbacks to ensure that your code works correctly on all browsers.
- If the amount of code you are loading is not that much, the performance gain from code splitting might not be that significant and the added complexity might not be worth it.
- Dynamic imports can also add some latency when loading the component as the browser need to download the additional chunk.
- The debugging and error handling process can be more complicated, as you need to handle errors and loading states of each chunk.
NOTE : It's generally a good idea to use dynamic imports for large JS modules that are not needed on initial load, and avoid using them for small modules. This can help reduce the overhead of loading many small chunks while still getting the benefits of code splitting for larger modules.
Example] In the below example we conditionally load modules, this is helpful since we only load large modules when needed.
NOTE : The import() is not supported in Node.js environments, so it should not be used in server-side code. The import() is only available in modern browsers and requires the babel-plugin-syntax-dynamic-import to be used in older browser.
React.Lazy() (Useful : 1] Click)
The import() is a more general JavaScript feature that can be used to load any type of module dynamically, wheras React.lazy() is a higher-level abstraction that provides a way to handle the dynamic imports for React components, it is specifically designed to work in react and import only react components.
React.lazy is a feature built on top of the JavaScript import() function, specifically for lazy loading of React components. It allows you to use the import() syntax within a React component, and handle the loading and rendering of the component in a way that's optimized for React.
NOTE : The main reason React.Lazy() is used in React instead of import() is because it enables us to use features like Suspense and Error Boundaries, which may not be possible with only using import() function.
Example] In Below example we dynamically import Counter component, since its loaded asynchronously there's a slight delay when Counter becomes visible.
To handle that slight delay React.Lazy() is always used with Suspense component which allows you to specify a fallback component to be displayed while the dynamically imported component is loading.
---------------------------------------------------------------------------------------------------------------
Suspense Component
React's Suspense component is designed to work with dynamic imports and React.lazy() specifically. It allows you to handle the loading state of components that are loaded lazily at runtime. When a component wrapped in React.lazy() is being loaded, any React.Suspense() component higher in the component tree will show the fallback UI.
So we basically wrap our dynamically imported component with React.Suspense() and provide a fallback component which will be displayed while the module is being loaded. The fallback component can be anything React is able to render lik Texts or custom components. The fallback component should be lightweight and simple, it should not contain any logic or side-effects that may slow down the loading process or cause errors.
NOTE : If you are not using dynamic imports with React.lazy(), React.Suspense will not Work and not render your loading component.
NOTE : When in development we may need to use "Throtling" with Chrome Dev Tools to slow down our Internet connection to make the Fallback UI last longer for us to see during development.
-------------------------------------------------------------------------------------------------------------


Comments
Post a Comment