ViteJS (Module Bundlers, Build Tools)
Module Bundlers (Useful:1] Click 2] Click)
Web browsers can only understand and execute JavaScript, HTML and CSS. However, developers often use other technologies and tools like React, Sass, TypeScript, and Tailwind to improve the development process, write more maintainable code, and add additional functionality to their applications. We need a way to combine all this JS & CSS code into a single optimized javascript file, this is achieved through module bundling.
A module bundler is a tool that takes all the JavaScript files in a project and combines them into a single JS file (or a few files) that can be loaded by a browser. It usually starts with an entry point file, and from there it will start looking for "import" statements and then bundles up all of code needed for that entry file.
The entry point is typically defined in the config file of the bundler. The entry point is the file where the bundler starts its traversal of the application's dependencies to bundle all the files and their dependencies into a single file. The bundler will start from this file and recursively follow all import & require statements in the code to build the full dependency graph of the application.

Some commonly used Module Bundlers include Webpack, Parcel, Rollup etc. Modern UI frameworks like Angular, React, Vue and NextJs typically use Webpack, but they can be configured to work with different module bundlers. As always, the choice of the module bundler depends on the requirements of the project.
NOTE : React typically use a module bundler, such as webpack, when running the command "npm run build" in order to bundle all of the application's JavaScript files into a single file that can be loaded by the browser.
Example] In Below example, the src/main.js serves as the entry point of the application, it imports three functions average, sum, and square from src/myDependency.js file. When you run the module bundler, it'll start at entry point src/main.js, follow the import statement to src/myDependency.js, and bundle all of the code from both files together into a single file build/main.js.
NOTE : It is possible to only transpile the code and run it directly without bundler, but it would not be as efficient and would not take advantage of other features provided by a module bundler such as minification, code splitting, and tree shaking to optimize the performance of the application.
NOTE : In most cases, transpilation is done first, then the transpiled code is passed to the bundler to be combined into a single file. Some bundlers like Parcel, comes with built-in transpilation, so you don't need to use a separate tool like Babel.
Build Tools
A build tool is a more general term that can refer to any tool that helps automate the process of building and deploying a project, which may include tasks such as bundling, minification, transpiling, and more. In the context of React, a bundler like webpack or Parcel is often used in conjunction with tool like Babel to transpile JSX and other modern JavaScript features into code that can be run in older browsers.
Here is a list of popular build tools that can be used to build React applications :
- Webpack : Webpack is a powerful module bundler that can be used to build React applications. It is often used in conjunction with other tools like Babel, which allows developers to use modern JavaScript features, and ESLint, which helps to enforce coding standards.
- Create React App (CRA) : CRA is a popular tool for bootstrapping React projects. It is built on top of webpack and it provides a simple and streamlined development experience for React developers.
- Gatsby : Gatsby is a static site generator for React. It uses webpack as its module bundler and it provides a simple and streamlined development experience for building static websites.
- Parcel : Parcel is a relatively new and fast web application bundler. It provides a simple and easy-to-use development experience, it also has a zero-config setup, which means you don't need to configure anything to get started.
- Babel : Babel is a popular JavaScript transpiler that allows developers to use modern JavaScript features, such as ES6 and JSX, which are not yet supported by all web browsers. It can be used in conjunction with webpack or other build tools to transpile the code before it is bundled and executed by the browser.
- ViteJS : Vite is a build tool that is designed for rapid development of small to medium-size JavaScript projects. It uses native ES modules in the browser and has a fast development server. This means that it does not require any configuration and it is fast.
These are just a few examples of popular build tools that can be used to build React applications. The choice of build tool will depend on the requirements of the project and the team's preference.
NOTE : Both React and Next.js use webpack and Babel as part of their build process. Both React and Next.js rely on webpack to bundle their JavaScript files, and they both use Babel to transpile JSX and other modern JavaScript features into code that can be run in older browsers.
---------------------------------------------------------------------------------------------------------------
Hot Module Replacement (HMR)
Developing a JavaScript application involves reloading the browser each time you save code changes in order to refresh the user interface. Bundlers like Webpack run in "watch mode" to monitor your project files for changes. As soon as Webpack detected a change, it will rebuild/rebundle the application and the browser is reloaded automatically. But this becomes very inefficient as the project gets biggers and starts pushing more javascript , and it would take long time to rebundle the entire app just to see the changes, that's where Hot-Module-Replacement comes.

HMR (Hot Module Replacement) is a feature that allows you to update parts of your application without having to refresh the entire page. HMR does not rebundle the entire app. When HMR is enabled, the development server watches the files in your project and when it detects a change, it sends the updated module to the browser, which then updates the corresponding part of the application without requiring a full refresh. It improve the development experience, as it allows you to make changes to your code and see the updates in real-time without having to stop and rebunde or restart the development server.
NOTE : Most Bundlers like Webpack, Parcel, Rollup, Vite etc come with built-in support for HMR, but Vite's HMR is considered much faster as it's uses Native ES modules and suitable for Large code bases.
Tree Shaking
Tree shaking is a technique used by modern bundlers like Webpack, Parcel, Rollup, and Vite to eliminate unused code or remove unreachable code (also known as dead code) from the final bundle. This can significantly reduce the size of the bundle and improve the performance of the application. The process of tree shaking works by analyzing the dependencies of the application and only including the code that is actually used.
The bundler starts by analyzing the entry point of the application and then recursively follows the dependencies of the modules that are imported. Only the code for the modules that are imported and used by the application are included in the final bundle.

Trees shaking is supported in most bundlers by default. In Webpack, tree shaking is enabled by default when using the ES6 module syntax, but it requires additional configuration to work with CommonJS modules. It is supportd by most bundlers but the implementation of tree shaking in these bundlers may differ.
Code Splitting
As you develop your web application and add more JavaScript code, the size of your source code will increase and the total size of your final bundle will also increase along with the time it takes to create the bundle.
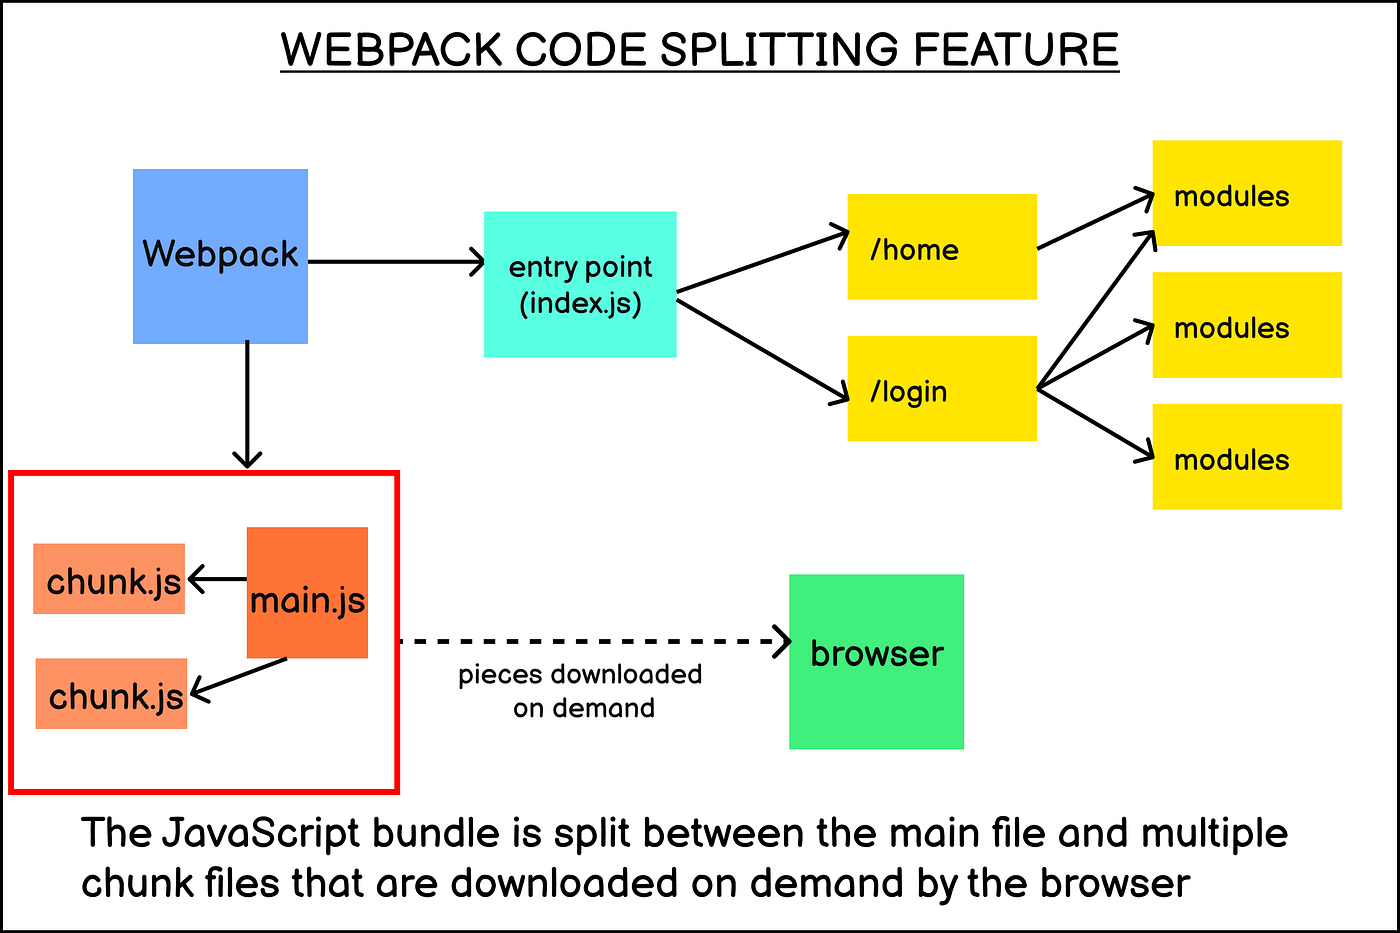
If your final bundle file amounts to 5 megabytes, then the execution of your JavaScript file happens after the 5 megabytes file has been downloaded by the browser. To solve the long load time caused by big JavaScript bundle files, module bundlers provide the code splitting feature.
Code splitting allows you to split your JavaScript bundle into several smaller bundles which are then served on-demand as the browser needs them. This increases initial load time since browser does'nt have to fetch or wait for the entire javascript bundle.
There are different ways to implement code splitting, which are as followed :
- Multiple Entry points : Specifying multiple entry points for the application, and the bundler will create a separate bundle for each entry point.
- Dynamic imports : Using the
import()syntax to dynamically import modules as needed.
- Pre-defined chunks : Using plugins or configuration options to define chunks and the modules that should be included in each chunk.
NOTE : Even though code splitting is supported by most module bundlers, it still requires some form of configuration or implementation to work. Without using any of the above mentioned methods, your bundler will not perform the code splitting and will generate one large bundle.
Code splitting can work together with HMR and Tree shaking to improve the performance of an application. Code splitting helps HMR by reducing the amount of code that needs to be updated.By dividing the code into smaller chunks, the browser only needs to update the chunks that have changed instead of the entire application. Code splitting helps tree shaking by reducing the amount of code that needs to be analyzed.
NO Bundler
The "No bundler" refers to a development approach where you don't use a bundler tool like Webpack, Parcel, Rollup or other bundler to bundle your JavaScript application. Instead, you rely on native ES modules support in the browser to load the application.
It takes advantage of fact that most modern browsers now support ES modules. This approach can be used in modern browsers that support ES modules natively. In this case, you don't need to rely on a bundler to bundle your JavaScript code and you don't need to worry about configuring a development server or building for production.
So basically we dont process the javascript into a single bundle and just simple pass the entire code to the browser. You structure your application using JavaScript modules, and use the import and export statements to define the dependencies between the modules. When the application is loaded in the browser, the browser will resolve the dependencies between the modules and load them on-demand as needed, eliminating the need for a single bundle. In short, we shift the work of a bundler to the browser.
The main advantage of this approach is the simplicity and ease of development. You don't need to configure a bundler, and you can use the same code in development and production. However, "no bundler" approach also has its own set of limitations.
It only works in modern browsers that support ES modules natively, it may not work with older browsers, and it often doesn't provide features such as code splitting & tree shaking which are useful for improving the performance of the application.
---------------------------------------------------------------------------------------------------------------
ViteJS - Build Tool (Useful:1] Click)
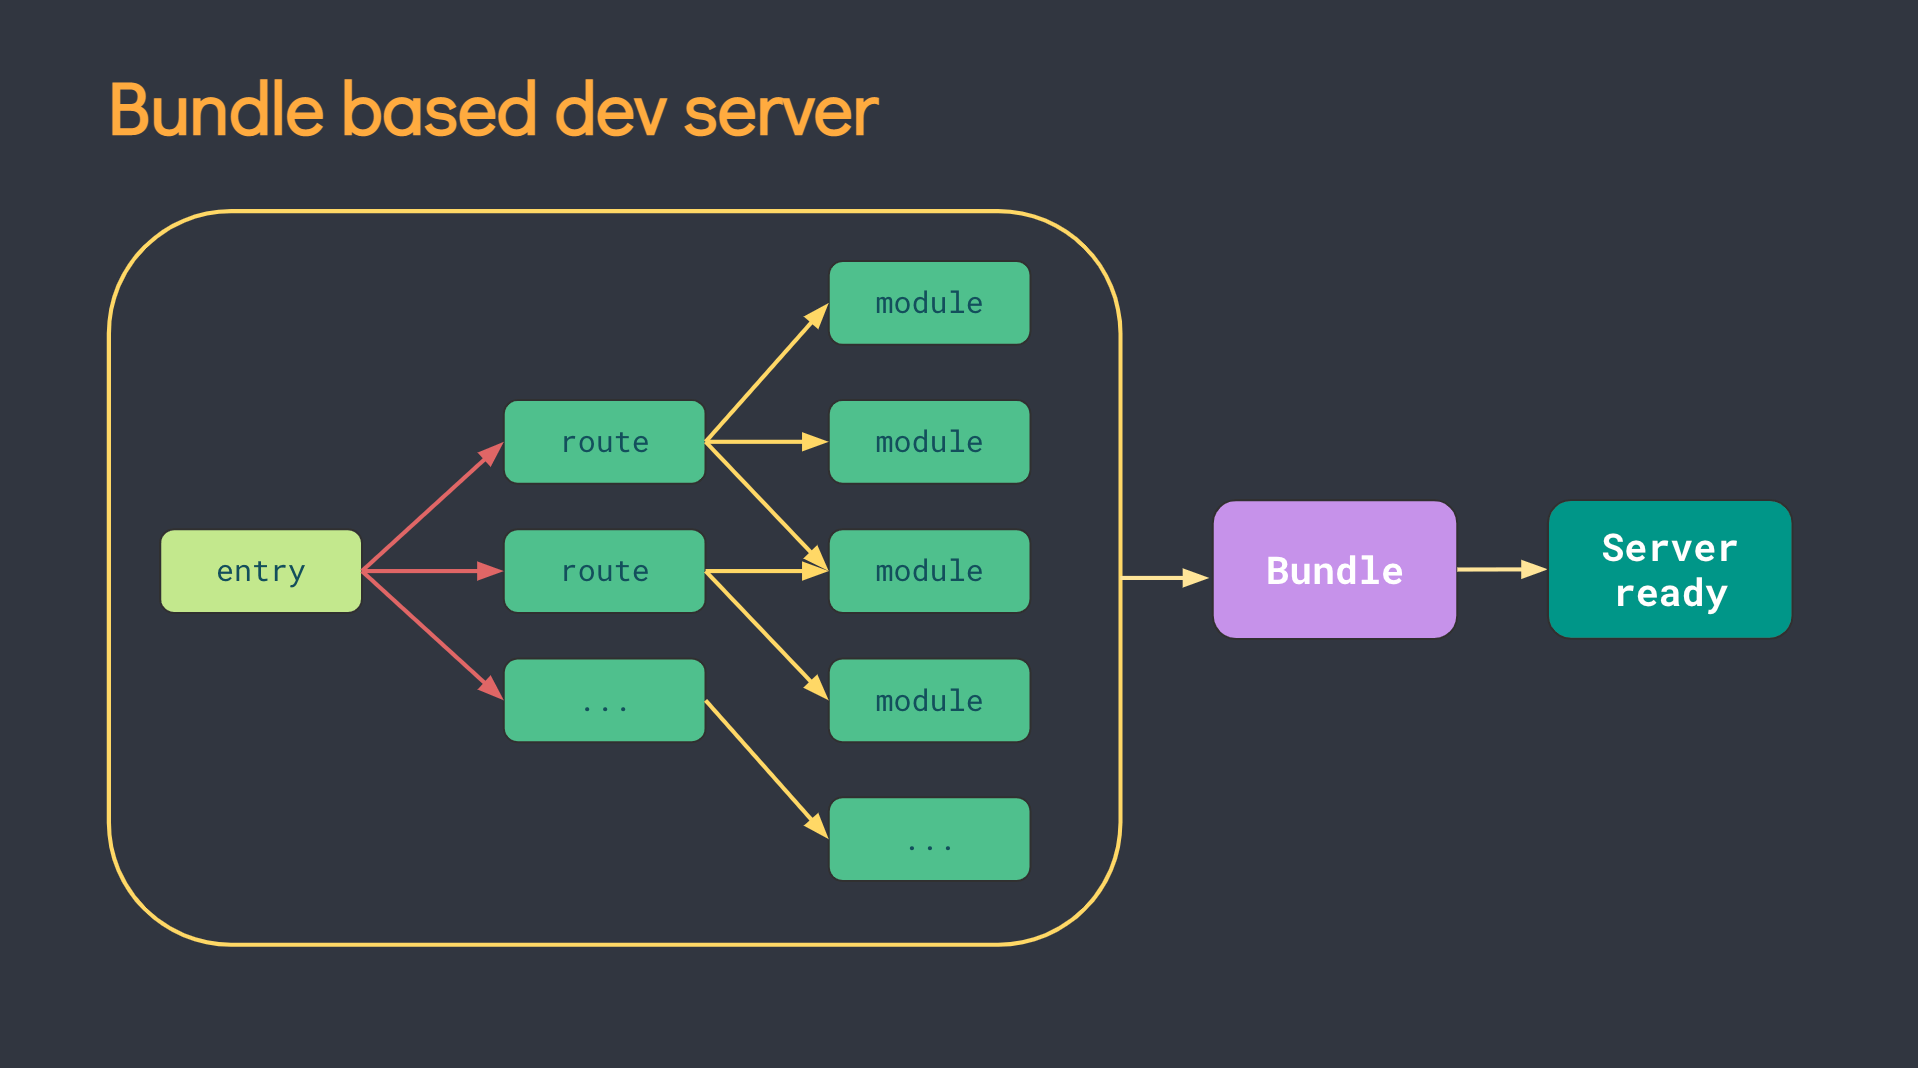
Vite is french for Fast, It does the same task as webpack but super fast. As the amount of javascript and number of modules increase in a project, the time it takes to bundle the entire app also increases. The process of re-bundling the entire app can be time-consuming, especially for large codebases with many modules. Furthermore, as the amount of code and modules increases, the time it takes to start the development server and the time it takes for code changes to reflect in the browser also increases.
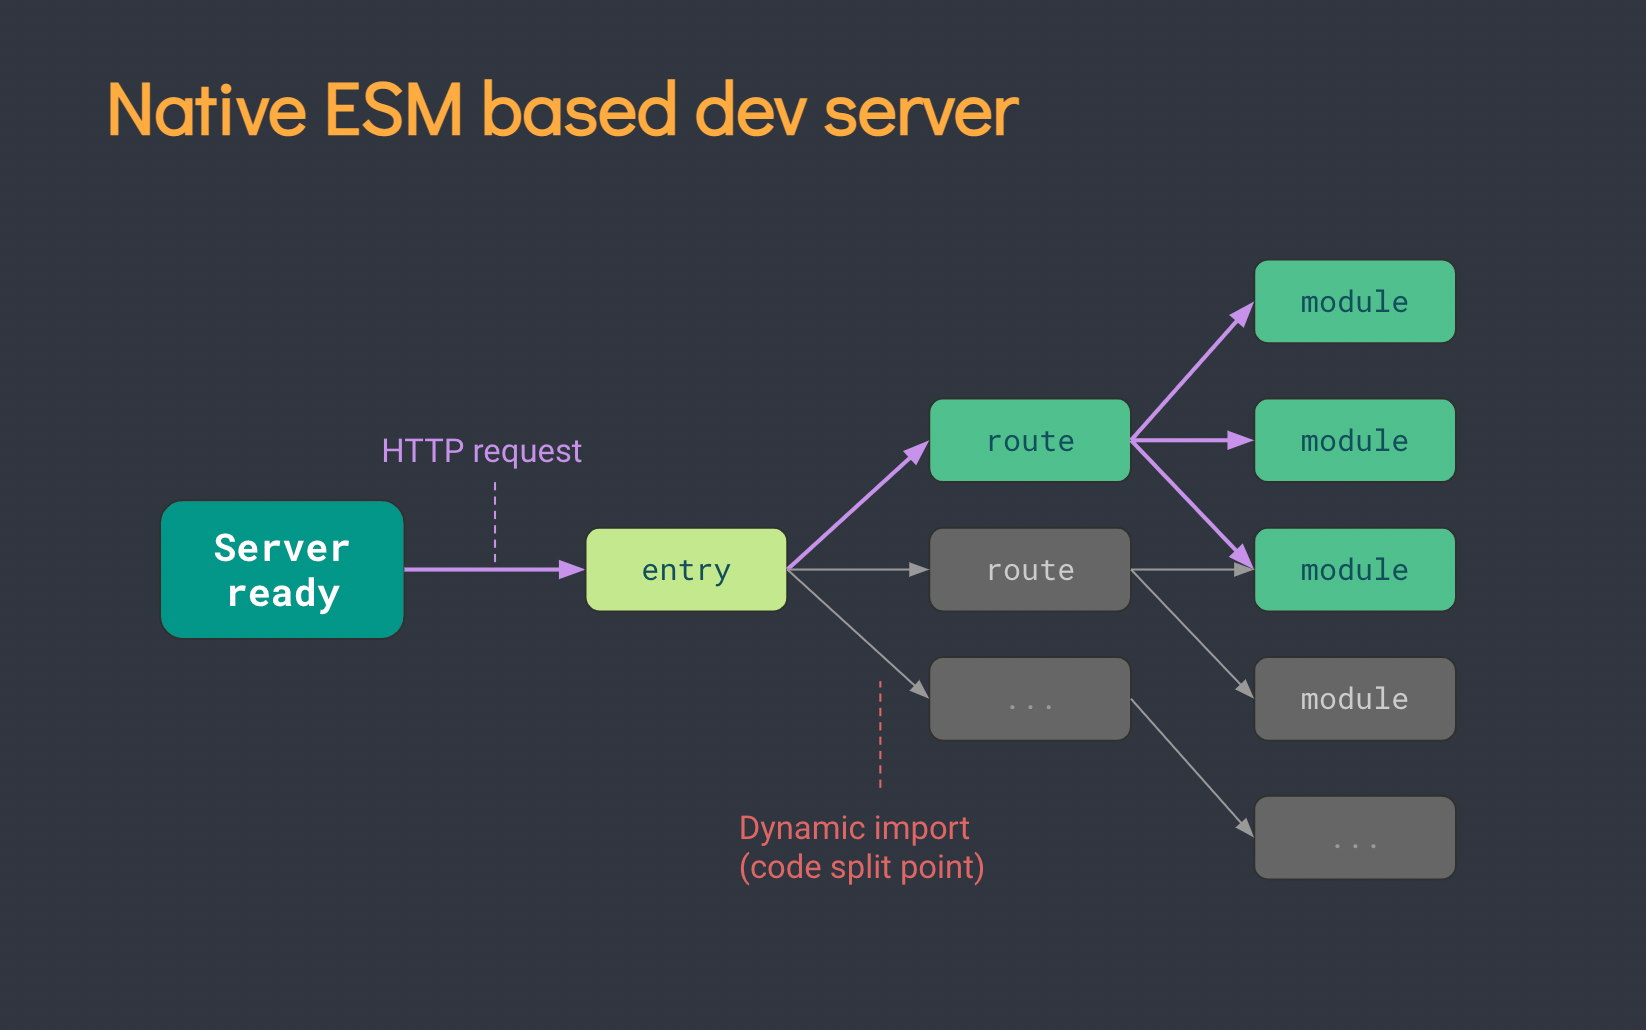
Vite is No Bundler based tool designed to improve the development experience by providing a fast development server and fast development feedback loop. It uses native ES modules, which means that it does not require any transpilation or bundling to work, this allows for faster development and instant changes reflected in the browser, as it does not wait for the bundling process to finish. It's best suited for small to medium-size projects where development experience is more important than production optimizations.

Rollup is a module bundler that is commonly used to bundle JavaScript code and its dependencies into a single file. Rollup uses "tree-shaking" to eliminate unnecessary code from the final bundle, resulting in a smaller bundle. Esbuild is an extremely fast JavaScript bundler and minifier that can be used as an alternative to other bundlers and is able to process large codebases very quickly. ViteJs uses both Rollup and ESbuild in combination for transpilation and bundling of code.
NOTE : ViteJS is considered a "no bundler" in the sense that it does not use a traditional bundler to bundle your JavaScript application, but it also provides built-in support for features such as code splitting and tree shaking, which are traditionally associated with bundlers.
NOTE : When using Create-React-App (CRA), the configuration files for Webpack and Babel are hidden by default to keep things simple, to access these files execute the "npm run eject" command.
Vite.Config.Js
Vite uses a file called vite.config.js to configure the development server and build process. This file is located in the root of your project, and it exports a JS object that contains the configuration options. It allows you to specify options for plugins, configure the development server, and customize the behavior of Vite.

Below are some config options that you can specify in the vite.config.js file :
port: The port that the development server will listen on. By default, Vite will use port 3000.
outDir: The directory where the built assets will be outputted to. By default, Vite will use adistdirectory.
rollupPlugins: An array of Rollup plugins to use for building for production.
alias: An object that maps imports to different file paths. This can be useful for creating shorthands for imports, or for pointing to different versions of a package.
optimizeDeps: A configuration object that tells Vite to automatically optimize the dependencies of the project.
defineConfig: A function that allows you to define custom configuration options that can be accessed viaprocess.env.
globalScript: A string that specifies the path of a global script that should be included in all pages.
globalStyle: A string that specifies the path of a global stylesheet that should be included in all pages.
Example] Below is an example config file which uses some of the above options.
NOTE : If you are using Typescript the the config file is vite.config.ts for typescript based projects.
ViteJS Plugins
In Vite, a plugin is a module that extends the functionality of the development server or the build process. Plugins can be used to add support for new languages or frameworks, optimize assets, or add additional features to the development server. These are useful when we want to add a new functionaility to vite that it does'nt support by default.
Plugins are added to the vite.config.js file, and they are passed to the Vite instance as an array of functions. Each plugin should export a function that returns an object with the plugin's configuration.
Example] Below is an example config file which adds new plugins to vite.
---------------------------------------------------------------------------------------------------------------


Comments
Post a Comment