JWT (Json Web Tokens)
Authentication vs Authorisation
In simple terms, authentication is the process of verifying who a user is, while authorization is the process of verifying what they have access to.
Comparing these processes to a real-world example, when you go through security in an airport, you show your ID to authenticate your identity. Then, when you arrive at the gate, you present your boarding pass to the flight attendant, so they can authorize you to board your flight and allow access to the plane.
Authentication is the act of validating that users are whom they claim to be. This is the first step in any security process. Complete an authentication process with :
- Passwords - Usernames and passwords are the most common authentication factors. If a user enters the correct data, the system assumes the identity is valid and grants access.
- One-time pins - Grant access for only one session or transaction.
- Authentication apps - Generate security codes via an outside party that grants access.
- Biometrics - A user presents a fingerprint or eye scan to gain access to the system.
Authorization in system security is the process of giving the user permission to access a specific resource or function. This term is often used interchangeably with access control or client privilege.
Giving someone permission to download a particular file on a server or providing individual users with administrative access to an application are good examples of authorization. In secure environments, authorization must always follow authentication. Users should first prove that their identities are genuine before an organization’s administrators grant them access to the requested resources.
The HTTP protocol is a stateless protocol, and in order to maintain the state of an application we can either use Sessions or Tokens for authentication and authorization.
Session based Authentication
Session-based authentication has been the default method for a long time. In the session based authentication, the server will create a session for the user after the user logs in.
The session id is then stored on a cookie on the user’s browser. While the user stays logged in, the cookie would be sent along with every subsequent request. The server can then compare the session id stored on the cookie against the session information stored in the memory to verify user’s identity and sends response with the corresponding state.
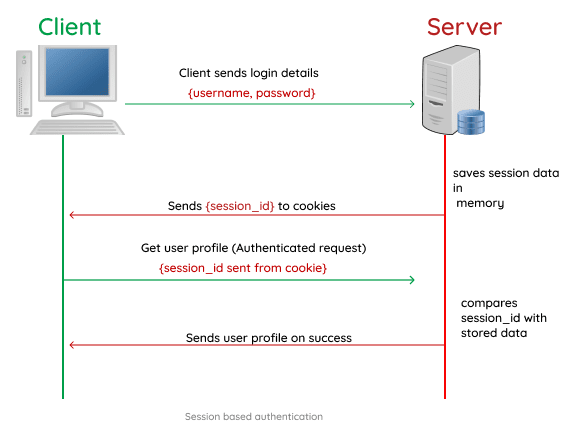
Here’s a typical flow of how session authentication works :
- You attempt to log in using your credentials.
- Your login credentials are verified, and the server creates a session with a session ID for you. This session is stored in the database.
- Your session ID is stored in your browser (client) as a cookie.
- Upon subsequent requests, your cookie is verified against the session ID stored in the server. If it’s a match, the request is considered valid and processed.
- If you log out of an application, the session ID is destroyed on both the client and server sides.
Token based Authentication
In the token based application, the server creates a Token with a secret and sends it to the client. The client stores the token (usually in local storage) and includes the token in the header with every request. The server would then validate the token with every request from the client and sends response.
The biggest difference here is that the user’s state is not stored on the server, as the state is stored inside the token on the client side instead. When the server receives the token, it does not look up for the user's session ID in the database for authentication. The server simply checks whether the token is valid or not, this way we can avoid any extra database lookup.
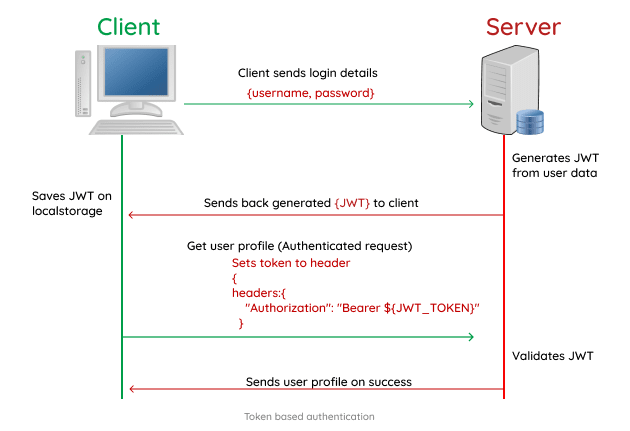
Let’s explore how Token authentication typically works :
- You attempt to log in using your user credentials.
- The server verifies your credentials, and if valid, it returns a signed token.
- The signed token is then stored on the client-side. It can either be stored in your local storage, in your session storage, or within a cookie.
- The token is placed in the header for subsequent requests to your server as an “authorization header”. The server then decodes the token in the header and processes it if it is valid.
- If you log out from an application, the token is deleted from the client-side, preventing further interactions.
- Since you can store additional data like permission levels and roles within a JWT, you essentially save the time and resources it would take to make other lookup calls.
- One of the biggest attractions to JWT Token authentication is that it is stateless and highly scalable. The backend does not need to store the JWT token, and each one contains all the data required for verification.
Some Disadvantages of Token based Authentication :
- Unlike cookies, JWT Tokens are significantly larger in sizes, and this is because they contain a lot more information.
- It is common to use JWT tokens for authentication. The authentication state is handled in the client. The tokens can be hijacked by hackers and they are harder to be invalidated on the server.
---------------------------------------------------------------------------------------------------------------
JSON Web Token
JWT, or JSON Web Token, is an open standard used to share information between two parties securely, a client and a server. JWT authentication is a token-based stateless authentication mechanism. It is popularly used as a client-side-based stateless session, this means the server doesn’t have to completely rely on a data store (or) database to save session information.
Using a JWT allows the client to provide state information to the server for each request. This is especially helpful in secured RESTful web services that require some form of client authentication and authorization control. A JWT is 3 base64 encoded parts concatenated with dots.
- JWT Header
- JWT Payload
- JWT Signature
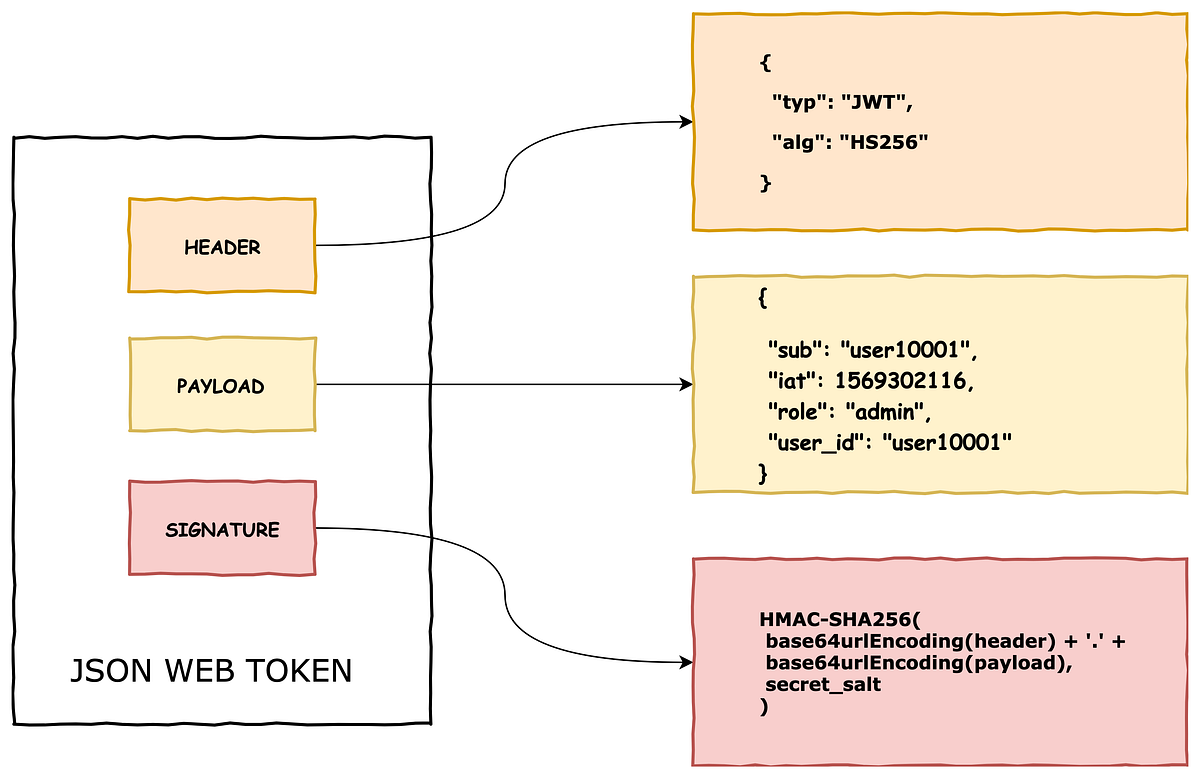
The header typically consists of two parts: the type of the token, which is JWT, and the signing algorithm being used to create the Signature, such as HMAC SHA256 or RSA. This JSON is Base64Url encoded to form the first part of the JWT.
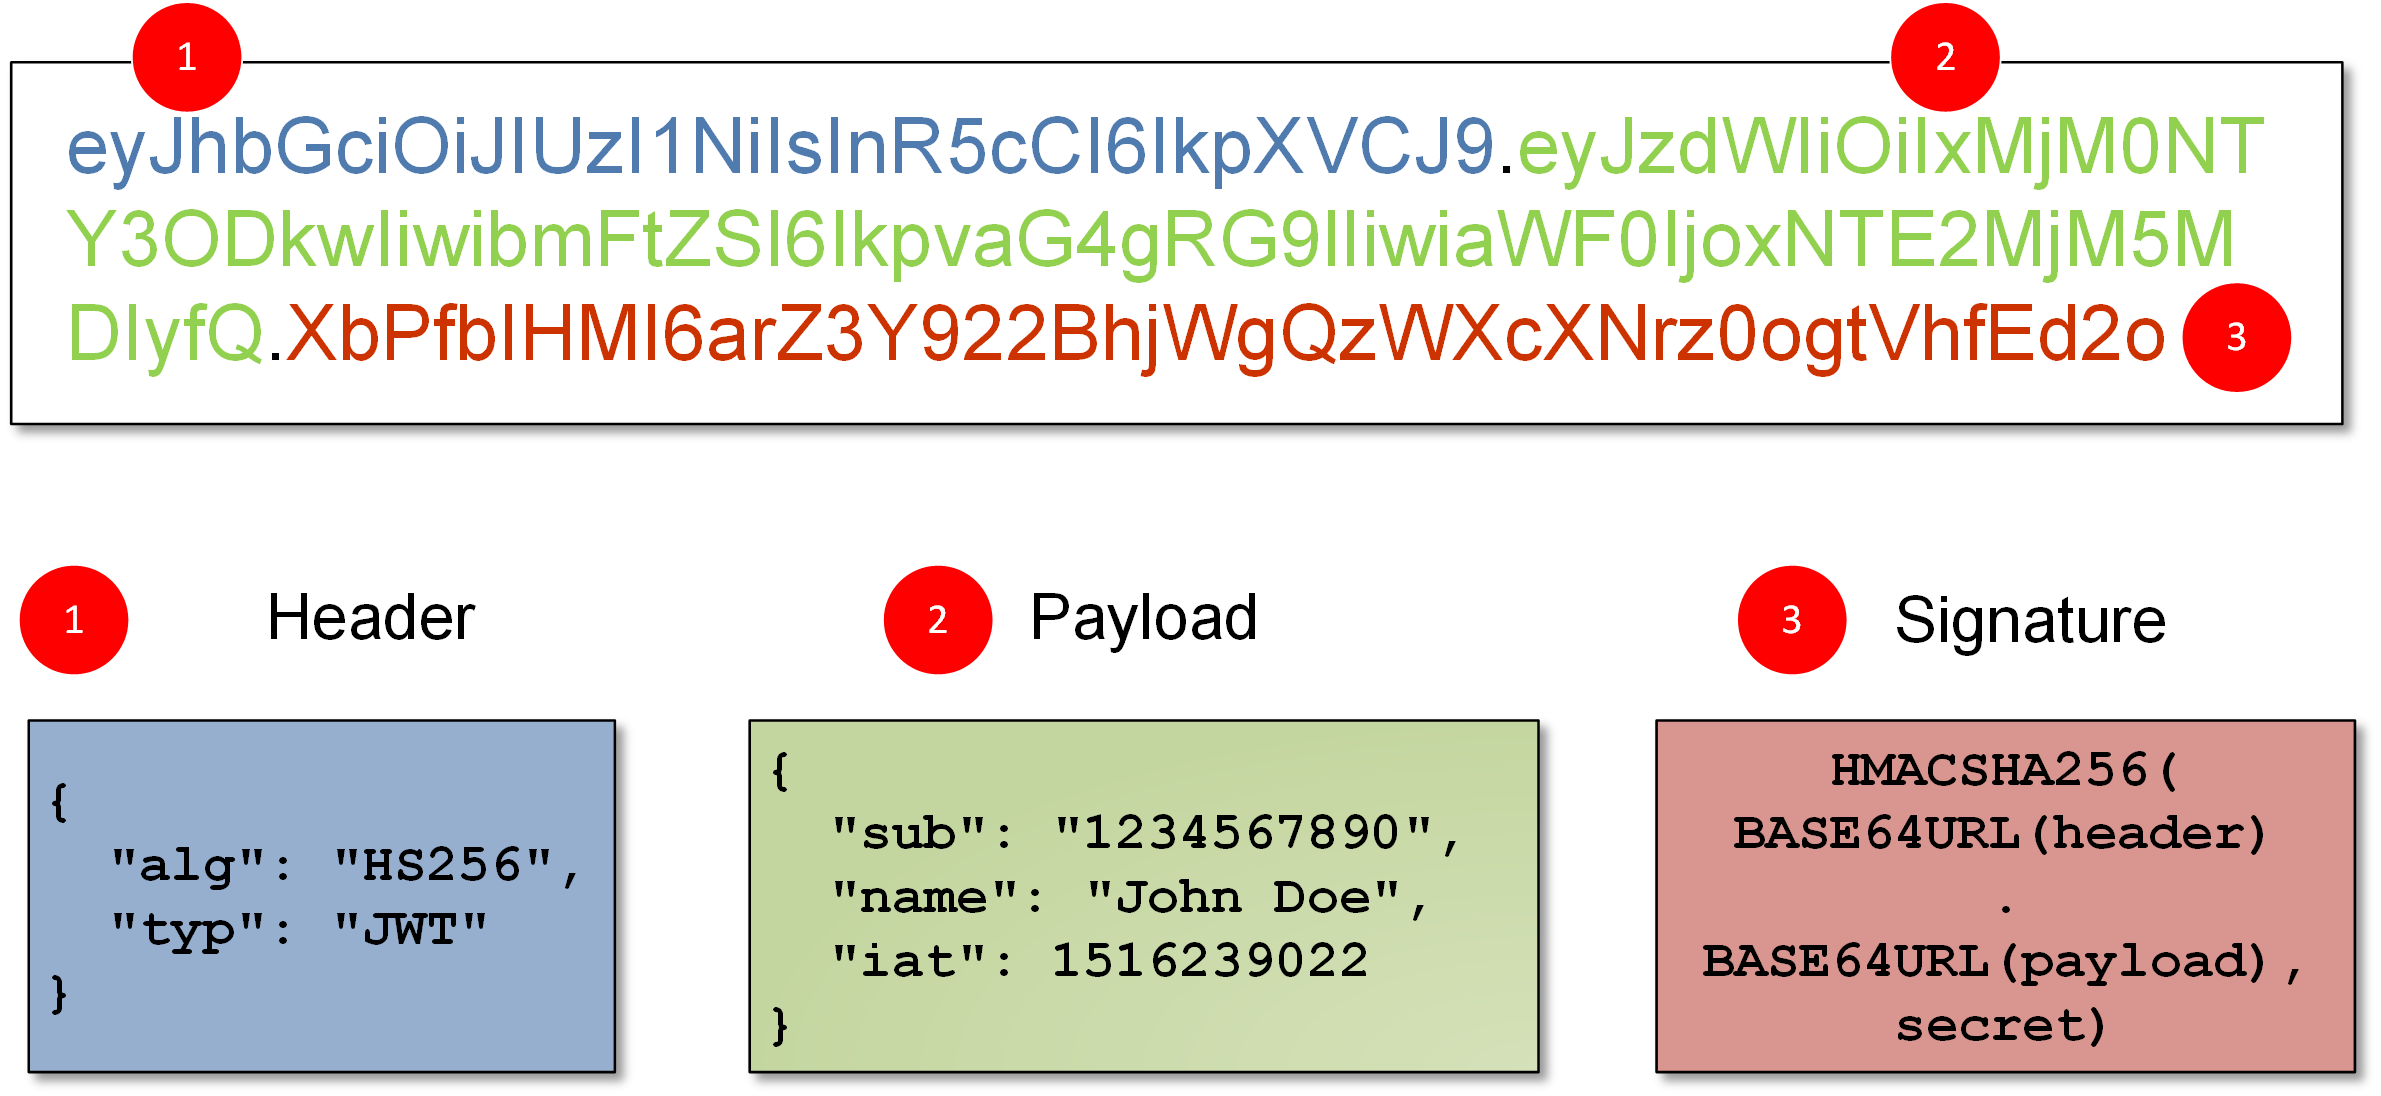
The second part of the token is the payload, which contains the "claims". In a JWT, a claim appears as a name/value pair where the name is always a string and the value can be any JSON value. Generally, when we talk about a claim in the context of a JWT, we are referring to the name (or key). Simply put the claims contain the state information necessary for user authentication and authorization.
1] Reserved Claims : Claims defined by the JWT specification to ensure interoperability with third-party, or external, applications. OIDC standard claims are reserved claims. The JWT specification defines seven reserved claims that are not required, but are recommended to allow interoperability with third-party applications. Below are the reserved claims as followed :

To create the signature part we need 3 things, the encoded header, encoded payload and a SECRET key. The signature is used to verify that the token was modified or not. If the token/payload is modified somehow then the signature must also change accordingly, but since the SECRET key is classified and present only to the server, no one can modify the payload and create a new token.
If an attacker modifies the payload and sends to the server, then it'll be invalidated, since we can quickly verify if the token was modified, using the secret key. The signature basically verifies that the token is not altered and was issued by th server.
NOTE : The Header and the Payload are borg encoded into Base64 which can easily be decoded, so do not put secret information in the payload or header elements of a JWT unless it is encrypted.
The JWT mechanism is mainly used for the following things :
- Secure RestAPI's - Using JWT we can add authentication/authorization to our APIs and allow only the requests whichc ontain the issued token. This is commonly used in commercial API's where people pay for acessing the resources.
- Sessions - JWT is also commonly used for maining sessions in web applications instead of using session IDs. This way instead of saving the session data on the server, we can save it on client side inside the token's payload with an expiry date.
Using JWT for Sessions (Useful : 1] Click 2] Click)
Instead of using Cookie Sessions where we store sessionId inside the client and store the state inside the server, we can also use JWT for sessions. So when the user logins/signups, a temporary token is created and store on the client side, all the necessary data for verifying the user is stored into the token itself, rather a seperate server. On subsequent requests we'll send the token along with request, so the server can then authenticate the user and acess the token payload.
The main idea is to store the user’s info in the session token itself! So instead of some long random string, store the actual user info in the session token itself. And to secure it, have part of the token signed using a secret that’s only known to the server. So even though the client and the server can see the user info part of the token, the second part, the signed part, can only be verified by the server.

Dangers of using JWT for Sessions :
1] Logout doesn’t really log you out - Imagine you logged out from Twitter after tweeting. You’d think that you are logged out of the server, but that’s not the case. Because JWT is self-contained and will continue to work until it expires. This could be 5 minutes or 30 minutes or whatever the duration that’s set as part of the token. So if someone gets access to that token during that time, they can continue to access it until it expires. We may also create a blacklist of tokens which are logged-out, but that again defeats the point of JWT if we need to look into database for authentication.
NOTE : If you are using Cookie Sessions then logging out is just a matter of deleting the sessionId, it's even easier when using Redis for storing session data.
2] Highly vulnerable to Man-in-Middle attack - JWT’s are often not encrypted so anyone able to perform a man-in-the-middle attack and sniff the JWT now has your authentication credentials. This is made easier because the MITM attack only needs to be completed on the connection between the server and the client.
3] Length of Tokens - In many complex real-world apps, you may need to store a ton of different information. And storing it in the JWT tokens could exceed the allowed URL length or cookie lengths causing problems. Also, you are now potentially sending a large volume of data on every request.
---------------------------------------------------------------------------------------------------------------
An IP bound JWT enters like a star in this situation. As it is only bound to a single IP address, malicious users outside the client’s private network cannot use the stolen JWT, hence making it invalid.
An IP address bound JSON Web Token (JWT) is a token which is constraint to a particular IP address — in most cases the IP which requested the token. These tokens are bounded, i.e. can only be used, by the IP Address which has requested it. The most common way to implement this type of JWT is to add the requester’s IP address in the token payload and sign the token. The signature makes sure that the IP address was not tampered or changed. The IP address is then verified at the time of token validation by comparing the IP address requesting with the token and the IP address inside the token.
---------------------------------------------------------------------------------------------------------------
Below are some examples for generating aand verifying JWT tokens, and how we can secure REST endpoints using these tokens.
NOTE : In production environments, secret keys must be stored inside the ".env" file or any other secure service.
Example] Generating an JWT given payload and secret key with an Expiration.
Example] Verifying an issued JWT token. If the token is valid then the payload is returned, else if the token is invalid or expired an error is thrown
Example] Securing an Rest API using JWT, allowing only the requests which contain an valid issued token inside their header.
---------------------------------------------------------------------------------------------------------------


Comments
Post a Comment