Next.JS React Framework (CSR,SSR,SSG,ISR)
Webpage Rendering
Rendering a webpage is the process of turning HTML, CSS, and JavaScript code into an interactive page that website visitors expect to see when clicking on a link. The primary function of a web browser is to request resources from the web and display them inside of a browser window. Typically a browser will request HTML, CSS, JavaScript and image content from a server and interpret them.
Here are the steps it takes to turn thousand lines of code into a webpage :
- HTML is received from the server and processed into the DOM.
- The styles are loaded and parsed into the CSSOM.
- The render tree is created using the DOM and CSSOM.
- The browser creates a layout for each render tree element with its individual coordinates using the flow method, which requires just one pass to layout all the elements, compared to the tables method that requires more than one pass.
- The information is displayed in the browser window in its final form through the last stage of the process, also known as painting.
Client-Side Rendering (CSR)
Client-Side rendering became popular after the introduction of JavaScript frameworks like Angular, React, Vue.js, etc. When we talk about client-side rendering, it’s about rendering content in client's browser using JavaScript. So instead of getting all the content from the HTML document itself, a bare-bones HTML document with a JavaScript file in initial loading itself is received, which renders the rest of the site using the browser.
The best examples for client-side rendering are SPA's like ReactJs applications, there is only a single "index.html" file with a "root" div tag. All the content and DOM elements are rendered dynamically using Javascript code in the browser.
In a standard React application, the browser receives an empty HTML shell and the entire "JavaScript Bundle" of instructions and components used to construct the UI. This is called client-side rendering because the initial rendering work happens on the user's device.

With client-side rendering, the initial page load is naturally a bit slow. However, after that, every subsequent page load is very fast. In this approach, communication with server happens only for getting the run-time data. Moreover, there is no need to reload the entire UI after every call to the server. The client-side framework manages to update UI with changed data by re-rendering only that particular DOM element.
Cons of Client-Side Rendering :
- The Initial Page Load takes long time to load, since we are receiving lots of Javascript through the network and it also takes more time to render the entire webpage dynamically then to directly render HTML.
- These sites are not optimized for SEO, since we are dynamically building the webpage components the Web Crawlers will only recieve the empty HTML shell. Even if they recieve the Javascript, Crawlers lack the required environment to run Javascript.
- If Javascript is disabled on the browser, then the user will only see the blank skeleton page since DOM won't be rendered.
Pros of Client-Side Rendering :
- After the Initial Page Load, the browser has all the JS components it needs to dynamically render pages, the site loads pages fast behaves like a Native App without the need to refresh the browser window.
- Less load on the server, since all the rendering happens on the client-side, the website dont need to request the server for webpages and only requests for essential data like Rest API's or Databases.
NOTE : Having the browser render plain HTML will always be faster than having to load JavaScript, wait for the DOM to be ready, and then use JavaScript to manipulate the DOM. By going the JavaScript route you're both downloading more content from the server and asking the browser to do more work to render the page.
Server-Side Rendering (SSR)
Server-side rendering is pretty much the opposite of the client-side rendering. In SSR the rendering is conducted by the server, you render some part or the entire document on the server. The user makes a request to the server; the server processes the HTML, CSS, and JavaScript on-demand and delivers a fully populated page to the user’s browser. It is a common method of loading your website’s JavaScript on your server, then the browser.
Unlike Client-Side Rendering, every subsequent time the user takes action to visit a different page, the rendering process repeats. The server will serve the page on demand every single time. The browser is constantly making requests to the server for every new page, and each request.
The downside of SSR is that it is resource-intensive and delays the content delivery to the user. It increases the page load time compared to single-paged apps. This is because the server has to render the dynamic content repeatedly. This can be eliminated through pre-fetching the web page like in <Link> component.
NOTE : SSR also has a major drawback, every URL request requires another round trip to the server which increases server load, whereas in CSR all the Javascript components are sent at once so no extra request is sent to the application server for anoher content.
When a user request a webpage, server prepares the page by fetching user-specific data and sends it to the user’s machine. The browser then construes the content and displays the page. This entire process of fetching data from the database, creating an HTML page and serve it to user is known as SSR.
Server-Side Rendering before CSR
The SSR is not a new concept like CSR, and has been around since the dawn of world wide web. If you serve a full HTML page using Jinja2 templating engine using Flask, that is also server-side rendering.
In the early days of the internet, web development was very straightforward. The only tool at our disposal for creating websites was HTML. For example, upon a user request for a page, the server had to query the database and generate an HTML file and serve it to the client based on the results. Whenever the user navigates to a new page, the page is fully reloaded with the new HTML file. SSR as mentioned was the only way to build websites at the time.
A singular point that changed web development forever is the invention of AJAX by Microsoft. AJAX provided a way to modify the DOM on the client-side and dispatch asynchronous HTTP requests back to the server. This opened the door to improve the performance of websites drastically. We no longer need to do a full reload to the page. We can dispatch a request and, based on the response, modify on the client-side the page and eventually led to the creation of SPA frameworks like React and Angular.
Pros of Server-Side Rendering :
Cons of Server-Side Rendering :
NOTE : In a nutshell, server-side rendering is like receiving a pre-assembled toy train set whereas client-side rendering is like receiving a dismantled one that you need to assemble yourself. You have to decide whether you’d like to play with a pre-assembled one or prefer assembling it just the way you want it.
Static-Site Generation (SSG)
In SSR we render the webpage on the server rather than the client's browser. This approach decreases the load time of the webpage on browser since we are sending a rendered site, but this may increase the delivery time of the webpage, as the server will take some time to render the entire webpage, not to mention that SSR takes more compute power than CSR and the server has more work load as the users and requests increase which can also regrade server performance.
The one thing we can do to increase the delivery time of our webpage and to decrease the server load is to adopt "Static-Site Generation". With SSR we pre-render the page into HTML on the server on every request, here TTFB (Time to first byte) is slower, but your data is always up-to-date. With Static Generation (SSG), we pre-render the page into HTML on the server ahead of each request, such as at build time. The HTML can be globally cached by a CDN and served instantly rather than rendering it on server constantly on each request.
If your webpage is mostly static or if the data does'nt change much frequently, then it's not optimal to render the webpage on each request as we do in SSR. We can use SSG to generate a view of the webpage and store it inside a CDN to be served directly rather than hitting the server for getting the same content.
NOTE : The term “static” comes from the fact that the HTML is static, but it doesn’t necessarily mean that the page itself is static. You can still fetch data and create dynamic interactions using client-side JavaScript.
The biggest difference between SSGs and the so-called traditional web dev (used in services like WordPress) is that the latter builds a page on demand each time a user visits the site, while SSGs do this only once at build time and save the build, a stored site is then served to the users on subsequent requests.
NOTE : The SSR generates the page’s HTML on each request. It is much more flexible than SSG because you can change the HTML without building the application every time. So, if you have data that is continuously updated, SSG might not be a good fit.
---------------------------------------------------------------------------------------------------------------
Module Bundling in CSR & SSR
Module bundling is the process of combining multiple JavaScript modules into a single bundle that can be included in a single script tag in a HTML file. This process is performed ahead of time by tools such as Webpack and is used to prepare the JavaScript code for deployment. The process of generating static HTML on request in SSR is different from the process of module bundling.
In both CSR and SSR, module bundling is typically performed ahead of time as part of the build process. The generated bundles are then used to serve the JavaScript code to the browser. In CSR, the entire JS bundle is sent to the browser with every request, and the browser runs the code to dynamically render the content on the page. In SSR, the server uses the JS bundle to generate static HTML for each request, which is then sent to the browser that uses it as the initial render. After the initial render, the JavaScript code in the bundle is then executed in the browser to "hydrate" the static HTML, adding interactivity and other dynamic behavior to the page.
In both cases, the process of module bundling is done once at build-time, and the resulting bundles are used to serve the JavaScript code to the browser. The main difference is in how the code is used, with CSR relying entirely on the browser to dynamically render the content, and SSR generating static HTML on the server and relying on the browser to hydrate the static HTML.
In CSR we have a single large JS bundle that is sent to browser in order to dynamically generate the entire web page, this can result in a slower initial load time and a larger total payload size, as the browser must download and parse the entire JavaScript bundle even if the user only visits a small subset of the pages in your web application.
In SSR each route or page generates its own smaller JS bundle during module bundling, when user request that page, only the smaller JS bundle associated with that page is sent, reducing the total JS payload size and improving the load speed of the page. This approach can result in a faster initial load time, as the browser only needs to download and parse the JavaScript required to render the specific page the user has requested.
Hydration
With client-side rendering, most actions trigger local DOM updates instead of network requests. Clicking a navigation link builds the requested page on the client instead of requesting it from the server. Because they make fewer network requests, applications rendered in the browser provide a blazing-fast user experience after the initial download.
That’s the drawback to client-side rendering : none of your site’s content is visible or interactive until the client downloads JavaScript and builds the DOM. However, not all clients can construct a DOM. For example, client-side rendering can prevent search engines and social media crawlers from consuming and indexing your site’s URLs. Browser users, on the other hand, may see a blank page or loading image while your JavaScript bundle downloads and executes.
Server-side rendering makes HTML available to the client before JavaScript loads. Your site visitors can see and read your content even if it is not fully interactive. Server rendering eliminates the blank page problem. Rendered HTML also makes it easier for search engines and social media crawlers to consume your site. Server-side rendering also has a drawback: every URL request requires another round trip to the server.
.jpg)
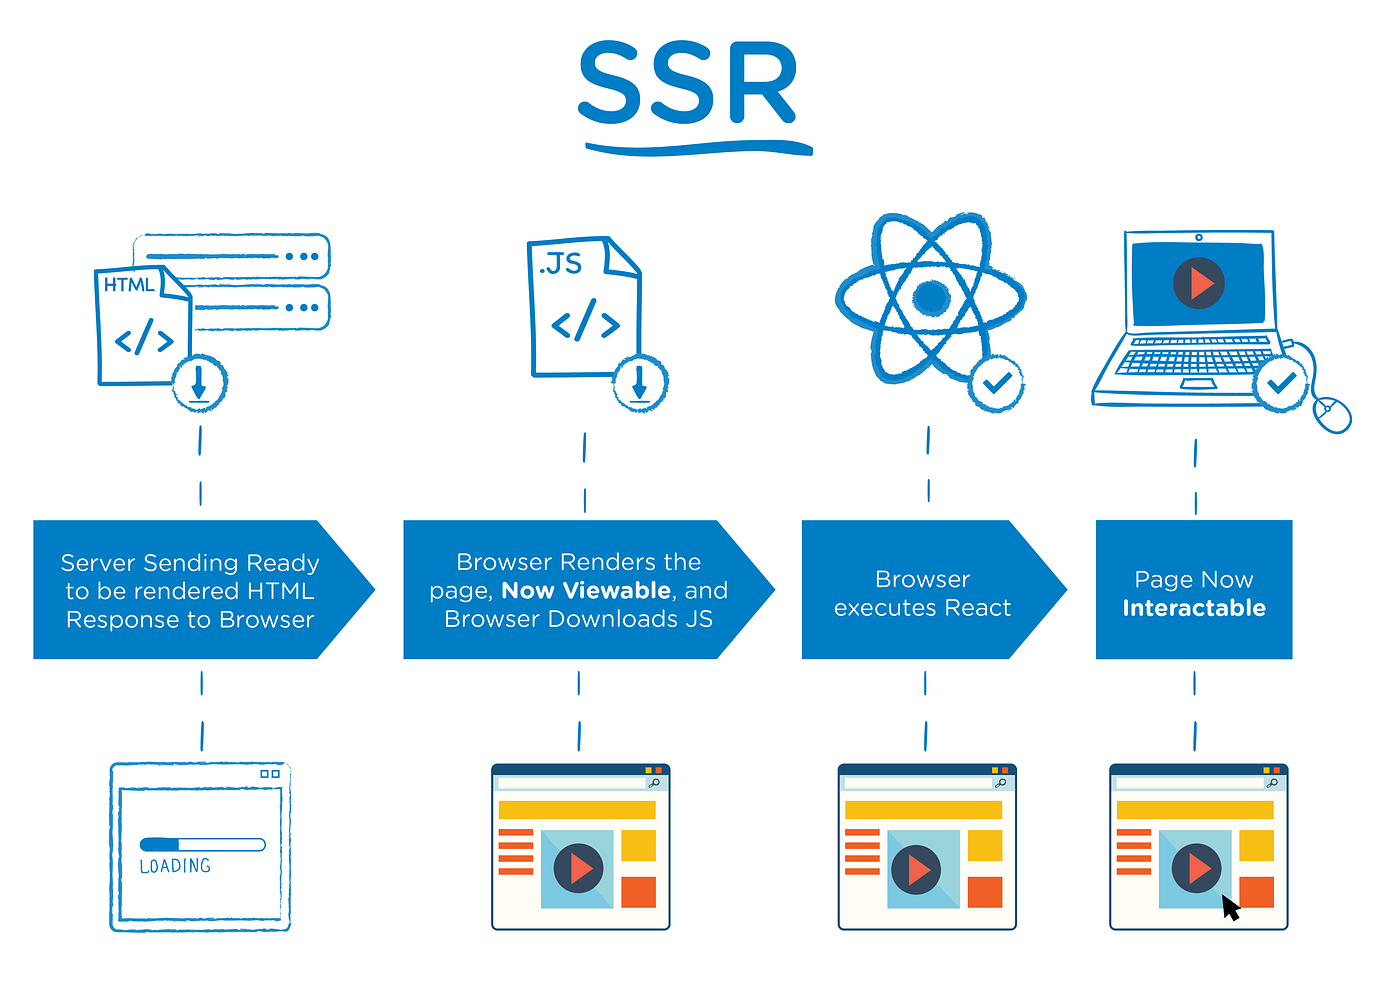
The term "Hydration" means the process of attaching event listeners to the HTML and making the page fully interactive. When using vanilla React which uses CSR, the entire task of rendering the HTML elements and hydration to make them interactive is done on client-side, which often leads to slower initial load and a blank page problem. In SSR, we render React components on the server into HTML and send them to the user. HTML is not very interactive. However, it lets the user see something while the JavaScript is still loading.
When using SSR, the Javascript components are rendered on the server and the required HTML is generated on the server but there are some things (like Event listeners) which cannot be loaded on the server and can only be loaded on the client-side. In SSR when a page is sent to the client,it may not be interactive at first. Each generated HTML is associated with minimal JavaScript code necessary for that page. When a page is loaded by the browser, its JavaScript code runs and makes the page fully interactive.
In SSR, rather than just sending the entire JS bundle to browser and letting it build the entire page using JS, we generate some static HTML using that same JS on the server and send it to the browser. This way the user see's atleast some content as soon as the request is made. But the HTML generated on the server (which is sent to browser) is completely static and is'nt interactive. To make this HTML page interactive the Hydration code is also sent to the browser.
This way upon request the user sees a non-interactive webpage which later become interactive on hydration. Below are some steps that are needed to be completed before a user can see and interact with a page :
- First, all data required for a given page is fetched on the server.
- The server then renders the HTML for the page.
- The HTML, CSS, and JavaScript for the page are sent to the client.
- A non-interactive user interface is shown using the generated HTML, while the minimal JS code need to make page interactive is downloaded.
- Finally, React hydrates the user interface to make it interactive.
Important
- When using CSR, if you disable javascript on browser, then the browser does'nt render the React components at all and the user only sees an white blank page.
- When using SSR, if you disable javascript on browser, then the browser only shows the HTML that was rendered on the server. But since the Javascript code required for hydration could'nt run, the page remains uninteractive, so things like button events and other event listeners will not work.
- In CSR the browser receives a single JS bundle, whereas in SSR the browser receives some static non-interactive HTML and JS code to hydrate that page.
NOTE : So the Hydration happens in both CSR and SSR, but in SSR the client does'nt see a blank page while the JS is loaded, but instead an initial server rendered page which later becomes interactive as the javascript loads.
---------------------------------------------------------------------------------------------------------------
NextJS Framework
Next.js is an open-source web development framework built on top of ReactJs. It provides primary functionalities such as server-side rendering and generating static websites. This framework was created by Vercel in 2016 and comes with MIT license. Next. js is widely used by the biggest and most popular companies all over the world like Netflix, Uber, Starbucks, or Twitch.
The NextJs provides various rendering strategies which are as followed :
- Client-Side Rendering (CSR)
- Server-Side Rendering (SSR)
- Static-Site Generation (SSG)
- Incremental Static Regeneration (ISR)
Some of the alternatives to NextJS are Gatsby, Angular Universal ,RemixJs etc. Next.js is now one of the most popular React frameworks for building superfast, and super SEO-friendly websites. It can be perfectly combined with headless CMSes, or eCommerce platforms to drive extraordinary performance and SEO results.
NextJs CLI commands
Below are some npm commands frequently used with NextJs :
- npm run dev - It starts the application in development mode with hot-code reloading, error reporting, and more.
- npm run build - It creates an optimized production build of your application. The output displays information about each route.
- npm run start - It starts the application in production mode. The application should be compiled with '
next build'first.
---------------------------------------------------------------------------------------------------------------
Module Bundling in NextJS
In Next.js, module bundling happens using Webpack, a module bundler for JavaScript applications. In Next.js, each page/route generates a separate smaller bundle and is built and served individually. This is different from CSR where we generate a single monolithic JS bundle to be seved to the browser. After the module bundling is done, the generated code is stored in the ".next" build folder in Next.js.
The process of module bundling in Next.js is different from the process of generating HTML on the serve for each request. For each request, the sever dynamically generates the HTML for each page and sends it to the client. However, the build folder is not generated for each request, but rather only once during the build process when you build your application.

NOTE : In CSR, we have a single big JS bundle that we get after module bundling, whereas in SSR each route create a smaller bundle that is sent along with the generated static HTML to hydrate and make the page interactive.
NOTE : The main reason module bundling is needed is because a web browsers only understands HTML, CSS and JS , while we use many tools like Typescript, Tailwind, JSX etc which the browser does'nt understand, so we run a build process which converts all assets to browser compatible files. Module bundling can also be used to reduce number of HTTP requests and improve load time of a web page.
Production Build in NextJS
In a Next.js application, the .next folder is where Next.js stores the generated files and assets after module bundling that are used to serve the application. This folder contains the optimized and transpiled version of the application's code, as well as any static assets that have been imported or referenced in the application.
The .next folder is generated when you run the next build command, and it contains the following items:
server: contains the server-side code that runs on the Node.js runtime.static: contains any static assets that have been imported or referenced in the application, such as images, fonts, and stylesheets.pages: contains the optimized version of the pages in your application, as well as any additional JavaScript, CSS, and other assets required for each page.chunks: contains the common modules that are shared across multiple pages in your application, so they don't have to be downloaded multiple times.
When you run the next start command, Next.js will use the content of the .next folder to serve the application. The .next folder is not intended to be edited manually, but it can be used to troubleshoot and understand how Next.js is building and serving your application.
Please note that the .next folder is generated every time you run the next build command and its content can be removed if you run next clean command. When you run npm run dev in a Next.js application, Next.js will automatically generate the .next folder, even though you are in development mode. This is because Next.js uses the .next folder to serve the application, whether you are in development or production mode.
In summary, the .next folder is generated every time you run npm run dev or next dev command, regardless of whether you are in development or production mode. It's the folder that Next.js uses to serve the application, and it's updated every time you make changes to your code, so you can see the changes in real-time.
---------------------------------------------------------------------------------------------------------------
NextJS File Structure
When you execute the above command, the following files are generated :
- Public Folder - It stores static assets such as images, fonts, etc. Files inside
publicdirectory can then be referenced by your code starting from the base URL (/).
- Pages Folder - It defines the routes of your project. For example
pages/about.jsis mapped to/about
- Styles Folder - It contains your global and local CSS styling files.
In a Next.js application, _app.js and _document.js are special files that are used to customize the behavior of the application at the top level. The "_app.js" is a higher-order component that wraps around all of the pages in the application. It is used for tasks such as providing a common layout, setting global styles, or handling authentication. The "_document.js" is used to customize the HTML document that is rendered on the server. This can include things like setting the title and meta tags, linking to stylesheets, or adding Google Analytics tracking code.
NOTE : Both "_app.js" and "_document.js" are optional and do not need to be included in a Next.js application, but they can be useful for adding global functionality to the application.
---------------------------------------------------------------------------------------------------------------
NextJS Routing (Before NextJS 13)
In a standard React application if we want to add routing then we would have to install additional modules like React-Router and also configure the routes manually. To avoid this tidious task, Next.js adopted a file system-based routing mechanism.
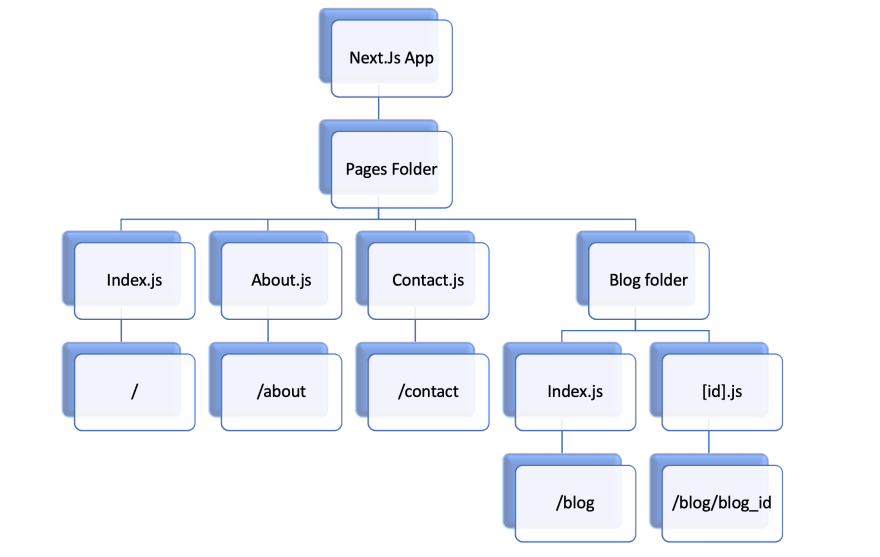
In Next.js when a file is added to the "pages" folder in a project, it automatically becomes available as a route. By mixing and matching file names with a nested folder structure it is possible to define the most common routing patterns. In Next.js, a page is a React Component exported from a .js, .jsx, .ts, or .tsx file in the pages directory. Each page is associated with a route based on its file name.
Example] In the below code we define a static route "/about" by creating an "about.js" file inside the pages folder.
NOTE : A page can have only one default export funtion. If you put multiple default export functiions you'll get an error. If you have multiple exported functions, the Next.js will render only the default exported function.
Index Routes
Every page in next.js opens with a specific router path in the web browser. You access a page with the file name. By default, in next.js the root ("/") of the url is defined by the "index.js" page. For example, 'localhost:3000/' will be defined by index.js in the pages folder.
// index.js
NOTE : The "index.js" file is not only used to define the root ("/") of a url, but also used to define to root ("/") of nested routes.
Nested Routes
In next.js the routing is entirely file system-based, so in order to create a nested route we just create a new folder and define the routes as usual.
// users/index.js
// users/deepeshdm.js
NOTE : The pages that you create inside the new folder will define new routes, but the root ("/") of new folder will be defined by index.js file.
---------------------------------------------------------------------------------------------------------------
Dynamic Routes
Defining routes by using predefined paths is not always enough for complex applications. In Next.js you can add brackets to a page path ([param]) to create a dynamic route.
// pages/[username].js
NOTE : We use the "useRouter" hook from nextjs to get acess to the router object which will give us acess to routing information. The "router.query" property returns the url variables and queries passed by the user in the url. The matched path parameter will be sent as a query parameter to the page, and it will be merged with the other query parameters.
We can also further nest this dynamic behavior to the Url by creating more further variables inside the Url. Below is an example.
Even with the use of [ ] for parameters the index routes still work the same.
Catch-All Routes
Instead of creating multiple named variables we can define a single Catch-All route which can capture all the variables and queries passed. Dynamic routes can be extended to catch all path variables by adding three dots (...) inside the brackets. Matched parameters will be sent as a query parameter to the page, and it will always be an array.
Error Pages (404.js, 500.js)
In Next.js we can create errror pages for 404 and 500 directly by creating the files named as "404.js" or "500.js". The user will be automatically redirected to these pages when a corresponding error occcurs, there's no need for extra configuration.
NOTE : If you want to show different eror pages for different paths, we do so using the useRouter() hook to acess the route object and check the current user path and redirect them to appropriate error pages.
Important
Predefined routes take precedence over dynamic routes, and dynamic routes over catch all routes. Take a look at the following examples:
---------------------------------------------------------------------------------------------------------------
Component Props
The NextJs is a ReactJs based framework so you can use almost all the things that you could in regular React application. You can define and use the props in the same way in NextJs.
You could even destructure the props before receving them, below is an example.
---------------------------------------------------------------------------------------------------------------
useRouter() Hook
The router object provides access to the URL routing information and functionality for your application. The useRouter() hook is a hook that allows you to access the router object of within your functional components. You can access the router object of the current page in Next.js by using the useRouter() hook.
It returns an object that contains information about the current URL and its properties. With this hook, you can access properties such as the pathname, query parameters, as well as perform actions such as navigating to a different page.
The router object from useRouter() provides following properties & methods :
- pathname : the path of the current URL
- route : the path pattern of the current route
- query : an object containing the query parameters of the current URL
- asPath : the current URL including query parameters
- push(url, as, options) : navigate to a new URL
- replace(url, as, options) : replace the current URL with a new URL
- reload(route) : reload the current page
- back() : navigate back to the previous page
- prefetch(url, as, options) : prefetch a URL to improve the performance of navigating to it later
---------------------------------------------------------------------------------------------------------------
Navigating Pages
There are 2 ways to perform page navigation in Next.js :
- Using the "Link" component
- Using the "router.push()" method
1] The Link component
When linking between pages on websites, you use the <a> HTML tag. The <a> tag is just a plain HTML element, with all the default behaviors. When you use it, a full page reload happens.
In Next.js, you use the Link Component from next/link to wrap the <a> tag. <Link> allows you to do client-side navigation to a different page in the application. The Link component is similar to using <a> tags, but instead of <a href="…">, you use <Link href="…"> and put an <a> tag inside.
NOTE : The <Link> component also includes prefetching. This means all pages linked to by any <Link> in the viewport or hovered on are loaded in advance, ready to be displayed when clicked on. Endusers will still navigate without reloading the page, creating the behavior of a Single Page App.
2] The Router.push() method
The router.push() is another way we an transition to different pages. It is mostly used in event listeners. It behaves similarly to window.location. It does not create a <a> tag, which means if you are concern with SEO, your links will not be detected by crawlers.
---------------------------------------------------------------------------------------------------------------
API Routes
In Nextjs, we also have the feature to create Rest API endpoints. Any file inside the folder pages/api is mapped to /api/* and will be treated as an API endpoint instead of a page. They are server-side only bundles and won't increase your client-side bundle size or affect the performance.
Using API routes in Next.js is a way to handle server-side logic and data within a single application, so we dont have to maintain a separate backend server. This can simplify the development process and make it easier to deploy and manage the application. Additionally, Next.js provides built-in support for API routes, making it easy to set them up and use them within your application.
NOTE : The "api" folder also follows the same file-system based routing, so "/api/index.js" will route to "/api" and "api/user/post.js" will route to "/api/user/post".
The API routes are mainly used for Masking the URL of an external service inside our Nextjs project. (e.g. /api/secret instead of https://company.com/secret-url)
Example] In the below example we create a POST endpoint for the users.
Dynamic API Routes
We can also create dynamic API routes similar to dynamic pages as we saw above.
Important
Predefined API routes take precedence over dynamic API routes, and dynamic API routes over catch all API routes. Take a look at the following examples:
---------------------------------------------------------------------------------------------------------------
(Useful : 1] Click)
NextJs CSS Styling
Next.js is opinionated about how to organize your JavaScript code, but it's not opinionated about how you style your components or store the CSS. There are many ways to apply CSS styling in Nextjs, some of them are as followed :
- Global CSS
- Sass
- CSS Modules (default way to style pages)
- CSS-In-JS
- Tailwind CSS
NOTE : There is no strict location to store css files in Nextjs (like for "pages"), but Nextjs do create a "styles" folder by default to store the css files.
NOTE : In Next.Js puts restrictions on importing pure ".css" or global css files freely anywhere (like we can in ReactJs). Instead it encourages us to use local component-level CSS through CSS modules. In Nextjs the only place where we can import pure css ('.css') files is inside the "_app.js" file, if you try to import a .css file inside any page, you'll get an error.
1] Global CSS
The easiest way to write CSS in a Next.js application is through its global stylesheet. Every newly created Next.js project comes with a "styles" folder and inside it, a "global.css" stylesheet.
In order to apply css globally to the entire application (i.e all pages) we create our pure css files and import them inside the "_app.js" file where all the pages get initialized.
Traditionally once you would have written your css files, you needed to specifically import them inside individual HTML or Component files, but in Nextjs we can import all the css files in one place and ensure that all css is applied globally.
NOTE : The "_app.js" is the only place in Nextjs where we can casually import pure css ('.css') files, If you do that inside any other pages you'll get an error.
2] Sass in Nextjs
Next.js also allows styling with SASS with the .sass or .scss extension. Installing Sass is a requirement. Just like global styles, they can only be imported in pages/_app.jssince they are also applied globally like traditional CSS files.
NOTE : All need to do to get started is to install sass, rename your css files or css modules with extension ".scss" and you're ready to use SASS (or SCSS) syntaxes.
3] CSS Modules (Useful : 1] Click)
All selectors in CSS are global variables. As an application scales, working with global variables and managing dependencies becomes increasingly difficult. To avoid problems like name collisions or dead code (unused css) inside our application we can scope our CSS locally to only a specific component.
CSS Modules let you write styles in CSS files but consume them as JavaScript objects for additional processing and safety. One of the main feature of css modules is that they are scoped locally by default so no worries of selector name collisions or affecting other components’ styles.
CSS Modules is not an official specification nor a standard. A CSS module is just like traditional CSS file but is processed differently. It’s a sort of step in CSS/JavaScript building process, which modifies CSS classes. CSS does not have a concept of local scope. However, CSS modules allow for scoping CSS styles to specific components by generating unique class names for the CSS classes. This helps to prevent naming conflicts and ensures that the styles only apply to the intended component.
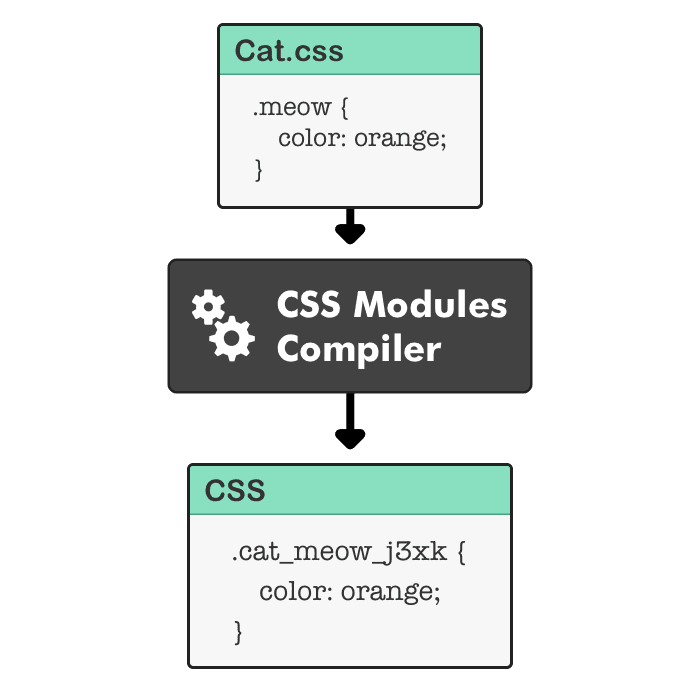
CSS modules use a tool called a CSS preprocessor to convert class names in the CSS file to unique, scoped class names. This is typically done by appending a hash or unique string to the class name. For example, a class named "button" in the CSS file would be converted to something like "button__abc123" in the final, compiled CSS. When the class is applied to an HTML element in the component, the unique, scoped class name is used instead of the original class name.
CSS modules are called "modules" because they allow you to import and use CSS styles in a modular fashion, only where they are needed. This is in contrast to traditional CSS, where styles are defined in a global scope and can affect all elements on the page.
NOTE : CSS Modules is a component-level CSS, that comes built-in with NextJS and can be activated by naming the style files with the .module.css extension. It is also possible to use CSS Modules with SASS/SCSS with the .module.sass or .module.scss extension.
Example] In the below example we use css modules and you can see how css modules automatically generate unique class-names for us and avoid name collisions.
You can also convert the CSS modules to use the Sass just by changing the file name from "file_name.module.css" to "file_name.module.scss".
NOTE : CSS Modules automatically make class names unique so you don’t have to worry about selector name collisions. When using CSS modules each CSS class we define inside our project automatically becomes unique throughout the project.
4] CSS-In-JSS
CSS-in-JS is a pattern for writing styles in JavaScript, rather than in a separate CSS file. This means that instead of having CSS rules defined in a separate file, they are defined and scoped within the component they style.This approach allows for styling to be more closely tied to the component structure, making it easier to understand which styles are being applied to which elements.
During build-time when this JavaScript is parsed, CSS is generated and attached into the DOM. It allows to abstract CSS to the component level itself, using JavaScript to describe styles in a declarative and maintainable way.
Simply put css-in-jsss is a method to write CSS using javascript, this way we can keep the css close to the components and also avoid other problems like name collisions or managing several .css files.
There are 2 common approaches for CSS-In-JSS styling in Nextjs :
- Styled components
- Styled JSX
Styled-Components
Styled-Component is a CSS-in-JS library that allows you to write CSS styles with JavaScript. It allows you to build custom components by writing actual CSS in your JavaScript.
NOTE : It's not built-in with Nextjs and does involve bit setup to get started. The proper steps to setup the Nextjs project to use styled-components is given here.
We basically use the styled() function to create a styled component. The styled() function takes a base element (like div, button or h1) and creates a new component that is based on a provided element, and it allows you to apply CSS styles to that element. The newly created component can then be used like any other component in your application.
Styled-JSX
As easy as writing vanilla CSS, Next-js also has an inbuilt support for styled jsx. It allows you to write CSS using Javascript directly inside your components. Styled JSX is a CSS-in-JS library that allows you to write encapsulated and scoped CSS to your components. The styles you introduce for one component won't affect other components, allowing you to add, change and delete styles without worrying about unintended side effects.
NOTE : Like Global CSS and CSS-Modules, Styled-JSX works with Next.js without any extra setup required.
Next.js includes Styled JSX by default, so getting started is as simple as adding an <style jsx> tag into an existing React element and writing CSS inside it. Basically using Styled JSX is like Internal CSS we used in traditional HTML code. It allows us to write CSS directly inside our JSX code.
NOTE : The css you write using styled-jsx is scoped only to that component and does'nt affect other components even if they have same classnames. Also the <style jsx> element should be placed inside the root element of the component.
5] Tailwind CSS
Tailwind is a popular utility first CSS framework for rapidly building custom User Interfaces. It provides low-level classes, those classes combine to create styles for various components.
NOTE : It's not built-in with Nextjs. Find proper steps to setup tailwind here.
---------------------------------------------------------------------------------------------------------------
Image Optimizations
When developing high performance web application we need to pay special attention to Images since they can decrease the load time of the website. Below is an exaustive list of ways we can optimize our images before serving them :
- Choose the right format - The three most popular image formats are JPEG, PNG, and WebP. Of all three, WebP provides the most superior lossy and lossless image compression.
- Resize images - Serving a huge 1080x800 image for users with 100x100 device sizes leads to unnecessary bandwidth downloading, which can slow down page loads. We can use a tool like Cloudinary to generate multiple image file sizes for different screen sizes.
- Compress images : Use tools such as TinyPNG or Compressor.io to reduce the file size of images without losing quality. Large file sizes should be reduced to a reasonable threshold without sacrificing image quality.
- Use lazy loading : Lazy loading can help to improve the loading speed of your web app by only loading images as they are appear on screen. This can be especially useful for images that are below the fold and not immediately visible to the user.
NextJs Image Component (Useful : 1] Click 2] Click 3] Click)
Next.js provides a built-in Image component which is an extension of the traditional HTML <img> element but with additional capabilities like image optimization, automatically serving images in modern formats, and responsiveness.

Below are some optimization the Image component does out-of-box for us :
- Convert Images to Webp format - When an Image is requested NextJS convert the Image into a more optimal format like ".webp" and then serves it.
- Compresses the Image - NextJS automatically compresses large images and reduces their size without much quality loss to improve the load time of page.
- Automatic Lazy Loading - By default images are lazy loaded which means it only loads images when they come into the view and avoids loading any unrequired images which can slow down the page.
- Automatic Image Resizing - Next.js automatically resizes images based on the screen size of the user, which can reduce image size and improve webpage load time.
- Statically Imported Images - These are imported using the standard JavaScript import statement and are also imported at build time to be included in the final bundle that is served to the client.
- Dynamically Imported Images - These images are imported at runtime and are not included in the initial bundle and can be useful for lazy loading images or for loading images based on user interactions. These all includes URLs to remote images.
NOTE : When dynamically importing images Next.js does not have access to remote files during the build process so we need to manually provide the width and height (in pixel units) props. When importing statically, nextjs automatically calculates the width and height of image at build time and sets the prop values.
blur or empty. Defaults to empty. When value is blur, the blurDataURL property will be used as the placeholder. 
Example] In the below example we apply a placeholder to both statically and dynamically imported images inside the Image component.
NOTE : For statically imported images the blurDataURL is added by NextJS automatically. For dynamically imported images since NextJS does'nt have acess to them at build time it does'nt set the blueDataURL and we need to manually set the blueDataURL prop.
NOTE : When using the Fill property the container's position must be "relative", "fixed" or "absolute". We can set it using traditional CSS.
Static File Serving
Next.js provides a special "public" folder to store and also automatically serve the static assets inside it. Any file inside the directory can be referenced by the base URL () inside your code. All types of static files are supported, such as images, text, pdf, videos etc.
NOTE : When the app is deployed, the NextJs server statically serves all the static files inside the "public" directory. For example, an image named "person.jpg" inside public folder can be acessed at url "localhost:3000/person.jpg".
For example, If you add an image to public/me.png, inside your code you can access it like the following :
NOTE : Don't name the directory anything different. It is the only directory that can be used to serve static files. Also, make sure you don't have a static file with the same name as a file in your directory. This will cause an error.
---------------------------------------------------------------------------------------------------------------
_App.js File
The "_app.js" is a special file inside the "pages" folder generated by NextJS. It contains the App component of the project. The App component in Next.js is a built-in component that is automatically created and used by Next.js to build your application. It acts as a wrapper for every page component in your application.
Every page component in a Next.js application goes through the App component. The App component acts as a wrapper for every page component and is responsible for handling common functionalities or coponents that should be shared across all pages components like Navbars, Titles etc.
Here are some of the common uses of the _app.js file :
- Global Styling: You can use the
_app.jsfile to add global styles to your application. This allows you to apply styles that should be shared across all pages in a single place, making it easier to manage and maintain.
- Authentication and Authorization: The
_app.jsfile can be used to handle authentication and authorization for your application. This allows you to implement a secure system that controls access to certain pages or functionality based on the user's role or permissions.
- Global Libraries and Functionality: You can use the
_app.jsfile to add global functionality to your application, such as setting up a global state, adding event listeners, or importing external libraries.
- Customizing the Document: The _app.js file allows you to customize the
<html>and<body>tags of the Document Object Model (DOM) for your application, which can be useful for adding analytics or tracking scripts, or for implementing custom meta tags.
The _app.js file allows you to centralize the common functionality of your application in a single place, making it easier to manage and maintain, while also providing a way to improve the performance and user experience of your application.
_Document.js File
The "_document.js" is a special file inside the "pages" folder generated by NextJS which allows you to customize the HTML structure of DOM for your entire application. By default, Next.js generates a basic HTML structure for each page component, with _document.js file you can make changes to this structure or certain tags and those changes will be reflected in the final HTML file generated for every page component in your application.
This means that any modifications you make to the <html>, <head>, and <body> tags in the _document.js file will be included in the final HTML file for every page component in your application Here's a list of some default tags inside the _document.js file :
<Html>: This component allows you to set thelangattribute on the<html>tag that gets rendered. You can also add other attributes to the<html>tag.
<Head>: This component allows you to add content to the<head>section of the HTML document. This is where you typically put meta tags, title tags, and links to external resources like stylesheets and favicons.
<Main>: This component is where the content of the current page component is rendered. It renders the child elements of the current page component.
<NextScript>: This component includes the script that is necessary for the client-side functionality of Next.js, such as client-side routing. This script should always be included at the end of the<body>tag, so that it can access the content that has been rendered by the<Main>component.
Example] In the below example we add some new attributes and tags the default HTML structure, these will be reflected on all pages generated by NextJS.
Here is a list of things that the _document.js file can be used for :
- Adding global styles: You can use the
_document.jsfile to include a link to a global stylesheet that will be applied to every page in your application.
- Adding analytics or tracking scripts: You can use the
_document.jsfile to include scripts for tracking tools such as Google Analytics, which will be included on every page of your application.
- Customizing meta tags: You can use the
_document.jsfile to customize the meta tags in the head of the HTML document, such as the<title>tag, which will be included on every page of your application.
- Adding SEO tags: You can use the
_document.jsfile to include SEO tags, such as Open Graph tags, which will be included on every page of your application.
NOTE : The "_app.js" and "_document.js" are both optional files in NextJS, if you dont have one then NextJS will use the default specifications and create one.
---------------------------------------------------------------------------------------------------------------
Next.Config.Js File
The "next.config.file" is a configuration file for the NextJS server that allows us to configure various aspects of the Next.js server, such as setting environment variables, customizing the webpack configuration, and adding plugins. It's a regular Node.js module, not a JSON file, used by the Next.js server and build phases, and it's not included in the browser build.
Below are some of the tasks the "next.config.js" file can be used for in NextJS :
- Setting environment variables : You can use the
next.config.jsfile to define environment variables that can be accessed throughout your application.
- Customizing webpack configuration : You can use the
next.config.jsfile to customize the webpack configuration for your Next.js project. This can be useful for adding custom loaders, plugins, or modifying the default configuration.
- Adding plugins : You can use the
next.config.jsfile to add custom plugins to your Next.js project. These plugins can be used to extend the functionality of the framework or add additional features to your app.
- Configuring routing : You can use the
next.config.jsfile to configure how routing works in your Next.js project. This can be useful for setting up custom routes, redirecting requests, or handling 404 errors.
NOTE : The next.config.js file is optional in a Next.js project. If you don't include it in your project, Next.js will use its default configurations. It is not parsed by Webpack, Babel or TypeScript so we should avoid using new JS features not available in target Node.js version.
JSConfig.Json File
The jsconfig.json file is not specific to NextJS, but is used in Javascript projects to configure the project's file paths. The presence of jsconfig.json file in a directory indicates that the directory is the root of a JavaScript Project.
Below are some commonly used options inside the "jsconfig.json" file :
baseUrl: This option is used to specify the root directory of the project, which acts as the base for resolving absolute imports paths.
paths: This option is used to configure custom path aliases for imports in your JavaScript project, typically used in conjunction withbaseUrlto create short and convenient aliases for frequently used paths in your project.
compilerOptions: This option is used to configure the TypeScript compiler and includes options such astarget,module, andoutDir.
include: This option is used to specify the files and directories that should be included in the project.
exclude: This option is used to specify the files and directories that should be excluded from the project.
jsconfig.json file to resolve the paths, it allows webpack to understand the structure of the project and makes it easier to navigate the project structure.The main point for having a jsconfig.json file in a Next.js project is to configure project paths. The baseUrl and paths options in the jsconfig.json file are used to specify the root directory of the project and create custom path aliases for imports, respectively.
NOTE : When using Typescript with NextJS we have tsconfig.json file instead of a jsconfig.json file, which will be used to configure TypeScript specific options and settings.
Path Aliases
The jsconfig.json file has the "paths" options which we can use to create path aliases which help us map relative/absolute paths to an alias path name. One of the main reasons to use path aliases is when you have a deeply nested file structure, it can make the import paths very long and hard to read.
By creating path aliases, you can shorten the import paths and make them more meaningful and easy to read. Instead of using relative paths like ../../components/Button, you can use the alias ~/components/Button.
Example] Below we define path aliases for different components and import them.
NOTE : The @ character is just a convention that is commonly used to define path aliases, but it can be any string you want.
---------------------------------------------------------------------------------------------------------------
(Useful : 1] Click)
NextJs Data Fetching (Before NextJS 13)
NOTE : By default Next.js pre-renders every page on the server. This means that Next.js generates HTML for each page in advance, instead of having it all done by client-side JavaScript. Pre-rendering can result in better performance and SEO.
Next.js provides two forms of pre-rendering : Static Generation and Server-side Rendering. The difference is in when each generates the HTML for a page.
- Server-side Rendering (SSR) is the pre-rendering method that generates the HTML on each request.
- Static Generation (SSG) is the pre-rendering method that generates the HTML at build time. The pre-rendered HTML is then reused on each request.

NOTE : Next.js lets you choose which pre-rendering form to use for each page. You can create a "hybrid" Next.js app by using SSR for most pages and using SSG for others. Also you can't use both SSR and SSG simultaneously for the same page.
NOTE : For performing SSR we have 2 main functions - getServerProps() and getStaticProps(). Both functions are used to fetch data that is needed to render a page, but they are executed at different times, getStaticProps() is executed only once at build time and getServerProps() is executed on each request.
NOTE : Both getServerSideProps() and getStaticProps() are asynchronous, this allowa the server to fetch data asynchronously while the page is being rendered. This ensures that the server can fetch data from an external API, a database, or perform other tasks without blocking the rendering of the page.
Server-Side Rendering (SSR)
The Next.js framework provides the getServerSideProps() function to perform Server-side rendering for a given page.The getServerSideProps() method helps us fetch data from our data source at request time and then render the HTML using it.
The getServerSideProps() allows us to define a piece of code which gets executed on server at request-time i.e for every request. It is a very efficient way to fetch data and then pass it to the page component as props.
There is no need import the getServerSideProps() method from anywhere, we just simply create and export a function of the same name inside our page and at build-time Next.js will automatically figure out that we need to Server-side render that page.
Example] In the below example we fetch data and then return it, which is then automatically passed as props to the page component.
The getServerSideProps() function takes the "context" object that contains all the information avoid the request. The context also includes the request and response objects which you can use just like in express.js library.
NOTE : Depending on what values the getServerSideProps() method returns, the props and the behaviour of the page will also change.
Example] Below we fetch user data on each request and increment request count.
The only time we must use Server-Side Rendering or getServerSideProps() method is when our data is frequently changing and we want to always show the latest data to the users visiting our page.
NOTE : In production build If you throw an error from inside "getServerSideProps()" then NextJS shows the error page for status code 500 i.e defined at "pages/500.js".
---------------------------------------------------------------------------------------------------------------
Static-Site Generation (SSG)
The cost of using SSR is that it increases the server load since we run an entire Nodejs pocess for each request. If our page is mostly static or if the data does'nt change that often then running SSR on every single request will only increase unnecessary load on the server and a better option would be to use Static-Site Generation (SSG) to pre-render the entire page at build time and then serving the same rendered-page for every request rather than generating and rendering the same HTML again.
The Next.js framework provides the getStaticProps() function to perform Static-Site Generation for a given page. The getStaticProps() method is executed only once at build-time i.e when you run "npm run build" to build for production and the statically generated page will be cached on the server to be served for subsequent requests.
The getStaticProps() is kind of similar to the getServerSideProps() , but it's executed only once during build-time rather than for every request. There is no req and res objects inside the Context argument for getStaticProps, because the pages are generated at build time, not at runtime. And at build time, there is no user http request to handle.
Example] In the below example if we run the code in production mode, then the getStaticProps() method is executed once during the build and increases the request_number , but on subsequent requests the request_number does'nt change.
NOTE : In development (npm run dev) the getStaticProps() will be called on every request. But in production (npm run start) it won't be called since a pre-rendered cached page will be served.
Cons of Static-Site Generation (SSG) are as follows :
- The Build-time of the app is proportional to the number of static pages. For a big application containing 1000's of static pages it'll take hours to just build the app for production.
- A page, once generated can contain stale or outdated data until you rebuild your entire application again.
In SSR, the server receives a request for a specific page and then uses a module bundler (such as Webpack) to bundle the JavaScript and other assets for that page, before rendering the HTML and sending it to the client. This process is repeated for each request, which can increase the server load and response time.
Example] Below we fetch user data only once and increment request count once during the build time, after that the same page is sent on every request.
In SSG, the application is pre-bundled, the process of bundling the application code and assets in to a single javascript bundle and this bundle is stored on server. The bundling process is only done once, during the build process, and the same bundle is then served to the client for each request. This can result in faster load times and lower server load, but can make it more difficult to handle dynamic content since the content is static. SSG is generally used for static websites or sites that doesn’t require real-time data or user-specific data.
Dynamic Routes with SSG
For a page with static route it's very simple to perform SSG, there's a single page with a defined route ,all we need to do is used the getStaticProps() method. But a dynamic route is adaptable and can represent almost any number of paths, so it's not as easy as using the getStaticProps() to apply SSG on a page with dynamic routing.
As discussed above, a dynamic route is adaptable so it's just not possible to generate the pages for all the paths created by a dynamic route during build-time, so we need to limit the number of paths for which to generate the pages with SSG. To apply SSG on a dynamic route we need to define a list of path parameters for which to generate and pre-render the pages on the server during build-time. The NextJs provides the "getStaticPaths()" which can be used with getStaticProps() to define such a list of path parameters.
If a page has Dynamic Routes and uses getStaticProps(), it needs to define a list of paths to be statically generated. When you export getStaticPaths() from a page that uses dynamic routes, Next.js will statically pre-render all the paths specified by getStaticPaths() during the build-time and cache them.
Example] In the below example we define 2 paths inside the getStaticPaths(), so during build-time NextJs will make sure to generate them during build-time just like any regular route in SSG.
NOTE : The "fallback" prop decides what happens when a request is made to path which is not defined inside the getStaticPaths(). If False, it'll show a 404 page. If True, NextJs will pre-render the page on the server, serve it and also cache it for subsequent requests.
This is useful when we want to optimize for some pages but also be open to pre-render other pages on demand. For example, an ecommerce website can decide to pre-render only the top 100 products, but also not limit other product paths.
---------------------------------------------------------------------------------------------------------------
Incremental Static Regeneration (ISR)
Incremental Static Regeneration, or ISR, seeks to extend the power of static sites by adding some server-side rendering (SSR) goodies on top. ISR is a newly released feature that allows the regeneration of static pages during runtime. It’s a hybrid solution of SSG and SSR.
In Static-Site Generation (SSG) , we just build the static pages once, cache it and then serve the same built pages for subsequent request. This might be ideal for some cases where the page is completly static and data never changes (Eg - About US page), but there might we cases where we may need to update or change the pages.
In ISR, the web application is initially rendered on the server using SSR and then the rendered HTML is cached on the server as a static HTML file. The bundling of the application code and assets is done by module bundler at specific intervals, rather than on each request like in SSR. This allows the application to have good SEO and fast load times for the initial request, while also reducing the server load and response time for subsequent requests by serving the cached HTML file.
For example, the web application is bundled every hour, or whenever a change is made to the codebase. This way, the application is updated with the latest changes and the users can have the latest version of the application, without the need to re-bundle the application for each request.
For example, if you are fetching some data using some API inside the getStaticProps() and generating the static page. The data will only be fetched once which is during build-time when the getStaticProps() gets executed once, and then the cached version of the page is served. Now even if the data is updated in the API backend, as the NextJs app will be serving the cached version of the page. So to update or change the static page, we would have to rebuild our entire app again so that getStaticProps() i executed again and caches the latest page.
The task of rebuilding the entire application again and again is tidious and time consuming,so NextJs provides the feature of Incremental-Static Regeneration (ISR) which automates the task of rebuilding the app and executing the getStaticProps() at runtime after a given interval of time, so that our static pages always show the latest data, yet dont overload the server like SSR.
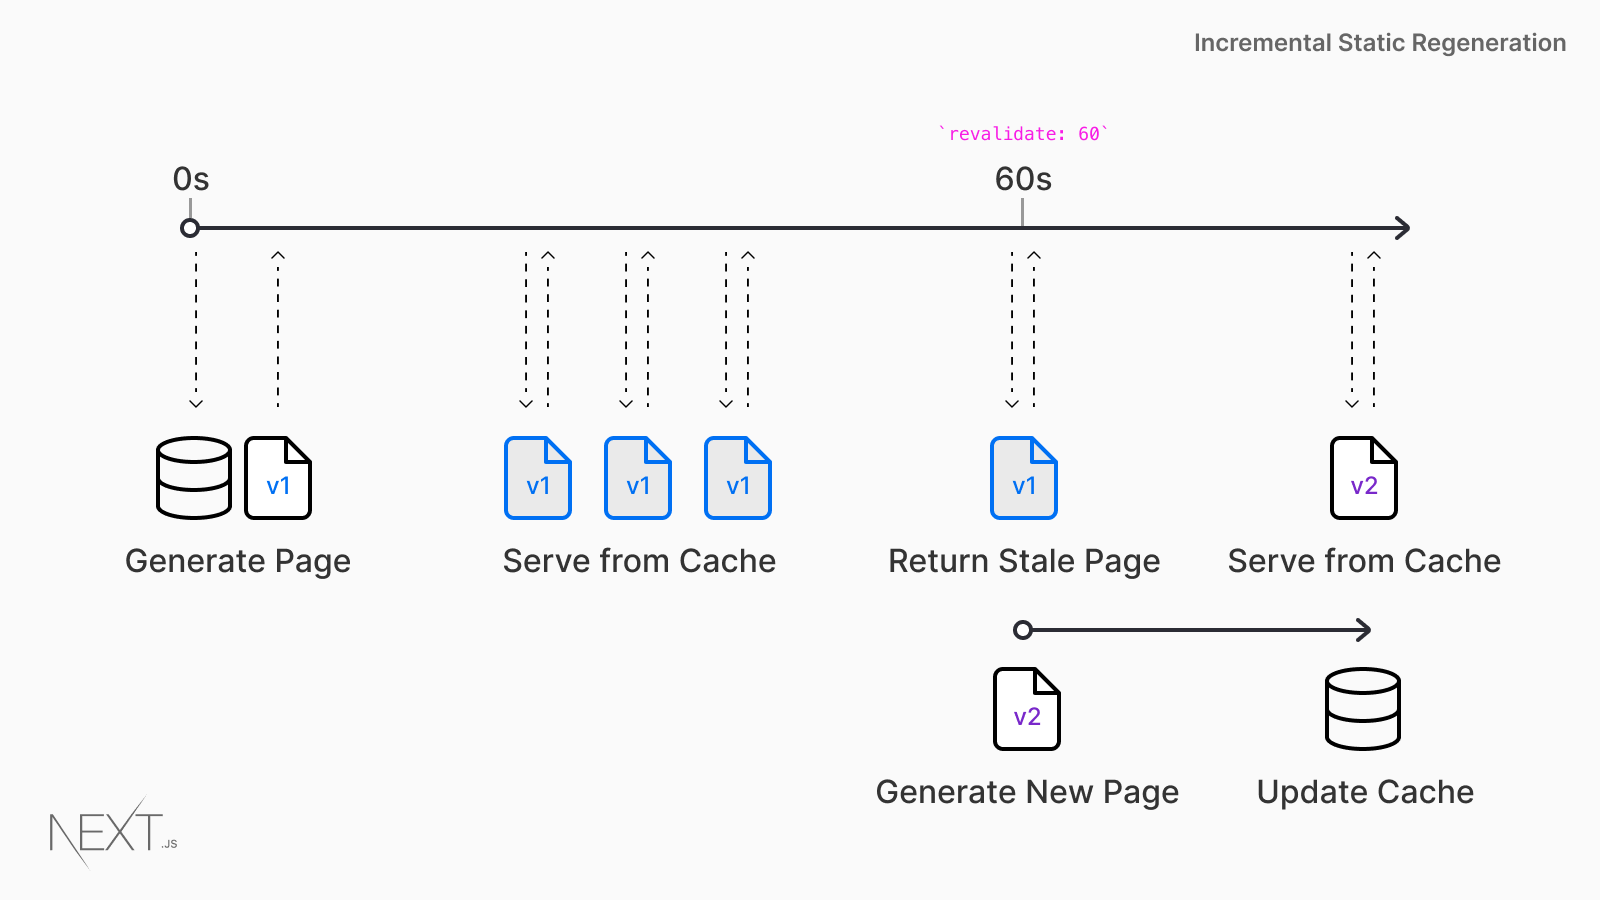
NOTE : To use ISR in NextJs is very easy, just return the "revalidate" prop from the getStaticProps() method. The "revalidate" prop takes an Integer value which represents the time interval (secs) in which to rebuild the static page during runtime.
Example] In the below example we force the request.js page to be rebuild and cached every 10 secs, which means that the getStaticProps() is also executed every 10 secs.
NOTE : If the time interval value of "revalidate" is too short then it's not different then using Server-Side Rendering.
ISR Revalidate Prop
As we discussed above that to use ISR in NextJs is very easy, just return the "revalidate" prop from the getStaticProps() method, which represents the time interval (secs) in which to rebuild the static page during runtime. But the way the revalidate prop caculates its time intervals is a bit different than a traditional timer.
There is no timer that's running in the background to trigger the rebuild, but rather the rebuild triggers are based on timestamps. For every request that comes to the ISR marked page, NextJs will revalidate or check if the revalidate interval time has passed, if yes then it triggers the rebuild.
So If revalidate=10, then even if 10 secs are passed the rebuild is not triggered if there is no request to the page. Only when a request is made to the page, then NextJs will check the timestamp and see if revalidation time interval has passed.
Example] Below we rebuild the page after every 15 secs and fetch user data and increment the request count. The first request after 15 secs triggers the rebuild.
Below is the flow of events when you set revalidate=10 when using ISR :
- Any requests to the page after the initial request and before 10 seconds are also cached and instantaneous.
- After the 10-second window, the next request will still show the cached (stale) page. Basically the 1st request after the interval, triggers rebuild process.
- Next.js triggers a regeneration of the page in the background.
- Once the page generates successfully, Next.js will invalidate the cache and show the updated page to later requests. If the background regeneration fails, the old page would still be unaltered.
NOTE : So if revalidate=N secs, then the first request after N secs will also see the same stale/old cached page, since the rebuild takes time.
---------------------------------------------------------------------------------------------------------------
getInitialProps() Method
The getInitialProps() method is a predecessor of getServerSideProps() method. It was used to perform server-side rendering and would execute on both client-side and server-side. The getInitialProps() method is executed on the server during the initial request for a page and then on the client during subsequent requests for that same page.
For the initial page load, getInitialProps() will run on the server only, after that it'll then run on the client when navigating to a different route via the next/link component or by using next/router.
NOTE : Basically when we request the route it'll execute the getInitialProps() on server, whereas if we navigate to it from client-side it'll be executed on client.
Example] Below is an example where the getInitialProps() is executed for every request on the server and works similar to the getServerSideProps() method.
Example] In the below example, inside our browser if we directly request "/" or "/users" the getInitialProps() is executed on server, whereas if we navigate to other page through the <Link> component, it is executed on the client-side browser.
NOTE : The getInitialProps() is considered deprecated and is scheduled for removal in a future version of Next.js. The recommended method for fetching data in Next.js is now either getServerSideProps() or getStaticProps(), depending on the use case.
---------------------------------------------------------------------------------------------------------------
Automatic Static Optimization
In Next.js, based on our configuration, each page can be one of the following :
- SSR Page - These pages are rendered on every request and contains method like getServerSideProps() inside it.
- Static Page - These pages are rendered only once during the build time and remain the same for every request. It contains getStaticProps() inside it. It could also include Revalidation to re-render the page after a specific time interval.
- SSG Page - These are basically static pages which are automatically generated and rendered once at build time based on some given URL parameters. They contain getStaticPaths() and getStaticProps() to fetch the data required to generate the page. These are commonly used to generate static pages for dynamic routes based on URL params.
NOTE : Both SSG and Static pages are rendered and saved at build time, the same page is then served on every request, but we can also add revalidation to re-render them at specific intervals. In summary, In Next.js a page can be either Dynamic (rendered per request) or Static (rendered once at build time or after intervals at runtime).
Automatic Static Optimizationis a default feature in Next.js that pre-render pages as static pages at build time. This can improve the initial loading performance of a website, as the browser can display the static HTML without having to wait for JavaScript to be executed. Simply create your Next.js pages, and if they don't use any data-fetching methods (or use getStaticProps() with/without revalidation), they will be pre-rendered as static pages at build time.
If a Next.js page does not use any data-fetching methods, such as getStaticProps, getServerSideProps, or getInitialProps, Next.js will automatically pre-render the page as static HTML at build time. This can improve the performance of the page, as the browser can display the static HTML without having to wait for JavaScript to be executed.
NOTE : When Next.js pre-renders a page as static HTML at build time, it generates an HTML file for that page and saves it in the '.next/static/' directory of your build folder. When a user requests the page, the server can serve this pre-generated HTML file directly, without having to go through the process of rendering the page on the server or waiting for the client to execute JavaScript and render the page. This can result in faster page load times and a better overall user experience.
NOTE : This behaviour also remains same even in Next.js 13. By default every page in Next.js 13 is a static page unless we opt-out of this behaviour by using things like the "no-store" option or set "revalidate=0" to render on each request.
---------------------------------------------------------------------------------------------------------------
Client-side data fetching with SWR (Useful : 1] Click)
SWR (Stale-While-Revalidate) is a data-fetching library for React by vercel that allows you to fetch and cache data on the client side. The library provides a convenient and efficient way to handle client-side data fetching in React applications, including Next.js applications. It is the recommended way to perform client-side data fetching inside the NextJS application.
NOTE : The useSWR() hook is not meant to replace Axios or Fetch() API, rather it is to be used with them to add additional features like caching and re-fetching.
Below are some features provided by SWR when used in NextJS applications:
- Caching : SWR caches the response of a successful data fetch in memory, serving it on subsequent renders.
- Revalidation : When the data is stale, SWR sends a new request to the server to revalidate the data and updates the cache with the new response.
- Focus Tracking : SWR tracks the focus state of the component and revalidates the data when the component is in focus, providing a better user experience.
- Refetching on Intervals : SWR can be configured to automatically refetch data at specific intervals, allowing you to easily implement live updates to your UI.
Example] Below is how we typically handle data fetching in our React application.
Example] Below is how we do it with SWR. We wrap our request logic inside the useSWR() and it returns data along with the current loading state & error if any.
NOTE : We can use the "refreshInterval" option to perform auto-fetching and updating the data after every specific interval of time.
Auto-Revalidation
This is a major feature provided by the SWR library when used for data fetching. It is a feature where SWR automatically revalidates or refetches the data everytime we re-focus the page or change tabs etc. This can be useful to immediately synchronize to the latest state without much hassle.
The useSWR() hook provides multiple options like "revalidateOnFocus", "revalidateOnConnect", "revalidateOnMount" etc to control when the data is revalidated (requests are re-executed).
NOTE : The auto-revalidation is enabled by default, but we can disable it too.
Example] Below we fetch a random number from our express sever. Everytime we change tabs or re-focus on our tab, the SWR re-executes the requests and updated the latest data on the UI.
Auto-Refetching with Intervals
The auto-refetching feature in SWR allows the data to be automatically refetched at a specified interval, ensuring that the data stays up to date without manual intervention. This feature can be enabled by passing the "refreshInterval" option to the SWR hook. It is useful when building realtime user interfaces like Stock market dashboard.
NOTE : We refetch or revalidate the requests at specific intervals rather than just when tabs changes or when page is focused.
Example] In the below example, SWR automatically refetches the data and updates the UI every 5 secs without any manually intervention.
---------------------------------------------------------------------------------------------------------------
Google Web Fonts
Web fonts are fonts especially created for websites. They're usually on a web server. This means web fonts are requested by the browser while rendering the web page, delivered to the browser over the internet., and then applied to the text. Google Fonts is a library of free, open-source web fonts that can be used on websites.
It's one of the largest and most popular sources of web fonts on the internet, with hundreds of fonts available to choose from. You can easily integrate Google Fonts into your website by adding a <link> tag to your HTML code that references the Google Fonts stylesheet.
While the browser is fetching the font file, it may display a fallback font in its place. The fallback font is a font that the browser uses to display text on the page until the web font has been fully downloaded and applied. We can specify a fallback font in your CSS styles using the font-family property. The font-family property defines the font that should be used to render text on a web page.
Example] In the below example we apply google font to out NextJS page.
While the web font is being fetched the fallback font is applied to the text, when web fonts are loaded, they may cause the layout of a page to change as the text is re-rendered using the new font. This can cause elements to shift or resize, leading to a CLS. This can be especially noticeable when the web font is larger or smaller than the fallback font that was used to render the text initially.
Web fonts can cause a cumulative layout shift (CLS) when swapping fonts. CLS occurs when the layout of a page changes dynamically after the page has loaded, causing elements to move or resize unexpectedly. This can create a poor user experience, especially if the change is noticeable or affects the layout in a significant way. To minimize the impact of CLS caused by web fonts, there are several strategies you can use, including :
- Using the
font-displayproperty to specify how the font should be displayed while it is loading.
- Using the
rel="preconnect"attribute to preload the font file, so that it is available more quickly when the browser needs it.
- Specifying a fallback font that is similar in size to the web font, so that the layout changes as little as possible when the font is swapped.
Font Optimization
One disadvantage of using custom fonts (like Google Fonts or TypeKit) is the fact that our browser needs to do an extra HTTP request to get them. This means that while the custom font is not loaded we will get the fallback front, and when the fonts are replaced we will see a CLS - Cumulative Layout Shift.
Next.js 13 introduced the @next/font package which allows for optimized self-hosting for any font file. It automatically optimizes your fonts and removes need for external network requests for improved privacy and performance. In addition, it generates fallback fonts with best-practices values for font-display, size-adjust (and more) to achieve zero layout shift as your app loads.
Example] Below we import and apply fonts without adding CDN links to the app.
NOTE : Rather than using CDN links to fetch font files, we directly import any google fonts from the '@next/font' package and self-host it on our server. So rather than fetching the font files from google's CDN, the browser fetches the files from our own server which can be faster than loading the fonts from a font provider's server. So when using this method no extra network request is made to the google server.
---------------------------------------------------------------------------------------------------------------
Environment Variables
Environment variables are values that can be passed to the application runtime, providing dynamic configuration options. They are used to store sensitive information such as API keys, database passwords, etc. so that they don't need to be hardcoded in the application code.
In NextJS we can define our environment variables inside the ".env.local" file which is a special file that NextJS looks for at build time. If ".env.local" file is present at the root of the project, NextJS loads all the variables defined inside it into the "process.env" variable. This loads them into Node.js environment automatically allowing us to use them in data fetching methods and API routes.
Example] Below we load our environment variables into server and acess them.
NOTE : By default environment variables are only available / accessable on the server in the Node.js environment, meaning they won't be exposed to the browser. In order to expose a variable to the browser/ client-side you have to prefix the variables with "NEXT_PUBLIC_".
Example] In the below example we make our environment variables accessable on both client-side and server-side.
---------------------------------------------------------------------------------------------------------------
Static HTML Export
The "Static HTML Export" is a feature in NextJS which allows us to generate a fully static version of our application. This version can be hosted on various static hosting platforms, such as CDNs, GitHub Pages, AWS S3, or Firebase. The static HTML export includes all HTML, JavaScript, and other assets required to run the web application. There are several benefits to using static HTML export in Next.js, including:
- Improved performance: Static HTML exports load faster and are more performant compared to dynamic web applications that require server-side processing.
- Better scalability: Static HTML exports can be easily hosted on a CDN or other static hosting platform, allowing for better scalability and handling of high traffic.
- Reduced server costs: With a static HTML export, there's no need for a Node.js server, so you can save on server costs and avoid the overhead associated with running a server.
- Improved security: Static HTML exports have a smaller attack surface and are less vulnerable to security threats compared to dynamic web applications.
- Simplified deployment: Static HTML exports are easy to deploy and can be hosted on a variety of platforms, including GitHub Pages, AWS S3, or Firebase.
- Improved user experience: Faster page load times and improved performance can lead to a better user experience for visitors to your web application.
- Better SEO: Static HTML exports can be optimized for search engines, improving your web application's SEO and visibility on search engines like Google.
next export' command, which generates a 'out' folder containing the static assets for the web application. Because 'next export' and 'next build' are so closely linked, a common approach to handling the generation of static HTML in a Next.js application is to amend the build command inside the package.json file. NOTE : Not all Next.js features are supported in the static HTML export. Some Next.js features, such as server-side rendering and dynamic data fetching, require a Node.js server to function properly. In a static HTML export, these features will not be available and must be reimplemented using client-side JavaScript.
---------------------------------------------------------------------------------------------------------------
Dynamic Imports
Dynamic imports in Next.js refer to the ability to load a module or component only when it is needed, rather than loading all components at once when the page is loaded. This helps improve the performance of Next.js applications by reducing the amount of code and data that needs to be loaded, and by allowing components to be loaded lazily on demand.
Below are some advantages of dynamic imports in Next.js :
- Code splitting : Reduces code and improves performance
- Lazy loading : Improves performance by loading only what's needed
- Maintainability : Makes code easier to maintain and update
Below are some disadvantages of dynamic imports in Next.js :
- Network requests : Can increase loading time and data transfer
- Complexity : Adds complexity to code and requires management
- Compatibility : May not be compatible with older browsers or devices
- Bundle file per request : Each dynamic import creates a new bundle file
- Server requests : Adds a new server request for each import.
Dynamic imports are created using the dynamic() function from the next/dynamic module, and they can be used to fetch and load components, libraries, or other assets dynamically at runtime. The dynamic() is an extension of React.lazy() and Suspense components from React.
When a component is dynamically imported, the browser makes a new request for the component's code, which will be downloaded and processed by browser. This additional network request can increase the amount of time it takes for the component to load and become available, but it also allows you to only load the components that are needed, which can improve the performance of your Next.js application. This is perfect when we want to display heavy components only when needed and are automatically loaded when they are needed to be rendered on the screen.
Example] In the below example we dynamically import the header. When we click the button, the browser makes an additional request to fetch the component and displays the loading component while its being fetched.
---------------------------------------------------------------------------------------------------------------


Comments
Post a Comment