Java Notes 2026 - Part 1 (Foundations OOP + Collection Framework)
IMPORTANT NOTES
- Java is a Purely Object Oriented Programming language.
- Every line of code that runs in Java must be inside a
class.
- Remember that every Java program has a
classname which must match the filename, and that every program must contain themain()method.
- A single java file can contain only a single Public class because it enforces better code readability and faster compilation.
- The main() method is the starting point a string array is to be passed to the main() as a parameter by default.
- Since Java is purely Object oriented , everything is structured in an "Inheritence" way. Object class is the Highest Parent class & everything else inherits from it.
- Each code statement must end with a semicolon.
Java source files have an extension of ".java" and the compiled bytecode files have an extension of ".class". To execute an java program we first compile them to bytecode and then execute that compiled code.
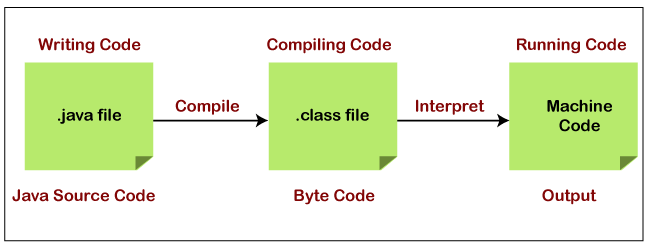
Bytecode is different from Machine code. Machine code is the low-level language that computers understand directly and is specific to the hardware architecture of the computer, and different CPUs require different machine code instructions. The extension of bytecode files is ".class". When a Java source code file is compiled, it is converted into bytecode and saved in a file with the .class extension. The bytecode file contains instructions that can be executed by JVM.
Bytecode is an intermediate language that is used by the JVM. The JVM converts Java code into bytecode, which is a platform-independent format that can be executed on any device that has a JVM installed. Bytecode is not specific to any hardware architecture and is optimized for interpretation by the JVM.
NOTE : Java generates a single '.class' file for each public class, and the name of the '.class' file corresponds to the name of the public class. By convention, Java allows only one public class per file, and the name of the file must match the name of the public class. If multiple public classes were allowed in a single file, it would be difficult to determine which '.class' file corresponds to which class. This convention also helps to reinforce the principle of encapsulation by ensuring that only one class is visible to the outside world, while any supporting classes or interfaces can be hidden from view.
---------------------------------------------------------------------------------------------------------------
History of Java
Java is one of the most popular programming languages worldwide. It was created by James Gosling and Patrick Naughton, employees of Sun Microsystems, with support from Bill Joy, co-founder of Sun Microsystems. Sun officially presented the Java language at SunWorld on May 23, 1995. Then, in 2009, the Oracle company bought the Sun company, which explains why the language now belongs to Oracle. It was initiated to develop a language for digital devices such as set-top boxes, televisions, etc. However, it became best suited for internet programming. Later, Java technology was incorporated by Netscape.
Java combines the power of compiled languages with the flexibility of interpreted languages. The compiler (javac) compiles the source code into bytecode, then the Virtual Machine (JVM) executes this bytecode by transforming it into machine-readable code. The two-step compilation process is what lies behind Java's most significant feature: platform independence, which allows for portability. Java can run on any device with a JVM, making it portable. JVM acts as a bridge between Java and the host system.
Being platform-independent means a program compiled on one machine can be executed on any other machine, regardless of the OS, as long as there is a JVM installed. The portability feature refers to the ability to run a program on different machines. In fact, the same code will run identically on different platforms, regardless of hardware compatibility or operating systems, with no changes such as recompilation or tweaks to the source code.
---------------------------------------------------------------------------------------------------------------
Data Types
A data type, in programming, is a classification that specifies which type of value a variable has and what type of mathematical operations can be applied to it. In Java the data types are divided into 2 groups :
- Primitive Data Types
- Non-Primitive Data Types

Primitive Types
A primitive data types are a set of basic data types from which all other data types are constructed. A primitive type is predefined by the language and is named by a reserved keyword. They have a fixed size in memory and are represented by a reserved keyword, such as int, float, double, boolean, etc. Primitive types are used to represent basic values such as integers, floating-point numbers, characters, and boolean values. Java provides 8 primitive data types which are as followed :

 public class Main{
     public static void main(String[] args) {

         // Primitive Data Types
         byte myByte = 120;
         short myShort = 100;
         int myNum = 5;
         long numStars = 1100000011;
         double myDouble = 1.033;
         float myFloatNum = (float) 1.0333;
         char myLetter = 'D';
         boolean myBool = true;

     }
 }
NOTE : Avoid using larger data types when that much range is not needed.
Non-Primitive Types
Unlike primitive data types, these are not predefined. These are user-defined data types created by programmers. The size of non-primitive data types is typically determined by the amount of memory that is allocated for them. This memory can be dynamically allocated and deallocated during runtime, as needed.These data types are used to store multiple values. There are 5 types of non-primitive data types in Java, as followed :
- Class
- Object
- Strings
- Array
- Interface
Command-Line Arguments
The args string array parameter in the main() method in Java is used to pass command-line arguments to a Java program. When a Java program is started from the command line, any additional arguments that are passed after the name of the program are captured as a string array and passed to the main() method as the args parameter.
 public class Main {
    public static void main(String[] args) {
        int num1 = Integer.parseInt(args[0]);
        int num2 = Integer.parseInt(args[1]);
        int sum = num1 + num2;
        System.out.println("The sum of " + num1 + " and " + num2 + " is " + sum);
    }
 }

 // Javac Main.java
 // Java Main.class 111 222
 // Output : The sum of 111 and 222 is 333
---------------------------------------------------------------------------------------------------------------
Variables
These are containers for storing data values. Below are some common types of variables. In Java, you need to declare your variable before using it in the code.
 // Syntax :
 // type variable = value;

 int myNum = 5;
 float myFloatNum = 5.99f;
 char myLetter = 'D';
 boolean myBool = true;
 String myText = "Hello";
 final String myConstant = "Hi";
NOTE : The "type" of the variable can also be a parent type of the value.
Type Casting
The process of converting the value of one data type to another data type is known as typecasting. In Java there are 2 main types of casting :
- Widening Casting - It is a type of implicit casting that converts a narrower data type to a wider data type. For example, converting an int value to a long value is widening because long can hold a wider range of values than int.
- Narrow Casting - It is a type of explicit casting that converts a wider data type to a narrower data type. For example, converting a long value to an int value is a narrowing conversion because int can hold a smaller range of values than long.
Widening / Implicit Casting
In Widening Type Casting, Java automatically converts one data type to another data type. In this the lower data type (having smaller size) is converted into the higher data type (having larger size). Hence there is no loss in data. This is why this type of conversion happens automatically.
There are 2 main conditions to perform Implicit type conversion as followed :
- The data types of the two variables are compatible.
- The destination data type is wider than the source data type.
 // byte < short < char < int < long < float < double

 public class Main {

    public static void main(String[] args) {

        // Example 1: Widening from int to long
        int intValue = 100;
        long longValue = intValue;
        System.out.println(longValue); // output: 100

        // Example 2: Widening from short to int
        short shortValue = 50;
        int intValue2 = shortValue;
        System.out.println(intValue2); // output: 50

        // Example 3: Widening from byte to float
        byte byteValue = 10;
        float floatValue = byteValue;
        System.out.println(floatValue); // output: 10.0
    }
 }
NOTE : If the data type are not compatible and the destination data type is narrower than the source data type we need to use explicit casting.
Narrowing / Explicit Casting
In Narrowing Type Casting, we manually convert one data type into another using the parenthesis. In Narrowing Type Casting, the higher data types (having larger size) are converted into lower data types (having smaller size). Hence there is the loss of data. Widening casting happens automatically and does not require the use of the cast operator.
 // double > float > long > int > char > short > byte

 public class Main {

    public static void main(String[] args) {

        // Example 1: Narrowing from double to int
        double doubleValue = 10.8;
        int intValue = (int) doubleValue;
        System.out.println(intValue); // output: 10 (data loss occurred)

        // Example 2: Narrowing from long to short
        long longValue = 123456789L;
        short shortValue = (short) longValue;
        System.out.println(shortValue); // output:  -13035 (data loss occurred)

        // Example 3: Narrowing from float to byte
        float floatValue = 150.1234567f;
        byte byteValue = (byte) floatValue;
        System.out.println(byteValue); // output: -106 (data loss occurred)

    }
 }
NOTE : Widening casting is done automatically when passing a smaller size type to a larger size type. Narrowing casting must be done manually by placing the type in parentheses in front of the value.
Pre and Post Increment/Decrement
In Java, pre-increment and pre-decrement operators increment or decrement a variable before its value is used in an expression, while post-increment and post-decrement operators increment or decrement a variable after its value is used in an expression.
- Pre-increment/decrement (++variable, --variable) : Pre-increment/decrement operators increment/decrement the value of the variable by 1 before using the value. This means that the incremented/decremented value will be used in the current expression or statement.
- Post-increment/decrement (variable++, variable--) : Post-increment/decrement operators increment/decrement the value of the variable by 1 after using the value. This means that the original value of the variable will be used in the current expression or statement.
public class Main {
public static void main(String[] args) {
int a = 5;
int b = ++a; // pre-increment: increment a and then assign it to b
System.out.println(a); // output: 6
System.out.println(b); // output: 6
int c = 10;
int d = --c; // pre-decrement: decrement c and then assign it to d
System.out.println(c); // output: 9
System.out.println(d); // output: 9
int x = 5;
int y = x++; // post-increment: assign x to y and then increment x
System.out.println(x); // output: 6
System.out.println(y); // output: 5
int p = 10;
int q = p--; // post-decrement: assign p to q and then decrement p
System.out.println(p); // output: 9
System.out.println(q); // output: 10
}
}
---------------------------------------------------------------------------------------------------------------
Java Input & Output
In Java, we have the following 2 main functions to display the output to console :
- System.out.print() - It prints string inside the quotes.
- System.out.println() - It prints string inside the quotes similar like
print()method. Then the cursor moves to the beginning of the next line.
  System.out.print("Hello World !");
  System.out.println("A New Line !");
Java provides different ways to get input from the user. However , mostly we use the object of Scanner class.
 import java.util.Scanner;

 public class Home {
    public static void main(String[] args) {

        System.out.println("Enter your name : ");
        Scanner input = new Scanner(System.in);
        String userinput = input.next();

        System.out.print("Welcome , "+userinput);

    }
 }
 import java.util.Scanner;

 public class Main {
    public static void main(String[] args) {

        Scanner scanner = new Scanner(System.in);

        System.out.println("Enter your username : ");
        String username = scanner.next();
        System.out.println("Hello "+username);

        System.out.println("Please enter your contact : ");
        int phone = scanner.nextInt();
        System.out.println("Your Phone is "+phone);

    }
 }
---------------------------------------------------------------------------------------------------------------
Conditional Statements
1] If...else If...else
 public class Home {

     public static void main(String[] args) {

         int num1=10;
         int num2=20;

         if (num1>num2){
             System.out.println("num1 greater than num2");
         }else if (num1<num2){
             System.out.println("num2 is greater than num1");
         }else{
             System.out.println("Both are equal");
         }
     }
 }
2] Short Hand If...Else (Ternary Operator)
 // Syntax
 // variable = (condition) ? expressionTrue :  expressionFalse;

 int num1=10;
 int num2=20;

 String result= (num1>num2)? "num1 greater than num2" : "num2 greater than num1 ";
 System.out.println(result);
3] Switch Statement
case. If there is a match, the associated block of code is executed. When Java reaches a break keyword, it breaks out of the switch block. The default keyword specifies some code to run if there is no case match:
 public class Home {
    public static void main(String[] args) {

        switch (10){
            case 1:
                System.out.println("Value is 1");
                break;
            case 10:
                System.out.println("Value is 10");
                break;
            case 100:
                System.out.println("Value is 100");
                break;
            default:
                System.out.println("Value Not Found");
        }
    }
 }
 public class Home {
    public static void main(String[] args) {

 //  This is a new "Enhanced Switch"
        switch (10) {
            case 1 -> System.out.println("Value is 1");
            case 10 -> System.out.println("Value is 10");
            case 100 -> System.out.println("Value is 100");
            default -> System.out.println("Value Not Found");
        }
    }
 }
---------------------------------------------------------------------------------------------------------------
Loops in Java
In Java, loops are used to execute a set of statements repeatedly until a certain condition is met.
1] While Loop
 public class Home {
    public static void main(String[] args) {

        int x=0;
        while (x<10){
         System.out.println("X : " + x);
         x++;
        }
    }
 }
When you know exactly how many times you want to loop through a block of code, use the for loop instead of a while loop.
2] For Loop
/*
for (statement 1; statement 2; statement 3) {
  // code block to be executed
 }

- Statement 1 is executed (one time) before the execution of the code block.
- Statement 2 defines the condition for executing the code block.
- Statement 3 is executed (every time) after the code block has been executed.
 */

 public class Home {
    public static void main(String[] args) {
        for (int i = 0; i < 5; i++) {
            System.out.println(i);
        }
    }
 }
3] Enhanced For Loop
 import java.util.ArrayList;

 class Linkedlist{

    public static void main(String[] args) {

        ArrayList<Integer> scores = new ArrayList<>();
        scores.add(10);
        scores.add(11);
        scores.add(13);
        scores.add(15);

        // Enhanced For Loop
        for (Integer score : scores) {
            System.out.println(score);
        }
    }
 }
NOTE : A for loop is typically used when you know the number of iterations in advance, and you want to iterate over a sequence of values. A while loop, on the other hand, is typically used when you don't know how many times you need to iterate in advance, or when you want to iterate until a certain condition is met.
Break statement
In Java, the 'break' statement is used to exit a loop or a switch statement. When encountered inside a loop or a switch statement, the 'break' statement causes the program to immediately exit the loop or the switch statement and continue execution at the next statement following the loop or the switch statement.
public class Main {
    public static void main(String[] args) {

        int i = 1;
        while (i <= 5) {
            System.out.println(i);
            if (i == 3) {
                break;
            }
            i++;
        }

        //--------------------------------------

        int[] numbers = {1, 2, 3, 4, 5};
        int searchValue = 3;
        int index = -1;

        for (int i = 0; i < numbers.length; i++) {
            if (numbers[i] == searchValue) {
                index = i;
                break; // Exit the loop if the search value is found
            }
        }

        //--------------------------------------

        int day = 3;
        switch (day) {
            case 1:
                System.out.println("Monday");
                break;
            case 2:
                System.out.println("Tuesday");
                break;
            case 3:
                System.out.println("Wednesday");
                break;
            default:
                System.out.println("Invalid day");
        }

    }
 }
Continue statement
In Java, the 'continue' statement is used inside a loop to skip the current iteration of the loop and move to the next iteration. When the continue statement is encountered inside a loop, the program skips the remaining statements in the current iteration and moves to the next iteration of the loop.
public class Main {
    public static void main(String[] args) {

        for (int i = 1; i <= 5; i++) {
            if (i == 3) { // Skip number 3
                continue;
            }
            System.out.println(i);
        }

        //--------------------------------------

        int i = 1;
        while (i <= 10) {
            if (i % 2 != 0) {
                // Skip odd numbers
                i++;
                continue;
            }
            System.out.println(i);
            i++;
        }
    }
 }
Exit() Method
In Java, the System.exit() method is used to terminate the currently running Java Virtual Machine (JVM) and stop the program execution. When the System.exit() method is called, the program stops running immediately and any remaining code in the program is not executed.
The System.exit() method takes an integer argument, which represents the exit status code. The exit status code is a numerical value that can be used to indicate the reason for the program termination. A non-zero exit status code usually indicates that the program terminated abnormally due to an error.
 public class Main {

    public static int factorial(int n) {
        if (n == 0) { return 1; }
        return n * factorial(n-1);
    }

    public static void main(String[] args) {

        int num = -10;
        if (num < 0) {
            System.out.println("Error: Number cannot be negative");
            System.exit(1); // Terminate the program with an exit status code of 1
        }

        int result = factorial(num);
        System.out.println(num + "! = " + result);
    }
 }
---------------------------------------------------------------------------------------------------------------
Packages in Java
A package in Java is used to group related classes. Think of it as a folder in a file directory. We use packages to avoid name conflicts, and to write a better maintainable code. Packages are divided into 2 categories :
- Built-In Packages (packages from the Java API)
- User-defined Packages (create your own packages)
Built-In Packages
The Java API is a library of prewritten classes, that are free to use, included in the Java Development Environment. Java comes with a large number of built-in packages that provide a wide range of functionality, including :
java.lang: Contains fundamental classes and interfaces that are essential to the core Java language, such as the Object class, the String class, and the Math class.
java.util: Contains utility classes and interfaces, such as the List interface, the Map interface, and the Scanner class, which are used to handle collections of objects, dates and times, and input/output operations.
java.io: Contains classes and interfaces for handling input and output operations, such as reading and writing files, working with sockets, and interacting with the console.
java.net: Contains classes and interfaces for working with network resources, such as URLs, sockets, and network protocols.
java.awt and javax.swing: Contain classes and interfaces for building graphical user interfaces (GUIs), such as buttons, labels, menus, and windows.
The complete list of built-in packs : https://docs.oracle.com/javase/8/docs/api/.
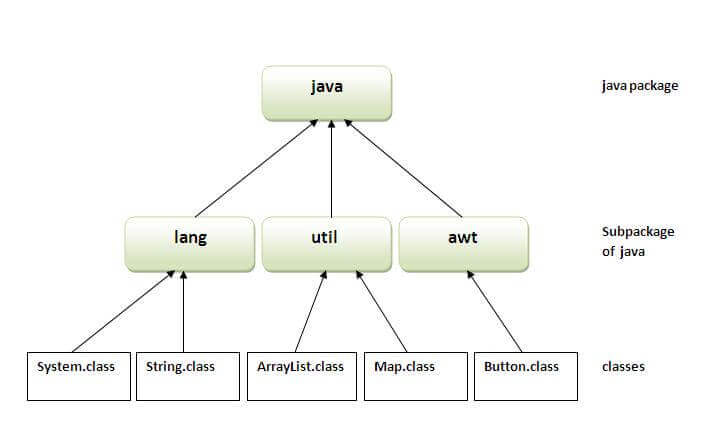
The library is divided into packages and classes. Meaning you can either import a single class (along with its methods and attributes), or a whole package that contain all the classes that belong to the specified package.
 import packageName.Class;   // Import a single class
 import packageName.*;      // Import the whole package

 import java.util.Scanner;  // Import a single class
 import java.util.*;       // Import the whole package
NOTE : To use a class/package from the Java library or your custom package you need to use the import keyword. If two Java files are in the same package or folder, you can use classes from one file in another file without an import statement.
User-defined Packages
In Java, we can also create our own custom packages to store related classes together. To create your own package, you need to understand that Java uses a file system directory to store them. To create a package, use the package keyword on top of your class file and then put that class file inside that package directory, then use the import keyword to import from that package.
Example] In the below example we created the "Animal" package with 2 classes.
NOTE : In Java, the dot (.) is used to separate the different levels in a package name, and it defines a folder structure for the packages. Each level of the package name corresponds to a sub-directory within the package directory. For example, if you want to create a package named 'com.example.myapp', you should create a directory structure 'com/example/myapp',Finally, you would put your Java source files for the com.example.myapp package within the myapp directory.
Example] Below we create 2 sub-packages and import them in Main.java.
// com/deepesh/cars/Car.javapackage com.deepesh.cars;
public class Car {
// Instance variables
private String make;
private String model;
private int year;
private double price;
// Constructor
public Car(String make, String model, int year, double price) {
this.make = make;
this.model = model;
this.year = year;
this.price = price;
}
public String getModel() {
return model;
}
public double getPrice() {
return price;
}
}
// com/deepesh/utils/Utils.javapackage com.deepesh.utils;
import java.util.Random;
public class Utils {
// Generates a random integer between min and max
public static int getRandomInt(int min, int max) {
Random rand = new Random();
return rand.nextInt((max - min) + 1) + min;
}
// Calculates the factorial of a number
public static int factorial(int n) {
if (n == 0) {
return 1;
} else {
return n * factorial(n - 1);
}
}
}
 import com.deepesh.cars.Car;
 import com.deepesh.utils.Utils;

 public class Main {

    public static void main(String[] args) {

        Car car = new Car("Custom","Ferrari",2019,150000);
        System.out.println(car.getPrice());
        System.out.println(car.getModel());

        System.out.println("Factorial of 100 : "+Utils.factorial(100));

    }
 }
This convention also makes it easy to organize code by creating sub-packages. Sub-packages are created by adding more levels to the package name hierarchy, separated by a dot (.). For example, a package named 'com.example' could have sub-packages like 'com.example.util', 'com.example.model' at the paths 'com/example/util' and 'com/example/model' in the file system.
NOTE : In Java, a JAR (Java ARchive) file is a format used to aggregate multiple files and resources (such as images, sounds, and property files) into a single file for distribution or deployment. If you want to distribute your Java package, you can package it into a JAR file so that it can be easily distributed and used by others.
---------------------------------------------------------------------------------------------------------------
Object Oriented Programming
To create a class, use the keyword class. A class should always start with an uppercase first letter, and the name of the java file should match the class name containing the main() method. To create an object of MyClass, specify the class name, followed by the object name, and use the keyword new.The specified class name can also be a Super class of the class you are creating object for.
 // Animal.java
 public class Animal {

    //ATTRIBUTE
    String name=null;

    //METHOD
    private void makeSound(){
        System.out.println("Animal makes sound !");
    }

    //CONSTRUCTOR
    Animal(String name){
        this.name=name;
    }

    public static void main(String[] args) {

        // Create Object of class.
        Animal tiger = new Animal("Tiger");
        tiger.makeSound();
        System.out.print(tiger.name);
    }

 }
NOTE : In one Java file there can only be one public class, this is for better readability.
The constructor name must match the class name, and it cannot have a return type (like void). Also note that the constructor is called when the object is created. All classes have constructors by default: if you do not create a class constructor yourself, Java creates one for you. However, then you are not able to set initial values for object attributes.
Constructor Overloading
Constructor overloading is a feature of object-oriented programming (OOP) where a class can have multiple constructors with different parameter lists. This allows objects to be created with different initial values depending on the needs of the application. Constructor overloading can be useful in situations where a class has multiple ways of being initialized, or where there are different levels of required or optional data to be provided.
class Car {
    private String make;
    private String model;
    private int year;

    // Default constructor
    public Car() {
        this.make = "";
        this.model = "";
        this.year = 0;
    }

    // Constructor with make and model parameters
    public Car(String make, String model) {
        this.make = make;
        this.model = model;
        this.year = 0;
    }

    // Constructor with all three parameters
    public Car(String make, String model, int year) {
        this.make = make;
        this.model = model;
        this.year = year;
    }
 }

 public class Main {
    public static void main(String[] args) {
        Car car1 = new Car("Honda", "Civic");
        Car car2 = new Car("Toyota", "Camry", 2020);
    }
 }
---------------------------------------------------------------------------------------------------------------
Object Class
In Java, the Object class is the root or parent class of all classes, and it is automatically extended by every other class. Therefore, any Java class including classes created by the user implicitly inherits all the methods of the Object class.
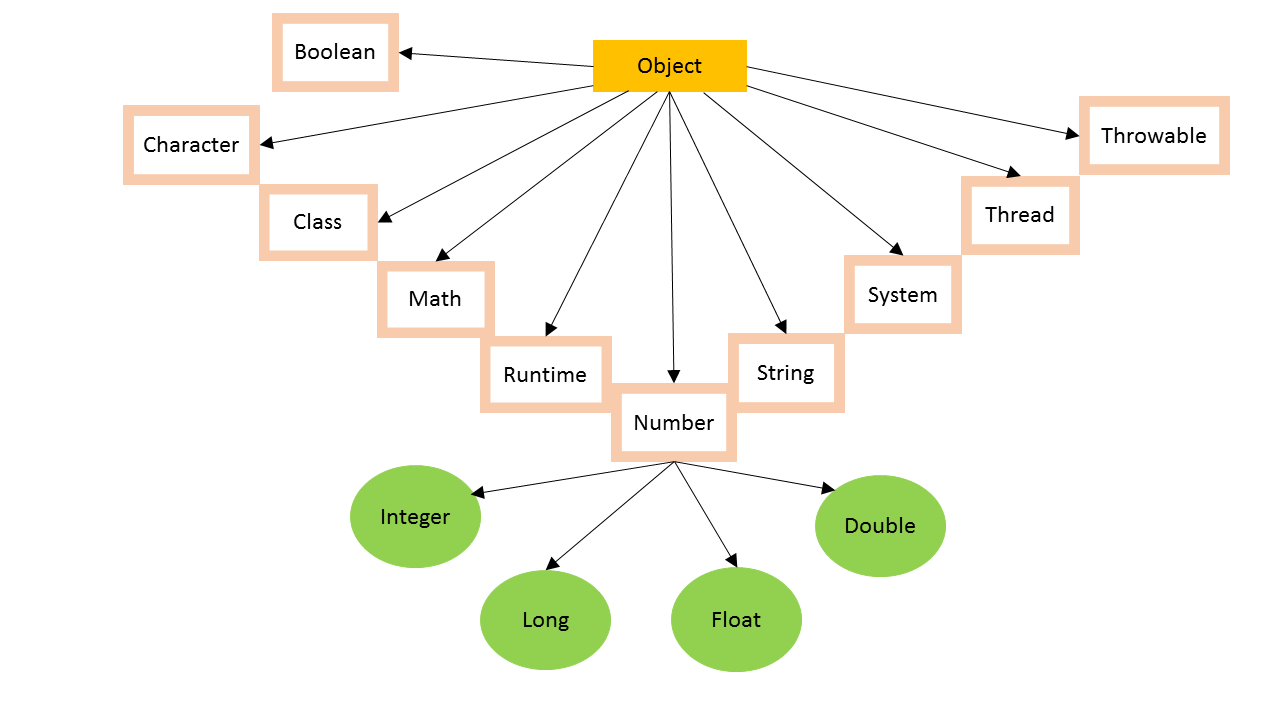
Extending the Object class allows user-defined classes to inherit useful behavior and functionality from the Object class, such as the ability to use the toString(), equals(), and hashCode() methods. Below are some of the commonly used methods of the Object class in Java :
toString(): This method returns a string representation of the object. By default, this method returns a string that consists of the class name, followed by the at-sign, followed by the hexadecimal representation of the object's memory address.
equals(): This method compares two objects for equality. By default, this method compares the memory addresses of the two objects. However, this method can be overridden in a subclass to compare the content of two objects.
hashCode(): This method returns an integer hash code value for the object. By default, this method returns the memory address of the object in hexadecimal format.
getClass(): This method returns theClassobject that represents the runtime class of the object.
toString()
The toString() method is a method defined in the Object class in Java, and it is inherited by all other classes in Java, including classes created by the user. The toString() method returns a string representation of the object on which it is called.
 class Person {
    String name;
    int age;

    public Person(String name, int age) {
        this.name = name;
        this.age = age;
    }
 }

 public class Main {
    public static void main(String[] args) {
        Person p1 = new Person("Deepesh",20);
        System.out.println(p1.name);  // Deepesh
        System.out.println(p1.age);  // 20
        System.out.println(p1.toString());  // Person@7b23ec81
    }
 }
By default, the toString() method returns a string representation of the object's memory address, which is not very useful for most purposes. However, in order to make the toString() method more useful, it is often overridden in user-defined classes to return a string that describes the object's state or contents.
 class Person {

    String name;
    int age;

    public Person(String name, int age) {
        this.name = name;
        this.age = age;
    }

    // overriding object class method
    @Override
    public String toString() {
        return "Person is " + name + " and age is " + age;
    }
 }


 public class Main {
    public static void main(String[] args) {
        Person p1 = new Person("Deepesh", 20);
        System.out.println(p1.name);  // Deepesh
        System.out.println(p1.age);  // 20
        System.out.println(p1);  // Person is Deepesh and age is 20
        System.out.println(p1.toString());  // Person is Deepesh and age is 20
    }
 }
NOTE : The print() and println() methods in Java rely on the toString() method of an object to print its content. When we pass an object to these methods, it implicitly calls the toString() method of that object and prints the string representation of the object returned by it.
To print the appropriate string for the given object, we can do the following :
- Execute the "toString()" of another class which is implemented as per our need and returns our required string format. Eg - we often use the "Arrays.toString()" to print arrays since it returns actual array string rather than just a string memory representation.
- Override the default "toString()" to print the string as needed. This is often done when dealing with custom objects.
Example] Below we demonstrate how the "toString()" is used while printing objects.
import java.util.HashMap;
class Person {
private String name;
private int age;
public Person(String name, int age) {
this.name = name;
this.age = age;
}
@Override
public String toString() {
return "Person{" + "name='" + name + '\'' + ", age=" + age + '}';
}
}
public class Main {
public static void main(String[] args) {
// Example for printing an array
int[] arr = {1, 2, 3, 4, 5};
System.out.println(arr); // [I@15aeb7ab
System.out.println(Arrays.toString(arr)); // [1, 2, 3, 4, 5]
// Example for printing a HashMap
HashMap<String, Integer> map = new HashMap<>();
map.put("one", 1);
map.put("two", 2);
map.put("three", 3);
System.out.println(map); // {one=1, two=2, three=3}
System.out.println(map.toString()); // {one=1, two=2, three=3}
// Example for printing custom objects
Person p1 = new Person("John", 30);
Person p2 = new Person("Jane", 25);
System.out.println(p1); // Person{name='John', age=30}
System.out.println(p2.toString()); // Person{name='Jane', age=25}
}
}
hashCode()
The hashCode() method returns a hashcode or unique integer representation of an object. The hashCode() method returns an random integer generated by an hashing algorithm.
The value returned by this method is used by various algorithms that use hash tables to store and retrieve objects. The hash code is used in hashing algorithms and data structures like HashMap, HashSet, and Hashtable.
 class Person {

    String name;
    int age;

    public Person(String name, int age) {
        this.name = name;
        this.age = age;
    }

    String getName(){ return this.name; }
    int getAge(){ return this.age; }
 }


 public class Main {
    public static void main(String[] args) {
        Person p1 = new Person("Deepesh", 20);
        Person p2 = new Person("Ajay", 20);

        System.out.println(p1.hashCode());  // 2065951873
        System.out.println(p2.hashCode());  // 1791741888
    }
 }
The default implementation of hashcode() in Java is based on the memory address of the object. In other words, if two objects have different memory addresses, they will have different hash codes. If they share same memory address they have same hashcode value.
equals()
In Java, equals() is a method defined in the Object class that is used to compare two objects for equality. The equals() method compares the content of two objects to determine whether they are equal or not.
 class Person {

    String name;
    int age;

    public Person(String name, int age) {
        this.name = name;
        this.age = age;
    }
 }


 public class Main {
    public static void main(String[] args) {
        Person p1 = new Person("Deepesh", 20);
        Person p2 = new Person("Ajay", 23);
        Person p3 = p2;

        System.out.println(p1==p2);    // false
        System.out.println(p3==p2);   // true
        System.out.println(p1.equals(p2));  // false
        System.out.println(p3.equals(p2)); // true

    }
 }
The '==' operator is used to compare two object references, it checks whether the two objects point to the same memory location. By default the equals() method works same as the '==' operator and checks whether the two object references are pointing to the same memory location. But the equals() method is often overriden to compare the contents of two given objects.
 class Person {

    String name;
    int age;

    public Person(String name, int age) {
        this.name = name;
        this.age = age;
    }

    // Override equals() to compare content
    @Override
    public boolean equals(Object obj) {
        if (obj == this) {
            return true;
        }
        if (!(obj instanceof Person)) {
            return false;
        }
        Person otherPerson = (Person) obj;
        return this.name.equals(otherPerson.name) && this.age == otherPerson.age;
    }
 }


 public class Main {
    public static void main(String[] args) {

        Person p1 = new Person("Deepesh", 20);
        Person p2 = new Person("Ajay", 23);
        Person p3 = p2;

        System.out.println(p1 == p2);    // false
        System.out.println(p3 == p2);   // true
        System.out.println(p1.equals(p2));  // false
        System.out.println(p3.equals(p2)); // true
        System.out.println(p1.equals(p3)); // false
    }
 }
InstanceOf Operator
The instanceof() operator in Java is used to check whether an object is an instance of a particular class or an interface. The operator returns a boolean value indicating whether the object is an instance of the specified type.
 class Human {
    void eatFood() {
        System.out.println("Human Eating Food !");
    }
 }

 public class Main {

    public static void main(String[] args) {

        Human obj = new Human();

        // Check if object is instance of Human
        if (obj instanceof Human) {
            System.out.println("I am Human !!!");
        }

    }
 }
---------------------------------------------------------------------------------------------------------------
Inner Classes
In Java, it is also possible to nest classes (a class within a class). To access the inner class, create an object of the outer class, and then create an object of the inner class.
 class OuterClass {
    int x = 10;

    static class InnerClass {
        int y = 5;
    }
 }

 public class Home {
    public static void main(String[] args) {

        OuterClass myOuter = new OuterClass();
        OuterClass.InnerClass myInner = new OuterClass.InnerClass();
        System.out.println(myInner.y + myOuter.x);
    }
 }

 // Outputs 15 (5 + 10)
Unlike a "regular" class, an inner class can be private or protected. If you don't want outside objects to access the inner class, declare the class as private.An inner class can also be static, which means that you can access it without creating an object of the outer class.
Generics
In java you can have generic classes which mean that you can use the same class or methods have different data types. Generics means parameterized types. The idea is to allow type (Integer, String, … etc., and user-defined types) to be a parameter to methods, classes, and interfaces. Using Generics, it is possible to create classes that work with different data types. An entity such as class, interface, or method that operates on a parameterized type is a generic entity.
 public class Main1{

    public static void main(String[] args) {

        Animal<Integer> animal1 = new Animal<Integer>(10);
        System.out.println(animal1.roll_number);

        Animal<String> animal2 = new Animal<String>("Ten");
        System.out.println(animal2.roll_number);

        // 10
        // Ten

    }


    static class Animal<T>{

        Animal(T roll_number){
            this.roll_number = roll_number;
        }

        T roll_number;

    }

 }
We can also write generic functions that can be called with different types of arguments based on the type of arguments passed to the generic method. The compiler handles each method.
// Java program to show working of user defined
// Generic functions

class Test {
    // A Generic method example
    static <T> void genericDisplay(T element)
    {
        System.out.println(element.getClass().getName()
                + " = " + element);
    }

    // Driver method
    public static void main(String[] args)
    {
        // Calling generic method with Integer argument
        genericDisplay(11);

        // Calling generic method with String argument
        genericDisplay("GeeksForGeeks");

        // Calling generic method with double argument
        genericDisplay(1.0);
    }
}
Type Parameter Naming Convention
By convention, type parameters are single uppercase letters. These are not rules, just conventions that make code more readable :
Bounded Type Parameters
Sometimes you want to restrict what types can be passed. For example you only want to allow number types. You use the extends keyword for this :
Wildcards
A wildcard ? is used when you want to work with a generic type but you dont care what the specific type is :
---------------------------------------------------------------------------------------------------------------
Class Methods
Methods are functions inside classes , since everything in java is inside a class , all functions are in a way Methods.
 // syntax   (Non-Access modifier is optional)

  AccessModifer NonAccess_Modifier ReturnType Function_name(){

  }
 public class Home {

     public static int addNumbers(int x, int y){
         return x+y;
     }

     public static void main(String[] args) {

         int result = addNumbers(10,20);
         System.out.print(result);

     }
 }
Method Overriding
In Java, method overriding is a feature that allows a subclass to provide a specific implementation of a method that is already defined in its superclass. Method overriding is achieved by defining a method with the same name, return type, and parameter list in the subclass as the method in the superclass.
 class Animal {
   public void makeSound() {
       System.out.println("The animal makes a sound !");
   }

   public void eatFood(){
       System.out.println("The animal is eating food !");
   }
 }


 class Dog extends Animal {

   @Override
   public void makeSound() {
       System.out.println("The dog barks !");
   }

   public void eatFood(){
       System.out.println("Dog is eating food !");
   }
 }


 public class Main {
   public static void main(String[] args) {
       Animal animal = new Animal();
       animal.makeSound();
       animal.eatFood();

       Dog dog = new Dog();
       dog.makeSound();
       dog.eatFood();
   }
 }

 // The animal makes a sound !
 // The animal is eating food !
 // The dog barks !
 // Dog is eating food !
NOTE : The @Override annotation is used to indicate that a method in a subclass is intended to override a method in its superclass. The @Override annotation is not required to override a method.
Variable Arguments (Varargs)
Variable Arguments (Varargs) in Java is a method that takes a variable number of arguments. Variable Arguments in Java simplifies the creation of methods that need to take a variable number of arguments. The varrags allows the method to accept zero or muliple arguments.
The varags method is implemented using a single dimension array internally. Hence, arguments can be differentiated using an index. A variable-length argument can be specified by using three-dot (...) or periods.
 import java.util.Arrays;

 class Maths {

    static int sum(int... numbers) {
        int sum = 0;
        for (int num : numbers) {
           sum += num;
        }
        System.out.println(sum);
        return sum;
    }

    static void printAll(String studentName, int... marks) {
        System.out.println("The student " + studentName +
                " has the following marks : " + Arrays.toString(marks));
    }
 }


 public class Main {
    public static void main(String[] args) {

        Maths.sum(1, 2, 3, 4, 5, 6);             // 21
        Maths.sum(1, 2, 3, 4, 5, 6, 7, 8, 9, 10);   // 55
        Maths.printAll("Deepesh", 12, 22, 33, 55);

    }
 }

 // 21
 //55
 //The student Deepesh has the following marks : [12, 22, 33, 55]
In Java, variables can be passed to a method either by value or by reference.
Pass by Value
When a primitive type (such as int, double, boolean, etc.) is passed as an argument to a method, a copy of the value is passed to the method. This means that any changes made to the parameter inside the method have no effect on the original variable outside of the method. In Java, pass by value variables are usually implemented to pure functions which have no side-effects and always returns the same output for a given set of input parameters.
// pass by value
 public static void main(String[] args) {
    int x = 5;
    increment(x);
    System.out.println(x); // Output: 5
 }

 public static void increment(int num) {
    num++;
 }
In order to achieve pass by reference behavior for primitive types, you can wrap them in objects using their corresponding wrapper classes (Integer for int, Double for double, Boolean for boolean, etc.), or use arrays, which are objects in Java.
// pass by referencepublic static void main(String[] args) {
Integer x = 5;
increment(x);
System.out.println(x); // Output: 6
}
public static void increment(Integer num) {
num++;
}
Pass by Reference
When an object is passed as an argument to a method, a copy of the object reference is passed to the method. This means that any changes made to the object inside the method will affect the original object outside of the method.
 public class Main {
    public static void main(String[] args) {
        int[] nums = {1, 2, 3};
        changeArray(nums);
        System.out.println(Arrays.toString(nums)); // Output: [4, 5, 6]
    }

    public static void changeArray(int[] arr) {
        for (int i = 0; i < arr.length; i++) {
            arr[i] += 3;
        }
    }
 }
public class Main {
public static void main(String[] args) {
int[] nums = {1, 2, 3};
changeArray(nums);
System.out.println(Arrays.toString(nums)); // Output: [4, 5, 6]
}
public static void changeArray(int[] arr) {
for (int i = 0; i < arr.length; i++) {
arr[i] += 3;
}
}
}
Pass by reference is often implemented with impure functions because it involves modifying the state of an object or data structure, which is a side effect. Pass by reference allows you to modify the state of an object or data structure directly, without having to create a copy of it or return a modified copy.
---------------------------------------------------------------------------------------------------------------
Modifiers in Java
Modifiers are the keywords that control the acessibility or add extra functionality to the methods or classes. In Java there are 2 types of modifiers :
- Access Modifiers - These controls the access level for classes, attributes, methods and constructors.
- Non-Access Modifiers - These do not control access level, but provides other functionality.
Access Modifiers
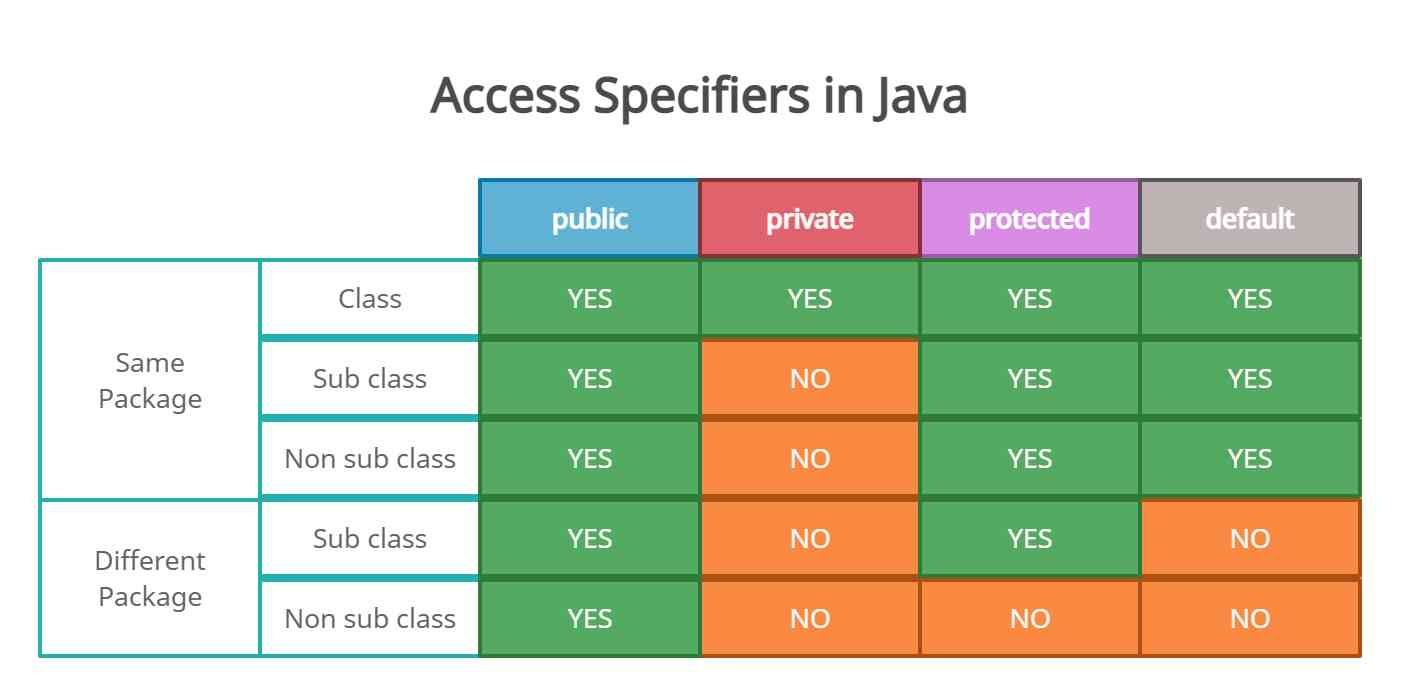
Access modifiers are keywords in Java that are used to set accessibility. An access modifier restricts the access of a class, constructor, data member and method in another class. Java language has 4 access modifier to control access level for classes and its members.
- Default: Default has scope only inside the same package.
- Public: Public has scope that is visible everywhere.
- Protected: Protected has scope within the package and all sub classes.
- Private: Private has scope only within the classes.
1] Default
When we don't use any keyword explicitly, Java will set a default access to a given class, method or property. It is used to set accessibility within the package. It means we can not access its method or class from outside that package.
NOTE : If no access modifier is provided, the default access modifier is package-private, which means that the class, its attributes, and its methods can only be accessed within the same package.
 // package1/Demo.java

 package package1;

 public class Demo {

    int a = 10;
    // default access modifier
    void show() {
        System.out.println(a);
    }

 }

//------------------------------------------------------------------------------------------

 // Test.java

 import package1.Demo;
 public class Test {

    public static void main(String[] args) {
        Demo demo = new Demo();
        demo.show(); // compile error, make show() public.
    }
 }
2] Public
public access modifier is used to set public accessibility to a variable, method or a class. Any variable or method which is declared as public can be accessible from anywhere in the application.
 // package1/Demo.java

 package package1;

 public class Demo {

    int a = 10;
    // public access modifier
    public void show() {
        System.out.println(a);
    }

 }

//-----------------------------------------------------------------

 // Test.java

 import package1.Demo;
 public class Test {

    public static void main(String[] args) {
        Demo demo = new Demo();
        demo.show(); // 10
    }
 }
3] Private
Method, property or constructor with private keyword is accessible only within the same class. This is the most restrictive access modifier and is core to the concept of encapsulation. All data will be hidden from the outside world.
 class Animal{
   private void makeSound(){
        System.out.println("Hello, I am Animal !");
    }

    public void makeSound2(){
       this.makeSound();
    }
 }


 public class Main {
    public static void main(String[] args) {

       Animal obj1 = new Animal();
       obj1.makeSound2();
       obj1.makeSound();   // Compile Error
    }
 }
4] Protected
Between public and private access levels, there's the protected access modifier. If we declare a method, property or constructor with the protected keyword, we can access the member from the same package and from all it's subclasses of its class, even if they lie in other packages.
 class Animal{
    static protected void makeSound(){
        System.out.println("Hello, I am Animal !");
    }
 }

 class Tiger extends Animal{ }

 public class Main {
    public static void main(String[] args) {

        Animal.makeSound();
        Tiger.makeSound();

    }
 }
There are some important points to remember :
- If one wishes to access a protected modifier outside a package, then inheritance is needed to be applied.
- Protecting a constructor prevents the users from creating the instance of the class, outside the package.
Non-Access Modifiers
Along with access modifiers, Java provides non-access modifiers as well. These modifier are used to set special properties to the variable or method. Non-access modifiers do not change the accessibility of variable or method, but they provide special properties to them. Java provides following non-access modifiers.
- Final
- Static
- Transient
- Synchronized
- Volatile
1] Final
Final modifier can be used with variable, method and class :
- If variable is declared final then we cannot change its value
- If method is declared final then it cannot be overridden
- If a class is declared final then we cannot inherit it
2] Static
Static modifier is used to make field static. We can use it to declare static variable, method, class etc. static can be use to declare class level variable. If a method is declared static then we don’t need to create object to access that member.
NOTE : The static methods/properties belong to the class and not a particular instance of class. When a method or property is declared as static, it is associated with the class rather than with an object of that class. This means that the same static method or property can be accessed by all instances of the class, and any changes made to the static method or property will be reflected across all instances of the class.
 class Car {

    private static int numCars = 0;

    // constructor
    public Car() {
        numCars = Car.numCars + 1;
    }

    public static int getNumCars() {
        return numCars;
    }
 }

 public class Main {

    public static void main(String[] args) {

        Car car1 = new Car();
        Car car2 = new Car();
        System.out.println(car1.getNumCars());  // 2

        Car car3 = new Car();
        Car car4 = new Car();
        Car car5 = new Car();
        Car car6 = new Car();
        System.out.println(car1.getNumCars());  // 6
    }
 }
NOTE : Since static properties belong to the class rather than a particular instance of the class, you cannot update them using the 'this' keyword. Instead, you would access and update the static property directly using the class name.
NOTE : Static members are not dependent on objects and can be accessed before any object is created for the class. The main() is also declared as static method which allows us to execute the entry point code without actually creating any objects.
NOTE : In Java, it is not possible to override static methods. Since static methods are associated with the class and not with instances of the class, they cannot be overridden by subclasses. Instead, if a subclass defines a static method with the same name and signature as a static method in its superclass, it will simply hide the superclass method. This means that if you call the static method on the subclass, the subclass's version of the method will be called, regardless of the type of the object used to make the call.
---------------------------------------------------------------------------------------------------------------
Java Inheritance
To inherit from a class, use the extends keyword. If you don't want other classes to inherit from a class, use the final keyword.
 class Animal{

    void eatFood(){
        System.out.println("I am eating");
    }
 }

 class Tiger extends Animal{

 }

 public class Home {
    public static void main(String[] args) {

        Tiger shera = new Tiger();
        shera.eatFood();
    }
 }
The "Super" keyword
The "super" keyword in Java is used to refer to the parent class of a subclass. It can be used to access the parent class's variables, methods, and constructors from the subclass. The super() is used to call constructor in the parent class, and it must be the first statement in a subclass's constructor.
public class Animal {
    String name;

    public Animal(String name) {
        this.name = name;
    }

    public void speak() {
        System.out.println("I am an animal.");
    }
 }
public class Dog extends Animal {
int age;
    public Dog(String name, int age) {
        super(name);     // call superclass constructor
        this.age = age;
    }

    public void speak() {
        super.speak();
        System.out.println("I am a dog.");
    }
 }


 public class Main {
public static void main(String[] args) {
        Dog dog = new Dog("Buddy", 5);
        dog.speak(); // Output: I am an animal. I am a dog.
    }
 }
---------------------------------------------------------------------------------------------------------------
Abstraction
The abstract keyword is a non-access modifier, used for classes and methods:
- Abstract class : It is a restricted class that cannot be used to create objects (to access it, it must be inherited from another class).
- Abstract method : It can only be used in an abstract class, and it does not have a body. The body is provided by the subclass (inherited from).
NOTE : An abstract class can have both abstract and regular methods.
 abstract class Animal{

    // ABSTRACT METHOD
   abstract void eatFood();
 }

 class Tiger extends Animal{

    void eatFood() {
        System.out.print("Tiger is eating");
    }
 }

 public class Home {
    public static void main(String[] args) {

        Tiger shera = new Tiger();
        shera.eatFood();
    }
 }
NOTE : Only a abstract class can contain abstract method ,so if you declare a method as "abstract" , you have to declare entire class abstract. The difference between Abstarct class and an Interface is that an Abstract class can contain both abstract and non-abstract methods,while an interface cannot contain both.
 abstract class Animal1{

    void makeSound(){
        System.out.print("Barkkk !");
    }

    abstract void eatFood();
 }


 interface Animal2{

    void makeSound();
    void eatFood();
 }
---------------------------------------------------------------------------------------------------------------
Interfaces
An interface is a completely "abstract class" that is used to group related methods with empty bodies: To access the interface methods, the interface must be "implemented" (kinda like inherited) by another class with the implements keyword (instead of extends). The body of the interface method is provided by the "implement" class.
By defining Interfaces we are defining "what a class must do" and the class that implements the interface has to implement "how to do" that particular task.
// Interface
interface Animal {
    void animalSound(); // interface method (does not have a body)
    void sleep(); // interface method (does not have a body)
}

// Pig "implements" the Animal interface
class Pig implements Animal {
    public void animalSound() {
        // The body of animalSound() is provided here
        System.out.println("The pig says: wee wee");
    }
    public void sleep() {
        // The body of sleep() is provided here
        System.out.println("Zzz");
    }
}

class Main {
    public static void main(String[] args) {
        Pig myPig = new Pig();  // Create a Pig object
        myPig.animalSound();
        myPig.sleep();
    }
}
NOTES :
- Like abstract classes, interfaces cannot be used to create objects.
- An interface cannot contain a constructor (as it cannot be used to create objects).
- Once you implement a interface , you have to implement all the methods inside the interface.
- A Java class can inherit only from one class , but it can implement multiple interfaces.
// Interfaces
interface Animal {
    void animalSound();
    void sleep();
}

interface SuperPowers{
    void Immortality();
    void SuperSonicFlight();
}

// Pig "implements" the Animal & SuperPowers interface
class Pig implements Animal,SuperPowers {
    public void animalSound() {
        System.out.println("The pig says: wee wee");
    }
    public void sleep() {
        System.out.println("Zzz");
    }

    public void Immortality() {
        System.out.println("I am Immortal");
    }

    public void SuperSonicFlight() {
        System.out.println("I can Fly");
    }
}

class Main {
    public static void main(String[] args) {
        Pig myPig = new Pig();
        myPig.animalSound();
        myPig.sleep();
        myPig.Immortality();
    }
}
In Java, variables in an interface are by default public, static, and final. These variables are also known as constants. In Java, interfaces cannot be instantiated directly, which means that there is no way to initialize instance variables through a constructor, hence they are constants.
 interface Shape {

   // Constants
   int DEFAULT_SIZE = 10;
   String DEFAULT_COLOR = "black";
   double PI = 3.14;

   // Methods
   double area();

   void draw(String color);
 }
 class MyShape implements Shape {

   public double area() {
       return 55.5555;
   }

   public void draw(String color) {
       System.out.println("I am Drawing !");
   }
 }


 public class Main {
   public static void main(String[] args) {

       System.out.println(Shape.DEFAULT_SIZE);
       System.out.println(Shape.DEFAULT_COLOR);
       System.out.println(Shape.PI);

       MyShape s1 = new MyShape();
       s1.area();
       s1.draw("Red");

   }
 }
An interface can also extend one or more other interfaces using the 'extends' keyword, and it can inherit all the abstract methods of the extended interfaces.
 interface Vehicle {
    void start();

    void stop();
 }

 interface Car extends Vehicle {
    void drive();
 }

 interface Truck extends Vehicle {
    void load();
 }

 interface PickupTruck extends Car, Truck {
    void tow();
 }


class MyPickupTruck implements PickupTruck {

    @Override
    public void start() {
        System.out.println("Starting the pickup truck.");
    }

    @Override
    public void stop() {
        System.out.println("Stopping the pickup truck.");
    }

    @Override
    public void drive() {
        System.out.println("Driving the pickup truck.");
    }

    @Override
    public void load() {
        System.out.println("Loading cargo onto the pickup truck.");
    }

    @Override
    public void tow() {
        System.out.println("Towing a trailer with the pickup truck.");
    }
 }


 public class Main {
    public static void main(String[] args) {

        MyPickupTruck myPickupTruck = new MyPickupTruck();
        myPickupTruck.start();
        myPickupTruck.drive();
        myPickupTruck.load();
        myPickupTruck.tow();
        myPickupTruck.stop();
    }
 }
Default Methods in Interfaces
Default methods in Java interfaces were introduced in Java 8 to allow interfaces to have implementations for their methods. Before Java 8, interfaces could only declare method signatures without any implementation.
A default method in an interface is a method that has a body, i.e., an implementation, and is marked with the "default" keyword. Default methods are used to provide a default implementation for a method in an interface. Any class that implements this interface can use this implementation or provide its own implementation.
 interface MyInterface {
    default void doSomething() {
        System.out.println("I am the Default one !");
    }

    void makeFood();
 }


 class MyClass1 implements MyInterface {

    // override default implementation
    public void doSomething() {
        System.out.println("I am the Custom one !");
    }

    public void makeFood() {
        System.out.println("I am making Food !");
    }
 }
 class MyClass2 implements MyInterface {
    public void makeFood() {
        System.out.println("I am making Food !");
    }
 }
 public class Main {
    public static void main(String[] args) {
        MyClass1 obj1 = new MyClass1();
        MyClass2 obj2 = new MyClass2();
        obj1.doSomething();   // I am the Custom one !
        obj2.doSomething();  // I am the Default one !

    }
 }
Static Methods in Interfaces
Prior to Java 8, interfaces only allowed the declaration of abstract methods and constants, but with the introduction of Java 8, static methods and default methods were also introduced in interfaces. A static method in an interface is a method that is declared with the "static" keyword and has a body. Unlike abstract methods, static methods are already implemented and can be used without the need for an instance of the interface to be created.
When a static method is defined inside an interface, it belongs to the interface and not any implementing class or its instance. They can also be used for providing default implementations of methods in interfaces, but this can lead to design issues if not used carefully. Static methods in interfaces can only be called using the interface name followed by the method name since they belong to the interface. They cannot be called using an instance of the implementing class because they do not belong to the instance.
 interface MyInterface {

    // abstract methods
    void doSomething();
    int calculateSomething(int x, int y);

    // static method
    static void printMessage(String message) {
        System.out.println("Message from MyInterface: " + message);
    }
 }
 class MyClass implements MyInterface {

    public void doSomething() {
        System.out.println("I am doing something !");
    }

    public int calculateSomething(int x, int y) {
        return x + y;
    }

 }


 public class Main {
    public static void main(String[] args) {

        MyInterface.printMessage("I am Deepesh");

        MyClass obj = new MyClass();
        obj.printMessage("I am Deepesh"); // Can't find printMessage

    }
 }
NOTE : Since static interface methods already have a body, it is not possible to override a static method in the implementing class. If we try to override a static method in a subclass, the method in the interface will still be called, and not the overridden method.
---------------------------------------------------------------------------------------------------------------
Enums
An enum is a special "class" that represents a group of constants. To create an enum, use the enum keyword (instead of class or interface), and separate the constants with a comma. Note that they should be in uppercase letters.
 enum Level {
    LOW,
    MEDIUM,
    HIGH
 }


 class Main {
    public static void main(String[] args) {

        Level acess = Level.HIGH;
        System.out.println(acess);  // OUTPUT: HIGH
    }
 }
NOTE : By default enums are static & final. Enums cannot be overridden because they are constants and cannot be modified once they are defined.
In Java, Enums are clases as well and can have their own methods just like any other class in Java. All the Enums in Java extend from "java.lang.Enum" class hence we cannot extend enums since extending multiple classes is not allowed in Java. But enum classes can implement interfaces.
 interface Animal {
    void makeNoise();

    void eatFood();
 }


 enum Colors implements Animal {
    RED, BLACK, BLUE, GREEN;

    void currentColor() {
        System.out.println("The Current Color : " + this);
    }

    @Override
    public void makeNoise() {
        System.out.println(this + " is making Noise !");
    }

    @Override
    public void eatFood() {
        System.out.println(this + " is eating Food !");
    }
 }


 public class Main {
    public static void main(String[] args) {

        System.out.println(Colors.BLACK);  // Black

        Colors color = Colors.RED;
        color.currentColor();  // The Current Color : RED

        Colors color2 = Colors.BLUE;
        color2.eatFood();  // BLUE is eating Food !
        color2.makeNoise();  // BLUE is making Noise !

    }
 }
---------------------------------------------------------------------------------------------------------------
Exception Handling
The try statement allows you to define a block of code to be tested for errors while it is being executed. The catch statement allows you to define a block of code to be executed, if an error occurs in the try block. The finally statement lets you execute code, after try...catch, regardless of the result.
public class Main {
    public static void main(String[] args) {
        try {
            int[] myNumbers = {1, 2, 3};
            System.out.println(myNumbers[10]);
        } catch (Exception e) {
            System.out.println("Something went wrong.");
        } finally {
            System.out.println("The 'try catch' is finished.");
        }
    }
}
The 'throw' keyword
The throw statement allows you to create a custom error. The throw statement is used together with an exception type.
public class Main {
    static void checkAge(int age) {
        if (age < 18) {
            throw new ArithmeticException("Access denied - You must be at least 18 years old.");
        }
        else {
            System.out.println("Access granted - You are old enough!");
        }
    }

    public static void main(String[] args) {
        checkAge(15); // Set age to 15 (which is below 18...)
    }
}
Some common Exception types available in Java are as followed :
- Exception
- ArithmeticException
- FileNotFoundException
- ArrayIndexOutOfBoundsException
- SecurityException
NOTE : When defining methods that can throw exceptions we must also specify the exceptions using the "throws" keyword. It is not required by helps maintain documentation and also helps the caller of the method to understand the exceptions that may be thrown and handle them appropriately.
 public class Main {

    static void checkAge(int age) throws ArithmeticException {
        if (age < 18) {
        throw new ArithmeticException("Access denied - You must be at least 18 years old.");
        }
        else {
            System.out.println("Access granted - You are old enough!");
        }
    }

    public static void main(String[] args) {
        checkAge(15); // Set age to 15 (which is below 18...)
    }
 }
NOTE : The Exception class is the superclass for all types of exceptions, hence must be specified at last, orelse it'll catch all the errors occuring.
 public class Main {

    public static void doSomeMath(int x, int y) throws ArithmeticException,
            ArrayIndexOutOfBoundsException {
        try {
            int quotient = x / y; // Attempt to divide x by y
            System.out.println("Quotient: " + quotient);

            int[] arr = new int[y];
            arr[x] = 1; // Attempt to set the x-th element of the array to 1
        } catch (ArithmeticException e) {
            System.out.println("Cannot divide by zero.");
        } catch (ArrayIndexOutOfBoundsException e) {
            System.out.println("Array index out of bounds.");
        } catch (Exception e) {
            System.out.println("An error occurred: " + e.getMessage());
        }
    }


    public static void main(String[] args) {
       doSomeMath(22,0);  // Cannot divide by zero
    }
 }
Custom Exceptions
Java custom exceptions are used to customize the exception according to user needs. In simple words, we can say that a User-Defined Exception or custom exception is creating your own exception class and throwing that exception using the ‘throw’ keyword. In order to create a custom exception, we need to extend the Exception class that belongs to 'java.lang package'.
 // class representing custom exception
 class InvalidAgeException  extends Exception {
    public InvalidAgeException (String str) {
        super(str);
    }
 }

 public class Main {

    static void validateAge (int age) throws InvalidAgeException{
        if(age < 18){
            // throw an object of user defined exception
            throw new InvalidAgeException("age is not valid to vote");
        }
        else {
            System.out.println("welcome to vote");
        }
    }

     public static void main(String args[]){
        try {
            validateAge(13);
        } catch (InvalidAgeException e){
            System.out.println("Exception occured: " + e.getMessage());
        }
    } }
// class representing custom exception
class InvalidAgeException extends Exception {
public InvalidAgeException (String str) {
super(str);
}
}
public class Main {
static void validateAge (int age) throws InvalidAgeException{
if(age < 18){
// throw an object of user defined exception
throw new InvalidAgeException("age is not valid to vote");
}
else {
System.out.println("welcome to vote");
}
}
public static void main(String args[]){
try {
validateAge(13);
} catch (InvalidAgeException e){
System.out.println("Exception occured: " + e.getMessage());
}
}}
---------------------------------------------------------------------------------------------------------------
Standard Data structures in Java
1] Arrays
 public class Main {

    public static void main(String[] args) {

        // Array of strings
        String[] numbers = {"one", "two", "three", "four", "five"};

        // Array of integers
        int[] integers = {1, 2, 3, 4, 5};

        // Array of booleans
        boolean[] booleans = {true, false, true, false, true};

        // Print the first element of each array to the console
        System.out.println(numbers[0]);
        System.out.println(integers[0]);
        System.out.println(booleans[0]);
    }
 }
Multi-dimensional Arrays
 public class Main {

    public static void main(String[] args) {

        String[][] numbers= { {"one","two"}, {"three","four","five"} };

        System.out.println(numbers[1][0]); //three

    }
 }
3] ArrayList
The difference between a built-in array and an ArrayList in Java, is that the size of an array cannot be modified (if you want to add or remove elements to/from an array, you have to create a new one).
import java.util.ArrayList;

public class Main {

    public static void main(String[] args) {

        ArrayList<String> numbers = new ArrayList<>();
        numbers.add("one");
        numbers.add("two");
        numbers.add("three");
        numbers.add("four");

        System.out.println(numbers);
        //OUTPUT : [one, two, three, four]

    }
}
The ArrayList class has a regular array inside it. When an element is added, it is placed into the array. If the array is not big enough, a new, larger array is created to replace the old one and the old one is removed.
4] HashMap
A HashMap store items in "key/value" pairs.
import java.util.HashMap;

public class Main {

    public static void main(String[] args) {

        HashMap<String,Integer> Data = new HashMap<>();

        Data.put("Deepesh",2000);
        Data.put("Rohan",3000);
        Data.put("Kiran",4000);

        System.out.print(Data.get("Deepesh")); //2000

    }
}
5] HashSet
A HashSet is a collection of items where every item is unique.
import java.util.HashSet;

public class Main {
    public static void main(String[] args) {
        HashSet<String> cars = new HashSet<String>();
        cars.add("Volvo");
        cars.add("BMW");
        cars.add("Ford");
        cars.add("BMW");
        cars.add("Mazda");
        System.out.println(cars);
    }
}

//OUTPUT: [Volvo, Mazda, Ford, BMW]
6] Vector
The Vector class is similar to ArrayList, except that it is synchronized i.e at any given moment only a single thread is able to access the vector object, if other thread tries to access it then they have to wait until the current thread finishes.
ArrayList is not thread-safe, which means that if multiple threads access the same ArrayList concurrently, there may be issues with data consistency. Vector is generally slower than ArrayList in single-threaded applications.
NOTE : Vector is resizable like ArrayList, but Vector doubles its size when it reaches its capacity while ArrayList increases its size by half of its capacity. This means that aVector can potentially waste more memory than an ArrayList.
 import java.util.Vector;

 public class Main {
    public static void main(String[] args) {

        Vector<String> v = new Vector<>();

        // add elements
        v.add("Hello");
        v.add("World");
        v.add("!");

        System.out.println("Size of vector: " + v.size());
        System.out.println("Vector is empty: " + v.isEmpty());
        System.out.println("Element at index 1: " + v.get(1));
        System.out.println("Vector contains \"World\": " + v.contains("World"));
        System.out.println("Index of \"!\": " + v.indexOf("!"));
        v.remove("!");

        // iterate over elements using for-each loop
        System.out.println("Elements in vector (using for-each loop):");
        for (String s : v) {
            System.out.println(s);
        }
    }
 }
// Size of vector: 3
// Vector is empty: false
// Element at index 1: World
// Vector contains "World": true
// Index of "!": 2
// Elements in vector (using for-each loop):
// Hello
// World
---------------------------------------------------------------------------------------------------------------
Wrapper Classes
Wrapper classes in Java provides a way to wrap/represent/convert the value of primitive data types as an object. Wrapper classes provide a way to use primitive data types as objects. Each Java primitive has a corresponding wrapper. These are all defined in the java.lang package, hence we don't need to import them manually.
The table below shows the primitive type and their equivalent wrapper class :
| Primitive Data Type | Wrapper Class |
|---|---|
| byte | Byte |
| short | Short |
| int | Integer |
| long | Long |
| float | Float |
| double | Double |
| boolean | Boolean |
| char | Character |
When we create an object of a wrapper class, it contains a field and in this field, we can store primitive data types. In other words, we can wrap a primitive value into a wrapper class object. “What's the purpose of a wrapper class?” basically, generic classes only work with objects and don't support primitives. As a result, if we want to work with them, we have to convert primitive values into wrapper objects.
Wrapper classes provide a way to convert primitive data types to objects, which allows us to access additional functionality and methods that are available only to objects. For example, we can use methods like toString(), valueOf(), and compareTo() on wrapper objects to manipulate their values.
 public class Main {

    public static void main(String[] args) {

        // Converting Primitives to Wrapper Class Objects

        int i = 10;
        Integer j = 10;
        j.toString();
        j.intValue();

        // Converting double to Double
        double d = 3.14159;
        Double wrapperDouble = Double.valueOf(d);
        wrapperDouble.toString();
        wrapperDouble.doubleValue();

        // Converting boolean to Boolean
        boolean b = true;
        Boolean wrapperBoolean = Boolean.valueOf(b);
        wrapperBoolean.toString();
        wrapperBoolean.booleanValue();

        // Converting char to Character
        char c = 'a';
        Character wrapperCharacter = Character.valueOf(c);
        wrapperCharacter.toString();
        wrapperCharacter.charValue();
    }
 }
Sometimes we also use wrapper classes when working with Collection framework where primitive types cannot be used, since the they can only store objects, hence internally they convert all primitive values to wrapper class objects.
    ArrayList<int> numbers = new ArrayList<int>() // INVALID
    ArrayList<Integer> number_s = new ArrayList<Integer>();// VALID
Convert Primitives to Wrapper
To convert regular primitives into wrapper class objects we can use the "valueOf()" method. Below is an example :
 public class Main{
    public static void main(String[] args) {

        // creates objects of wrapper class
        Integer i = Integer.valueOf(100);
        Double j = Double.valueOf(11.55);
        Boolean k = Boolean.valueOf("true");
        System.out.println(i);  // 100
        System.out.println(j); // 11.55
        System.out.println(k); // true
    }
 }
Convert Wrapper to Primitives
We can use "xxxValue()" methods to get the primitive for the given Wrapper Object. Every number type Wrapper class contains the following 6 methods to get primitive for the given Wrapper object :
- byteValue()
- shortValue()
- intValue()
- longValue()
- floatValue()
- doubleValue()
 public class Main{
    public static void main(String[] args) {

        // creates objects of wrapper class
        Integer i = Integer.valueOf(100);
        Double j = Double.valueOf(11.55);
        Boolean k = Boolean.valueOf("true");
        System.out.println(i);  // 100
        System.out.println(j); // 11.55
        System.out.println(k); // true

        // converts into primitive types
        int a = i.intValue();
        double b = j.doubleValue();
        boolean c = k.booleanValue();
        System.out.println(a);   // 100
        System.out.println(b);  // 11.55
        System.out.println(c); // true
    }
 }
Autoboxing & Unboxing
In the above examples we manually converted the primitives to wrapper objects and vice-versa, but we can also allow Java to do it for us. The Java compiler can directly convert the primitive types into corresponding objects, this process is known as Auto-boxing.
 public class Main{
    public static void main(String[] args) {

        // auto-boxing
        Integer i = 100;
        Double j = 11.55;
        Boolean k = true;
        System.out.println(i);  // 100
        System.out.println(j); // 11.55
        System.out.println(k); // true

    }
 }
In Un-boxing, the Java compiler automatically converts wrapper class objects into their corresponding primitive types.
 public class Main{
    public static void main(String[] args) {

        // auto-boxing
        Integer i = 100;
        Double j = 11.55;
        Boolean k = true;
        System.out.println(i);  // 100
        System.out.println(j); // 11.55
        System.out.println(k); // true

        // unboxing
        int a = i;
        double b = j;
        boolean c = k;
        System.out.println(a);   // 100
        System.out.println(b);  // 11.55
        System.out.println(c);  // true
    }
 }
Convert Wrapper to String
We can use the toString() method to convert the Wrapper object to String. Below is an example :
 public class Main{
    public static void main(String[] args) {

        // auto-boxing
        Integer i = 100;
        Double j = 11.55;
        Boolean k = true;

        String a = i.toString();
        String b = i.toString();
        String c = i.toString();

        System.out.println(a);  // 100
        System.out.println(b); // 11.55
        System.out.println(c); // true
    }
 }
---------------------------------------------------------------------------------------------------------------
Functional Interface
A functional interface is any interface that has exactly one abstract method. In Java we can use the '@FunctionalInterface' annotation to indicate that an interface is intended to be a functional interface and enforce the requirement that the interface has only one abstract method. These are also sometimes refered to as Single Abstract Method (SAM).
 @FunctionalInterface
 interface MySAMInterface1 {
   void doSomething1();
 }

 @FunctionalInterface
 interface MySAMInterface2 {
   void doSomething2();
 }

 class MyClass implements MySAMInterface1, MySAMInterface2 {
   public void doSomething1() {
       System.out.println("Doing something 1...");
   }

   public void doSomething2() {
       System.out.println("Doing something 2...");
   }
 }

 public class Main {
   public static void main(String[] args) {
       MyClass obj = new MyClass();
       obj.doSomething1(); // Output: Doing something 1...
       obj.doSomething2(); // Output: Doing something 2...
   }
 }
Lambda Expressions
A lambda expression is essentially an inline function in Java. Lambda expressions are a concise way to define an implementation of a functional interface, without the need for a separate class to implement the interface. By using lambda expressions, we can pass behavior as an argument to a method or store it in a variable, making our code more modular and flexible.
 import java.util.ArrayList;
 import java.util.List;

 public class Main {
    public static void main(String[] args) {
        List<String> names = new ArrayList<>();
        names.add("Alice");
        names.add("Bob");
        names.add("Charlie");
        names.add("Dave");

        // Using a lambda expression to print all names
        names.forEach(name -> System.out.println(name));

        // Using a lambda expression to print names that start with "C"
        names.stream()
                .filter(name -> name.startsWith("C"))
                .forEach(name -> System.out.println(name));
    }
 }
Lambda expressions are essentially shorthand for implementing the abstract method of a functional interface effectively providing a body for the method. When you define a lambda expression, you are providing an implementation for the single abstract method of the functional interface, which can then be used as an instance of the interface.
// Custom Lambda expressions
 interface MathOperation {
    int operate(int a, int b);
 }

 public class Main {
    public static void main(String[] args) {
        // Using lambda expressions to define custom math operations
        MathOperation addition = (a, b) -> a + b;
        MathOperation subtraction = (a, b) -> a - b;
        MathOperation multiplication = (a, b) -> a * b;

        // Using the custom math operations
        int result1 = addition.operate(5, 3);
        int result2 = subtraction.operate(5, 3);
        int result3 = multiplication.operate(5, 3);

        System.out.println(result1); // Output: 8
        System.out.println(result2); // Output: 2
        System.out.println(result3); // Output: 15
    }
 }
---------------------------------------------------------------------------------------------------------------
Memory Management (Useful: 1] Click 2] Click)
When we execute a Java program, two different types of memory spaces are created to store various data types. These are Stack memory and Heap Memory.
The stack memory is a region of memory used for storing primitive data types, method calls, and reference variables. The stack memory is managed by the JVM (Java Virtual Machine). The heap memory is a region of memory used for storing objects and arrays. The heap memory is also managed by the JVM and is shared among all threads. When an object is created, memory is allocated from the heap memory, and a reference to that object is stored on the stack.
In Java, memory management is handled automatically by the JVM through a process called garbage collection. When an object is no longer being referenced, the JVM automatically frees up the memory allocated for that object.
Stack Memory
The stack memory stores primitive data types, method calls, and reference variables. Primitive data types, such as int, boolean, char, etc., are stored directly on the stack. Whereas Non-Primitive data types are stored on the Heap memory, but references to their memory addresses are stored on the stack memory.
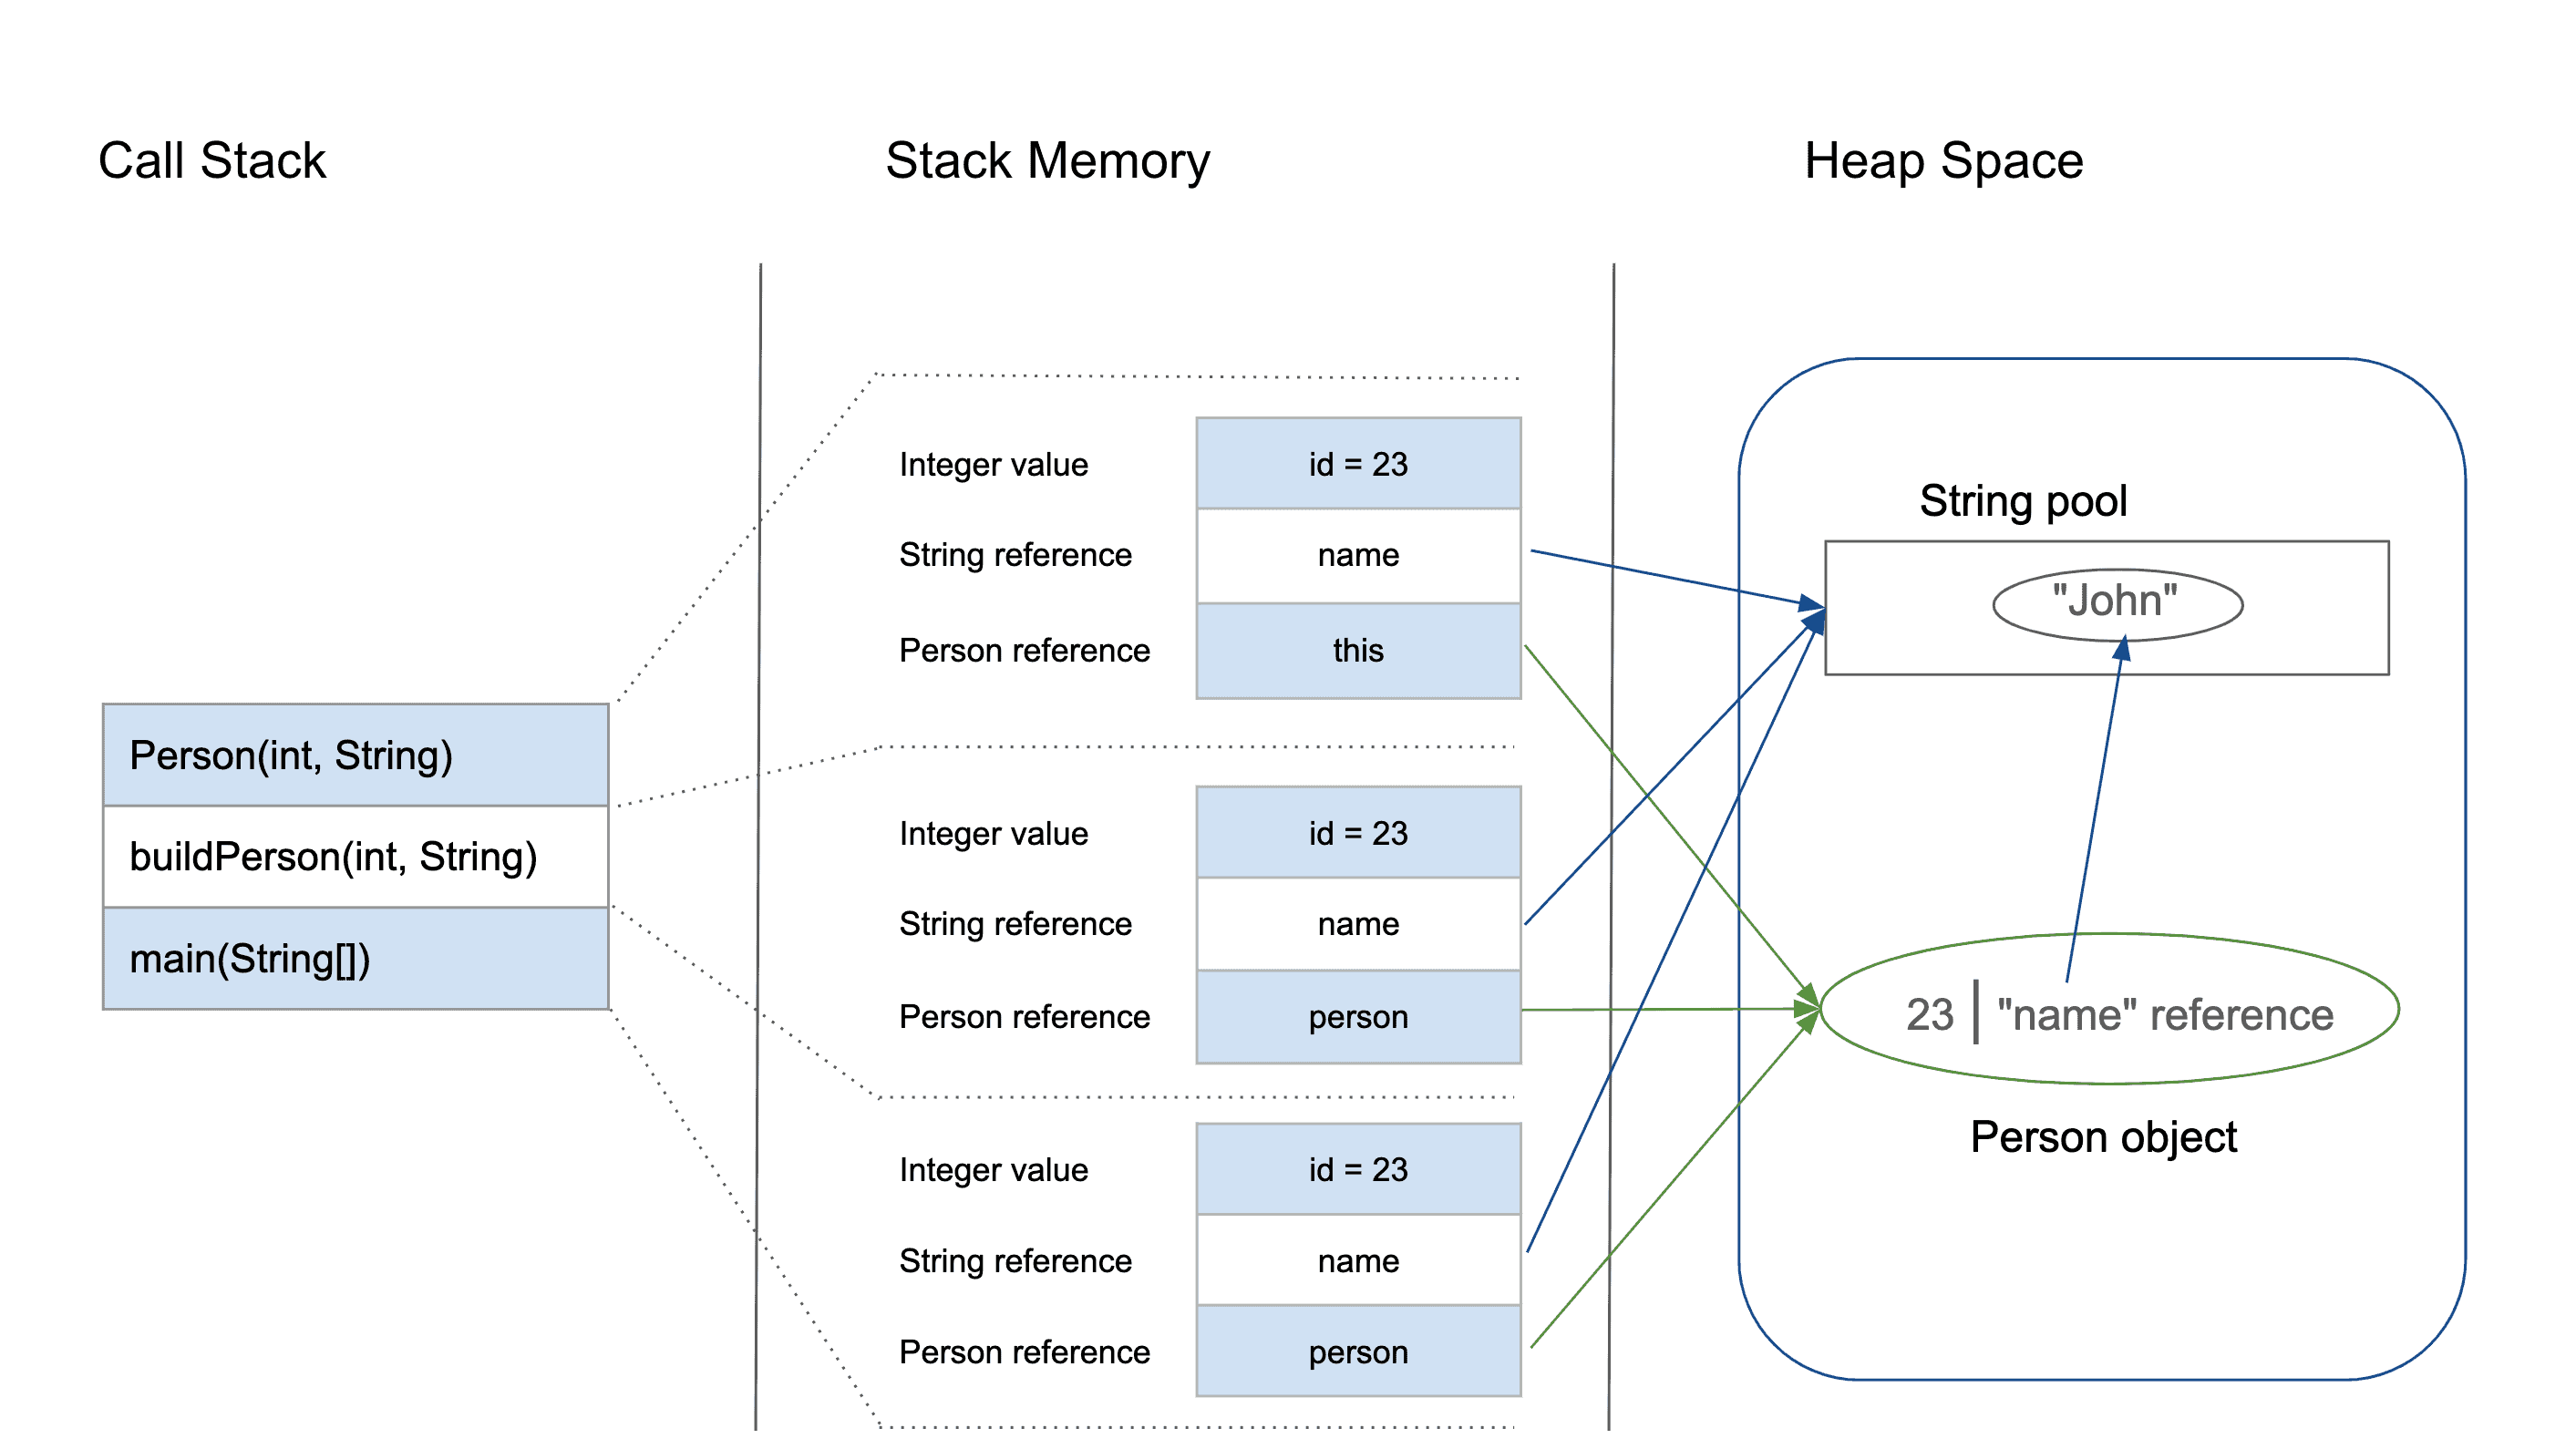
The Stack is also responsible to store method calls which allows execution of methods in proper order. When a method is called, a new frame is added to the top of the stack memory, and when the method returns, the frame is removed from the stack. The stack memory is a LIFO (Last In First Out) data structure, which means that the most recently added item is the first one to be removed.

NOTE : In Java, If we try to print value of any object directly it returns the memory address of that object, because Non-Primitive data types are actually stored on Heap and only their reference variables which hold memory addresses are stored in Stack.
 import java.util.Arrays;

 class Animal {
    String name;
    int age;

    Animal(String name, int age) {
        this.age = age;
        this.name = name;
    }

    void printAll() {
        System.out.println("Name : " + name + " Age : " + age);
    }
 }


 public class Main {
    public static void main(String[] args) {

        int[] arr1 = {1, 2, 3, 4, 5};
        int[] arr2 = arr1;
        System.out.println(arr2);                    // [I@15aeb7ab (memory address)
        System.out.println(Arrays.toString(arr2));  // [1, 2, 3, 4, 5]

        Animal obj1 = new Animal("Happy", 2);
        System.out.println(obj1);       // Animal@6acbcfc0 (memory address)
        obj1.printAll();               // Name : Happy Age : 2

    }
 }
NOTE : It is important to note that the size of the stack memory is fixed and limited, so if the stack is filled with large number of frames, it can result in a StackOverflowError.
 class MyClass {
    static void doSomething() {
        System.out.println("Doing something....");
        MyClass.doSomething();
    }
 }

 public class Main {
    public static void main(String[] args) {

        // Overflows the Stack and Causes StackOverflowError
        MyClass.doSomething();

    }
 }
NOTE : Stack memory is short-lived whereas heap memory lives from the start till the end of application execution. Stack memory is very fast when compared to heap memory.
Heap Memory
In Java, storing objects or Non-primitives directly on the stack memory is not possible because the stack memory has a fixed size and can only store data of a fixed size. When an object is created, it can have a varying size, and its size may not be known until runtime. This means that the stack memory cannot be used to store objects because it would be difficult to determine the amount of memory required to store an object on the stack. If an object was stored on the stack, its lifetime would be limited to the lifetime of the method that created it, which would be very limiting.

The heap memory stores non-primitives like objects and arrays. When an object is created, memory is allocated from the heap memory and it's stored there, and a reference to that object is stored on the stack. The heap memory does'nt have a fixed size and is designed to support dynamic allocation of memory for objects and arrays and its size can be dynamically increased/decreased at runtime. The lifetime of the object is not tied to the method that created it, and the object can be accessed and modified by other methods. This makes the heap memory a more flexible data structure for storing objects and arrays than the stack memory.
Reference Variables
Reference variables in Java store the memory address of an object, which is used to access and manipulate the object's data. Reference variables are almost always non-primitives or objects, and they are stored on the stack memory as memory addresses that point to the actual object or data stored in the heap memory. Non-reference variables, on the other hand, are basically primitives that are stored directly on the stack memory. When a reference variable is created, memory is allocated on the stack to store the reference variable's value, which is the memory address of the object or data stored in the heap memory.
 public class Main {
    public static void main(String[] args) {
        // Creating reference variables for objects
        String str = "Hello";
        Integer num = 42;
        Object obj = new Object();

        // Creating reference variables for arrays
        int[] arr1 = new int[5];
        double[] arr2 = new double[10];
        String[] arr3 = new String[3];

        // Printing the values of the reference variables
        System.out.println(str);     // Hello
        System.out.println(num);     // 42
        System.out.println(obj);     // java.lang.Object@7cd845d3
        System.out.println(arr1);    // [I@6d06d69c
        System.out.println(arr2);    // [D@7852e922
        System.out.println(arr3);    // [Ljava.lang.String;@4e25154f
    }
 }
Reference variables are typically created with the 'new' keyword. When we create an object or an array in Java, memory is allocated for the object or array on the heap, and a reference to that memory location is returned. We can then assign that reference to a variable, which becomes a reference variable.
NOTE : When the data stored in the heap memory is modified, all reference variables that point to that memory location will see the changes in value.

Example] Below we can see even though the original reference changes its value or location was pointing, other reference variables maintain their values.
 import java.util.Arrays;

 public class Main {
    public static void main(String[] args) {

        int[] arr1 = {1, 2, 3, 4, 5};
        int[] arr2 = arr1;                 // point to same memory location
        arr1 = new int[] {5,6,7,8,9,10};  // assign new memory location

        System.out.println(Arrays.toString(arr1));   // [5, 6, 7, 8, 9, 10]
        // Still references the previous memory space
        System.out.println(Arrays.toString(arr2));  // [1, 2, 3, 4, 5]

    }
 }
 class Person {
    String name;
    int age;

    Person(String name, int age){
        this.name = name;
        this.age = age;
    }

    void printAll(){
        System.out.println("NAME : "+name+" AGE : "+age);
    }
 }


 public class Main {
    public static void main(String[] args) {

        Person p1 = new Person("Deepesh", 20);
        Person p2 = p1;                 // point to same memory location
        p1 = new Person("Rohan", 22);  // assign new memory location

        p1.printAll();  // NAME : Rohan AGE : 22
        // Still references the previous memory space
        p2.printAll();  // NAME : Deepesh AGE : 20

    }
 }
NOTE : Reference variables cannot be used to refer to primitive data types directly since they are not objects, and they are stored directly on the stack memory. But we can convert primitives to objects using wrapper classes and store them on heap memory by creating their reference variables.
Null in Java
In Java, the "null" is a special type of literal or value that can be assigned to reference variables of any object type. It represents the absence of an object, or an uninitialized variable. When you declare a reference variable in Java, space in memory is allocated for the reference to an object of that type. If you don't initialize the variable with a valid object reference, it does'nt point to anything and is automatically initialized to null.
 public class Main {
    public static void main(String[] args) {

        // Reference variable of type String, initialized to null
        String str = null;

        if (str == null) {
            System.out.println("str is null"); // prints 'str is null'
        }

        // Attempting to access a method on a null reference.
        int length = str.length(); // throws a NullPointerException

    }
 }
The reference variable that points to nothing has a value null, and attempting to access the variable's methods or properties will result in a NullPointerException, since the variable is'nt pointing to anything.
NOTE : The 'null' is not a data type in Java, but rather a special value that can be assigned to reference variables of any object type. Additionally, you cannot create an object of type null - it is simply a value that represents the absence of an object.
Static & Dynamic Memory Allocation
In static memory allocation, the memory is allocated at compile time and remains fixed throughout the program's execution. This means that the amount of memory required is known at compile time and does not change during runtime. Static memory allocation is typically used for global variables, static variables, and constants. In Java, static memory allocation is used for static variables, which are allocated memory once when the class is loaded into memory and remain in memory throughout the program's execution.
In dynamic memory allocation, the memory is allocated/deallocated during runtime and can change as the program executes. This means that the amount of memory required is not known at compile time and can vary at runtime depending on the program's input and execution. Dynamic memory allocation is typically used for objects, arrays, and dynamically created data structures. In Java, dynamic memory allocation is used for objects and arrays, which are allocated memory from the heap memory during runtime.
In the context of stack and heap memory in Java, static memory allocation refers to the allocation of memory on the stack memory during compilation. Dynamic memory allocation refers to the allocation of memory for objects and arrays on the heap memory during runtime.
NOTE : Static Memory Allocation often takes place for Primitives, whereas as Dynamic Memory Allocation takes place for Non-Primitives like Arrays and Objects.
NOTE : Dynamic memory allocation requires explicit allocation and deallocation in languages such as C and C++. However, in Java, dynamic memory allocation/deallocation is managed automatically by the JVM through a process called garbage collection, which automatically frees up memory for objects that are no longer being used.
Garbage Collection
Garbage collection is the process of automatically freeing up memory that is no longer in use by the program, making it available for use by other parts of the program or by other programs running on the system. The garbage collector in Java works by periodically examining all the objects in the heap and identifying which objects are no longer in use. An object is considered to be no longer in use if there are no live references to it.
In Java, the garbage collector is responsible for reclaiming memory that is no longer needed by the application. The garbage collector operates on the heap memory, which is where objects are stored. The stack memory, on the other hand, is managed automatically by the Java Virtual Machine (JVM) and does not require garbage collection.
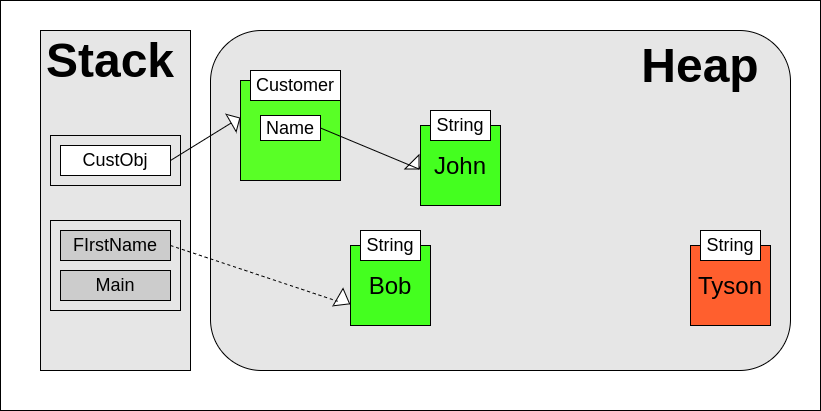
NOTE : In Java, an object stored in heap memory becomes eligible for garbage collection when it is no longer reachable or not referenced by any variables. Below are some situations where an object becomes eligiblke for removal by the garbage collector.
 // 1] The object's reference variable is set to null:
 MyClass obj = new MyClass();
 // obj is no longer referencing any object, eligible for garbage collection
 obj = null;


 // 2] The object goes out of scope:
 public void myMethod () {
    MyClass obj = new MyClass(); // obj is in scope
 }
 // obj goes out of scope and becomes eligible for garbage collection
 // 3] The object's reference variable is reassigned:
 MyClass obj1 = new MyClass();
 MyClass obj2 = new MyClass(); // obj1 is not eligible for garbage collection yet
 obj1 = obj2; // obj1 now references obj2, so obj1 is eligible for garbage collection
---------------------------------------------------------------------------------------------------------------
Strings in Java
In Java, a string is a non-primitive data type that represents a sequence of characters. Strings are widely used in Java programs to represent text and are represented by the java.lang.String class. Strings are objects, while primitive types (such as int, float, boolean, etc.) are not.
When you declare a string variable, you're actually creating an instance of the String class. This means that you can call methods on a string object, like length(), charAt(), indexOf(), etc.
 public class Main {
    public static void main(String[] args) {

        // Different ways to make string objects

        // Using string literals
        String str1 = "Hello World";

        // Using the new keyword
        String str2 = new String("Hello World");

        // Using a character array
        char[] charArray = {'H', 'e', 'l', 'l', 'o', ' ', 'W', 'o', 'r', 'l', 'd'};
        String str3 = new String(charArray);

        // Using the valueOf() method
        int num = 12345;
        String str4 = String.valueOf(num);

        // Using concatenation
        String str5 = "Hello";
        String str6 = "World";
        String str7 = str5 + " " + str6;

        System.out.println(str1);       // Hello World
        System.out.println(str2);      // Hello World
        System.out.println(str3);     // Hello World
        System.out.println(str4);    // 12345
        System.out.println(str7);   // Hello World
    }
 }
String Methods
In Java, since Strings are Non-Primitive objects they also come with a bunch of methods that we can utilize to convert strings into different formats.
 import java.util.Arrays;

 public class Main {
    public static void main(String[] args) {
        String str1 = "Hello";
        String str2 = "World";
        String str3 = "   Spaces   ";
        String str4 = "one,two,three";

        // length() method
        int length1 = str1.length();
        int length2 = str2.length();
        System.out.println("Length of str1: " + length1);
        System.out.println("Length of str2: " + length2);

        // concat() method
        String str5 = str1.concat(str2);
        System.out.println("Concatenated string: " + str5);

        // equals() method
        boolean equal = str1.equals(str2);
        System.out.println("str1 equals str2: " + equal);

        // toLowerCase() and toUpperCase() methods
        String str6 = "Hello, World!";
        String lowerCaseStr = str6.toLowerCase();
        String upperCaseStr = str6.toUpperCase();
        System.out.println("Lowercase string: " + lowerCaseStr);
        System.out.println("Uppercase string: " + upperCaseStr);

        // trim() method
        String trimmedStr = str3.trim();
        System.out.println("Trimmed string: " + trimmedStr);

        // indexOf() method
        int index = str6.indexOf(",");
        System.out.println("Index of comma: " + index);

        // substring() method
        String substring = str6.substring(7);
        System.out.println("Substring starting from index 7: " + substring);

        // toCharArray() method
        char[] charArray = str1.toCharArray();
        System.out.println("charArray: " + Arrays.toString(charArray));

        // strip() method
        String strippedStr = str3.strip();
        System.out.println("Stripped string: " + strippedStr);

        // split() method
        String[] splitStr = str4.split(",");
        System.out.println("Split string: " + Arrays.toString(splitStr));

    }
 }

 //Length of str1: 5
 //Length of str2: 5
 //Concatenated string: HelloWorld
 //str1 equals str2: false
 //Lowercase string: hello, world!
 //Uppercase string: HELLO, WORLD!
 //Trimmed string: Spaces
 //Index of comma: 5
 //Substring starting from index 7: World!
 //charArray: [H, e, l, l, o]
 //Stripped string: Spaces
 //Split string: [one, two, three]
Stringpool in Java
The string pool in Java is a part of the heap memory. Specifically, the string pool is a special area of the heap memory where the JVM stores string literals created inside a Java program. When we create a string using the string literal syntax it is automatically stored inside stringpool and string literals with same value reference the same memory address.
 public class Main {
    public static void main(String[] args) {

        // String Literal Syntax
        String <variable name> = “<value of string>”;

        // Stored inside String pool
        String name = "Deepesh";
        String surname = "Mhatre";
        String city = "Mumbai";

        // Stored as reference variables outside stringpool
        String name = new String("Deepesh");
        String surname = new String("Mhatre");
        String city = new String("Mumbai");

    }
 }
When we create a new string literal, the JVM checks whether a same string value is already present in the string pool. If it is, the JVM returns a reference to the existing string object in the pool. If it is not present, the JVM creates a new string object in the pool and returns a reference to it. This behavior of the string pool can be useful for improving performance and reducing memory usage in Java programs.

NOTE : String pool is only used for string literals. Strings that are created using the 'new' keyword, such as String str3 = new String("hello");, are not added to the string pool. Instead, a new object is created in the heap memory, like any other object as reference variables.
 public class Main {

    public static void main(String[] args) {

        // Both reference same location in stringpool
        String a = "Deepesh";
        String b = "Deepesh";
        // Stored as reference variable
        String c = new String("Deepesh");

        System.out.println(a==b);           // true
        System.out.println(a==c);          // false
        // print actual memory addresses.
        System.out.println(System.identityHashCode(a)); // 363771819
        System.out.println(System.identityHashCode(b)); // 363771819
        System.out.println(System.identityHashCode(c)); // 2065951873

    }
 }
In Java, strings that are stored in the stringpool are immutable. This means that once a string is created, its value cannot be changed. Therefore, if you try to reassign a new value to a string literal, the JVM will create a new string object in the string pool with the new memory address, while the original string object remains unchanged.
 public class Main {

    public static void main(String[] args) {

        String a = "Deepesh";
        String b = "Deepesh";
        System.out.println(System.identityHashCode(a));  // 363771819
        System.out.println(System.identityHashCode(b));  // 363771819

        a = "Deepesh123";   // Creates new string in stringpool
        System.out.println(System.identityHashCode(a));  // 2065951873

    }
 }
This behavior is enforced by the JVM to ensure that multiple references to the same string literal always have the same value, and that the value of a string literal is not accidentally changed by code that is outside of its control.
NOTE : The main reason for immutability of strings is security. If strings were mutable, any changes made to a string object could potentially affect all the references pointing to that object. This could lead to unintended changes and errors in the program, and could also compromise the security of sensitive data stored in the string. By making strings immutable, Java ensures that once a string object is created, its value remains same for all the references.
String Concatenation
String concatenation in Java is the process of combining two or more strings into a single string. In Java, you can concatenate strings using the '+' operator or the concat() method.
 public class Main {
    public static void main(String[] args) {

        // Char Syntax :  'A'
        // String Syntax :  "ABCDE"

        System.out.println('a');  // a
        System.out.println('b');  // b
        System.out.println('a' + 'b');  // 195

        System.out.println("a");  // a
        System.out.println("b");  // b
        System.out.println("a" + "b");  // ab

        System.out.println('a' + "A");  // aA
        System.out.println('A' + 100);  // 165
        System.out.println("A" + 100);  // A100

        String str1 = "Hello";
        String str2 = "World";
        String str3 = str1.concat(" ").concat(str2);
        System.out.println(str3); // "Hello World"

    }
 }
// Print all alphabets A-Zpublic class Main {
public static void main(String[] args) {
for(int i=0;i< 26;i++){
int asci_code = 'a'+i; // Get ascii code
char ch = (char) asci_code; // Convert ascii code to it's character
System.out.println(ch);
}
}
}
NOTE : In Java, when you use the + operator to concatenate a char value with another char or with an int, the char value is automatically converted to its corresponding ASCII code before the concatenation happens.
StringBuilder
In Java, Strings are immutable which means they cannot be modified and when we modifiy the value of a string literal, the JVM internally creates a new string object with the modified value, while the previous value still remains unchanged inside the heap memory occupying the allocated space.
This can be inefficient in situations where you need to modify a string multiple times, as it can lead to the creation of many unnecessary string objects, which can consume a lot of memory and slow down your program.
To address this issue, Java provides the 'StringBuilder' class, which is mutable and allow you to modify the contents of a string without creating new string objects. It also provides methods for appending, inserting, and deleting characters in a string, as well as for converting the contents of the string to other data types.
 public class Main {
    public static void main(String[] args) {

        // NOT EFFICIENT
        String alphabets = "";
        for(int i=0;i< 26;i++){
            char ch = (char) ('a'+i); // Convert ASCII to Alphabet Char
            alphabets = alphabets + ch;  // Concatenate with String
        }
        System.out.println(alphabets);  // abcdefghijklmnopqrstuvwxyz
    }
 }
 public class Main {
    public static void main(String[] args) {

        // EFFICIENT
        StringBuilder alphabets = new StringBuilder();
        for(int i=0;i< 26;i++){
            char ch = (char) ('a'+i); // Convert ASCII to Alphabet Char
            alphabets.append(ch);  // Concatenate with String
        }
        System.out.println(alphabets);  // abcdefghijklmnopqrstuvwxyz
    }
 }
The StringBuilder object is mutable, which means that you can modify its contents without creating a new object each time. It works by creating a mutable object on the heap memory that allows you to modify its contents without creating new objects each time.
NOTE : The StringBuilder objects are not stored in the string pool. When you create a StringBuilder object, a new object is created on the heap memory, like any other object.
---------------------------------------------------------------------------------------------------------------
Collection Framework
The Java collections framework is a set of classes and interfaces that Implement commonly used data structures. Although referred to as a framework, it works in a manner of a library. The collections framework provides both interfaces that define various collections and classes that implement them.
The utility package, (java.util) contains all the classes and interfaces that are required by the collection framework. All the collections extend the collection interface thereby extending the properties of the iterator and the methods of this interface. The following figure illustrates the hierarchy of the collection framework :
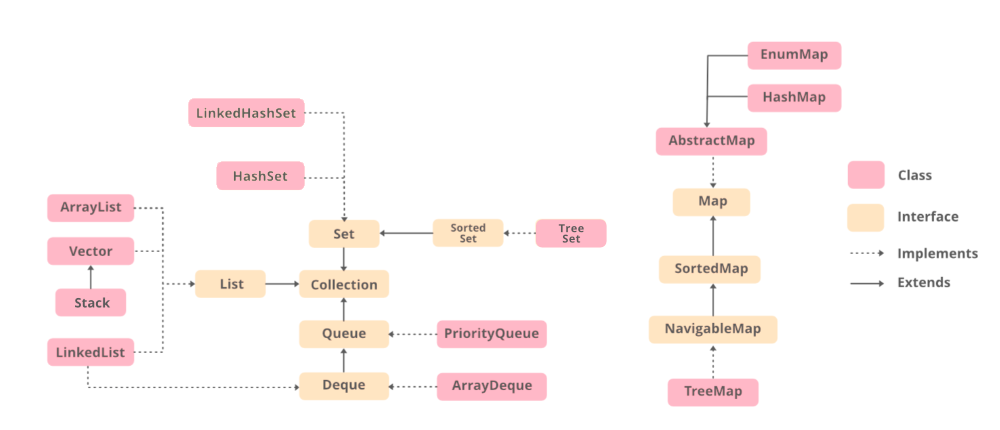
NOTE : In Java, most commonly used data structures are implemented by different classes under the "Collection" and "Map" interfaces. This provides a common API and methods through which we can access and deal with these structures.
The Collection interface ("java.util.Collection") is used for collections of objects, such as lists, sets, and queues. The interface provides methods for adding, removing, and accessing elements in the collection, as well as methods for iterating over the collection.
The Map interface ("java.util.Map") is used for mapping keys to values, such as with dictionaries or hash tables. The interface provides methods for adding, removing, and accessing key-value pairs in the map, as well as methods for iterating over the keys, values, or key-value pairs.
 import java.util.ArrayList;     // Implements List & Collection interfaces
 import java.util.LinkedList;
 import java.util.Queue;
 import java.util.Stack;

 public class Main{
     public static void main(String[] args) {

     // List of numbers
     ArrayList<Integer> i = new ArrayList<>();
     i.add(10); i.add(11); i.add(12);
     i.remove(0);
     System.out.println(i);

     // LinkedList implementation of Queue
     Queue<String> j = new LinkedList<>();
     j.add("A"); j.add("B"); j.add("C");
     j.remove();
     System.out.println(j);

     Stack<Integer> k = new Stack<>();
     k.add(10); k.add(11); k.add(12);
     k.remove(1);
     System.out.println(k);

    }
 }

 /*
 [11, 12]
 [B, C]
 [10, 12]
 */
 import java.util.ArrayList;
 import java.util.Collection;
 import java.util.List;
 import java.util.LinkedList;
 import java.util.Stack;

 public class Main{
    public static void main(String[] args) {

        // Collectiion & List Interfaces are parents.

        // List of numbers
        Collection<Integer> i = new ArrayList<>();
        i.add(10); i.add(11); i.add(12);
        i.remove(0);
        System.out.println(i);

        // LinkedList implementation of Queue
       List<String> j = new LinkedList<>();
        j.add("A"); j.add("B"); j.add("C");
        j.remove("A");
        System.out.println(j);

        Collection<Integer> k = new Stack<>();
        k.add(10); k.add(11); k.add(12);
        k.remove(1);
        System.out.println(k);

    }
 }

 // [10, 11, 12]
 // [B, C]
 // [10, 11, 12]
NOTE : Collections cannot hold primitive types such as int, long, or double, instead they only hold Wrapper Class Objects such as Integer, Long, or Double. Internally Java converts the primitive values to Wrapper class objects using the valueOf() method.
---------------------------------------------------------------------------------------------------------------
Arrays in Java
In Java, an array is a data structure that allows you to store a fixed-size collection of elements of the same type. Arrays are often used to hold a sequence of values or objects, and can be accessed using an index.
class Person{String name;
int age;
Person(String name, int age){
this.name = name;
this.age = age;
}
}
public class Main {
public static void main(String[] args) {
// SYNTAX 1: dataType[] name = new dataType[size];
int[] intArray = new int[5]; // Creates an int array with a size of 5
intArray[0] = 10; // Assigns 10 to the first element of intArray
intArray[1] = 20; // Assigns 20 to the second element of intArray
intArray[2] = 30; // Assigns 30 to the third element of intArray
intArray[3] = 40; // Assigns 40 to the fourth element of intArray
intArray[4] = 50; // Assigns 50 to the fifth element of intArray
// SYNTAX 2: dataType[] name = {value1, value2, value3...};
String[] stringArray = {"apple", "banana", "orange"};
stringArray[1] = "grape"; // Replaces "banana" with "grape" in stringArray
// Store Custom Objects
Person[] group1 = new Person[3];
group1[0] = new Person("Deepesh",20);
group1[1] = new Person("Rohan",21);
Person p1 = new Person("Deepesh",20);
Person p2 = group1[1] = new Person("Rohan",21);
Person[] group2 = {p1,p2};
}
}
Some main points to know about arrays in Java are as followed :
- Arrays in Java can only hold values of same type. To store values of different types we can use other collections like ArrayList or LinkedList
- Arrays in Java are fixed-size, we can modify the values of existing elements but we cannot add new elements from the array once defined.
 public class Main {
    public static void main(String[] args) {

        // SYNTAX :
        // 1] dataType[] name = new dataType[size];
        // 2] dataType[] name = {value1, value2, value3...};

        int[] arr1 = new int[2];
        arr1[0] = 100;
        arr1[1] = 100;
        arr1[2] = 100; // ERROR : INDEXOUT OF BOUND

        int[] arr2 = {0,1,2,3};
        arr2[2] = 10;
        arr2[5] = 4;  // // ERROR : INDEXOUT OF BOUND

    }
 }
Arrays can also be multidimensional meaning they can hold multiple levels of data. For example, a two-dimensional array can be used to store data in a table or grid format, with rows and columns of values.
 public class Main {
    public static void main(String[] args) {

     // SYNTAX: dataType[][] name = new dataType[rows][cols];
     int[][] twoDArray = new int[3][4]; // Creates a 3x4 integer array
     twoDArray[0][0] = 10; // Assigns 10 to the element at row 0, column 0
     twoDArray[0][1] = 20; // Assigns 20 to the element at row 0, column 1
     twoDArray[2][0] = 90; // Assigns 90 to the element at row 2, column 0
     twoDArray[2][1] = 100; // Assigns 100 to the element at row 2, column 1

     // SYNTAX: dataType[][] name = {{row1col1, row1col2...}, {row2col1, row2col2...},...};
     String[][] twoDStringArray = {
                {"John", "Doe", "25"},
                {"Jane", "Doe", "30"},
                {"Bob", "Smith", "45"}
     };

     // Accessing a specific element in the 2D array
     int element = twoDArray[1][2]; // Accesses the element at row 1, column 2
     System.out.println("Element at row 1, column 2: " + element);

     String name = twoDStringArray[2][0]; // Accesses the element at row 2, column 0
     System.out.println("Name at row 2, column 0: " + name);
    }
 }
NOTE : To Traverse through each element in a multi-dimensional array we need to use nested loops.
Since a 2D array is essentially an array of arrays, we need to use nested loops to traverse through all the elements in each row and column. The outer loop will iterate over the rows, while the inner loop will iterate over the columns of each row, allowing us to access each element in the array.
public class Main {
public static void main(String[] args) {
int[][] arr = {
{1, 2, 3},
{4, 5, 6},
{7, 8, 9}
};
// Normal Loop
for (int row = 0; row < arr.length; row++) {
for (int column = 0; column < arr[row].length; column++) {
System.out.print(arr[row][column] + " ");
}
System.out.println(); // newline
}
// Enhanced Loop (see dataType is int[] since each element is an array)
for (int[] ints : arr) {
for (int anInt : ints) {
System.out.print(anInt + " ");
}
System.out.println();
}
// With Single Loop
for (int row = 0; row < arr.length; row++) {
System.out.println(Arrays.toString(arr[row]));
}
}
}
//1 2 3
//4 5 6
//7 8 9
//1 2 3
//4 5 6
//7 8 9
//[1, 2, 3]
//[4, 5, 6]
//[7, 8, 9]
For primitive data types, like int or boolean, the values of the elements are set to their default values (0 for int, false for boolean) until explicitly assigned a different value. For reference data types, like String or Object, the default value is null until explicitly assigned a different value.
 import java.util.Arrays;

 public class Main {
    public static void main(String[] args) {

        // Default Values

       int[] myarr1 = new int[10];
       System.out.println(Arrays.toString(myarr1));
       // [0, 0, 0, 0, 0, 0, 0, 0, 0, 0]

        boolean[] myarr2 = new boolean[10];
        System.out.println(Arrays.toString(myarr2));
        // [false, false, false, false, false, false, false, false, false, false]

        String[] myarr4 = new String[10];
        System.out.println(Arrays.toString(myarr4));
        // [null, null, null, null, null, null, null, null, null, null]

    }
 }
When you create an array in Java, the JVM allocates memory for the array object on the heap and reference is stored inside stack memory. When you pass an array as an argument to a method or assign it to a variable, only the reference to the array object is copied to the stack. The actual array object and its elements remain on the heap.
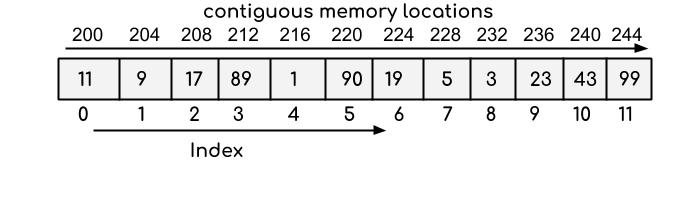
NOTE : In Java, the values of an array's elements are stored in contiguous memory locations, meaning that they are stored one after the other in memory. This makes it possible to access array elements using their index values, since the location of each element in memory can be calculated based on its index and the size of each element.
ArrayList in Java
In Java, an ArrayList is a dynamic array implementation that can resize itself when needed. It is a part of the Java Collection Framework and is located in the 'java.util' package.
An ArrayList can hold elements of any data type, such as integers, characters, objects, and so on. When you create an ArrayList, you don't need to specify its size beforehand because it can automatically adjust its size based on the number of elements added to it.
 import java.util.ArrayList;
 import java.util.Arrays;

 public class Main {
    public static void main(String[] args) {

        // SYNTAX 1 : ArrayList<Type> name = new ArrayList<>(INITIAL_SIZE);
       // SYNTAX 2 : ArrayList<Type> name = new ArrayList<>(value1,value2,...);


        ArrayList<String> fruits1 = new ArrayList<>(3);
        fruits1.add("apple");
        fruits1.add("banana");
        fruits1.add("orange");
        fruits1.add("vineger");
        System.out.println(fruits1); // ["apple", "banana", "orange", "vineger"]


        ArrayList<Integer> numbers = new ArrayList<>(Arrays.asList(1, 2, 3, 4, 5));
        System.out.println(numbers); // [1, 2, 3, 4, 5]

        // List of different things
        ArrayList<Object> mixedList = new ArrayList<>();
        mixedList.add("apple");
        mixedList.add(10);
        mixedList.add(true);
        System.out.println(mixedList); // ["apple", 10, true]

    }
 }
NOTE : Arrays are used when you know the no. of elements to be stored. In case you are unsure about length and type of data to be stored then use ArrayList.
The ArrayList is part of collection framework which implements the Collection & List interfaces, hence we can get access to various methods to manipulate the list.
 import java.util.ArrayList;

 public class Main {
    public static void main(String[] args) {

        // create an ArrayList of strings
        ArrayList<String> colors = new ArrayList<String>();

        // add elements to the list
        colors.add("red");
        colors.add("green");
        colors.add("blue");
        colors.add("yellow");
        System.out.println("Original list: " + colors);
        //[red, green, blue, yellow]

        // remove specific element
        colors.remove("green");

        // check if an element is present in the list
        colors.contains("yellow");

        // replace an element at a specific index
        colors.set(1, "purple");
        System.out.println("List after replacing element at index 1: " + colors);
        // get the index of an element
        int index = colors.indexOf("blue");
        System.out.println("Index of blue: " + index); // 2

        // check if the list is empty
        boolean empty = colors.isEmpty();
        System.out.println("Is the list empty? " + empty); // false

        // create a new ArrayList and add elements to it
        ArrayList<String> moreColors = new ArrayList<String>();
        moreColors.add("orange");
        moreColors.add("pink");

        // add all elements of a collection to the list
        colors.addAll(moreColors);
        System.out.println("List after adding all elements of another list: " + colors);
        // [red, purple, blue, yellow, orange, pink]

        // remove all elements of a collection from the list
        colors.removeAll(moreColors);
        System.out.println("List after removing all elements of another list: " + colors);
        // [red, purple, blue, yellow]
    }
 }
NOTE : Internally the ArrayList object at any given time also holds a fixed-sized array, but when that array gets filled upto a certain capacity, a new larger array is created and the contents are copied to it.
Below are the steps that an ArrayList takes internally to become resizable :
The ArrayList is created with an initial capacity (default capacity is 10) and an underlying array of that capacity is initialized.
When an element is added to the ArrayList using the
add()method, the element is inserted at the end of the list if there is enough space available in the underlying array.If there is not enough space available in the underlying array, the ArrayList needs to resize the array to accommodate the new element. To do this, it creates a new array with a larger capacity, typically 50% to 100% larger than the original capacity.
The existing elements are then copied from the old array to the new array using the
System.arraycopy()method or similar, which is a native code implementation that is optimized for performance.Once the elements are copied to the new array, the new array becomes the underlying array for the ArrayList, and the old array is garbage collected.
Subsequent elements are added to the new array in the same way as before until the array is full again.
When the array becomes full again, the ArrayList repeats the resize process, creating a new array with a larger capacity and copying the existing elements to the new array.
NOTE : The Time complexity for adding an element to ArrayList is O(1) since the element is added to the end of the List. However, if the underlying array is full, the ArrayList needs to resize the array by creating a new array with a larger capacity and copying all the existing elements from the old array to the new array. This operation takes O(n) time and hence the worst-case time complexity of adding an element to an ArrayList is O(n) when the underlying array needs to be resized.
---------------------------------------------------------------------------------------------------------------


Comments
Post a Comment