Next.JS version 13


Documentation : 1] Click)


NextJS Routing (NextJS 13)

Next.js 13 introduced a new routing system using the "app" directory. Next.js 12 already provided an easy way of handling routes through file-based routes. Adding a component to the "pages" folder would automatically make it a route. The Next.js 13 provides a more directory-based routing system which comes with a built-in setup for layouts, loading UI, error handling, and support for server components and streaming.

Next.js 12 used the "pages" directory for routing, but it is replaced with the "app" directory in Next.js 13. In the app directory, you use folders to define routes and the files inside these folders are used to define the UI of the page

NOTE : The pages/ directory still works in Next 13 to allow for incremental adoption. You can still use the "pages" folder as long as the routes don't clash with the "app" folder routes in which case you'll get an error. Generally the "pages" folder is now only used to define API routes.

Below are some special files Next.js provides to be defined inside route folders :

  • page.js - Create the index route ("/") in the name of containing folder and make the path publicly accessible. It is similar to "index.js" in pages folder of Next.js 12.
  • layout.js : Create shared UI for a segment and its children. A layout wraps a page or child segment.
  • loading.js : Create loading UI for a segment and its children. The loading UI is displayed while they load.
  • error.js : Create error UI for a segment and its children. The error UI is shown if an error is caught.
  • not-found.js : The not-found file is rendered when Next.js encounters a 404 error for that page. In Next.js 12, you’d have to manually create and set up a 404 page.
  • head.js : Define the contents of a route's HTML <head> tag.
NOTE : The filenames for these special files are reserved and cannot be used for any other tasks. Extensions like ".js", ".jsx" or ".tsx" can be used for special files


Index & Nested Routes

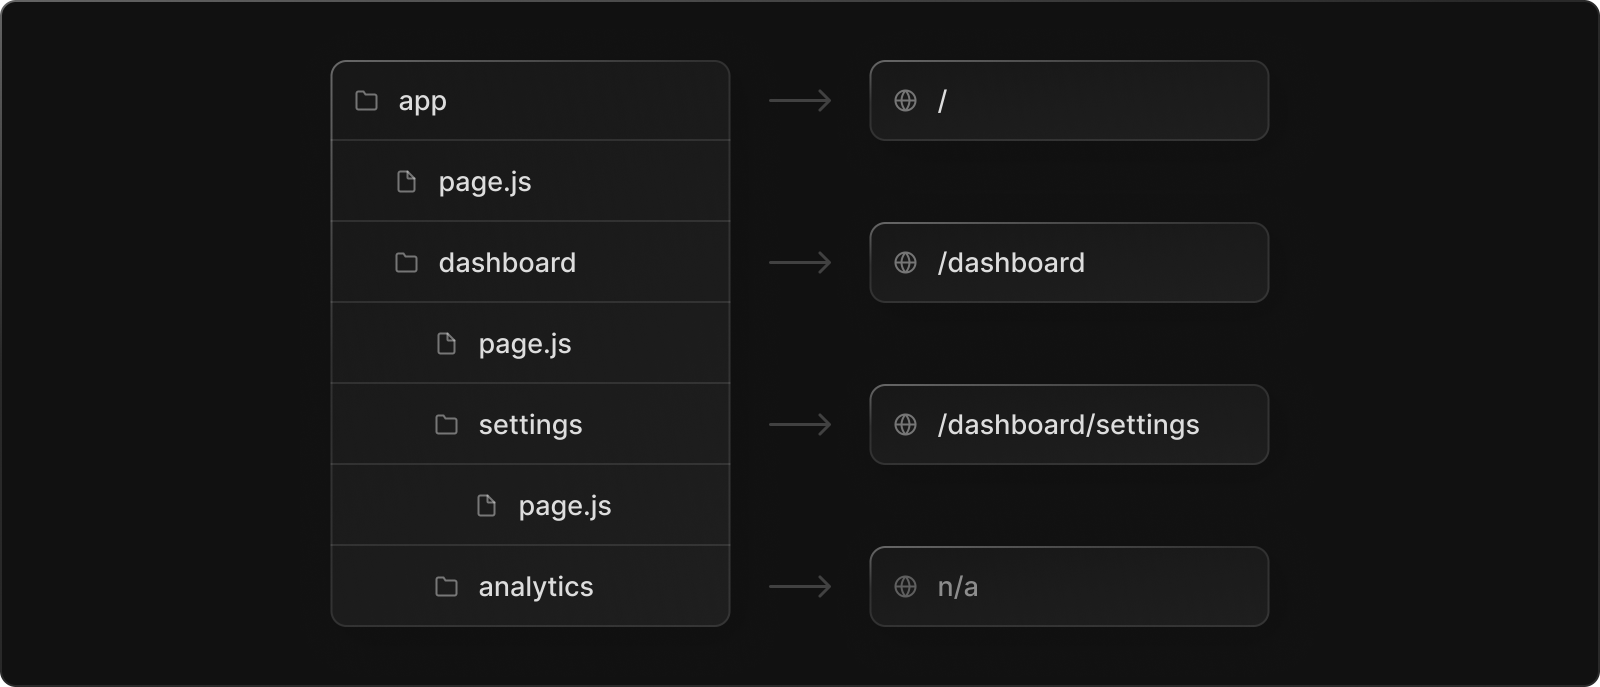
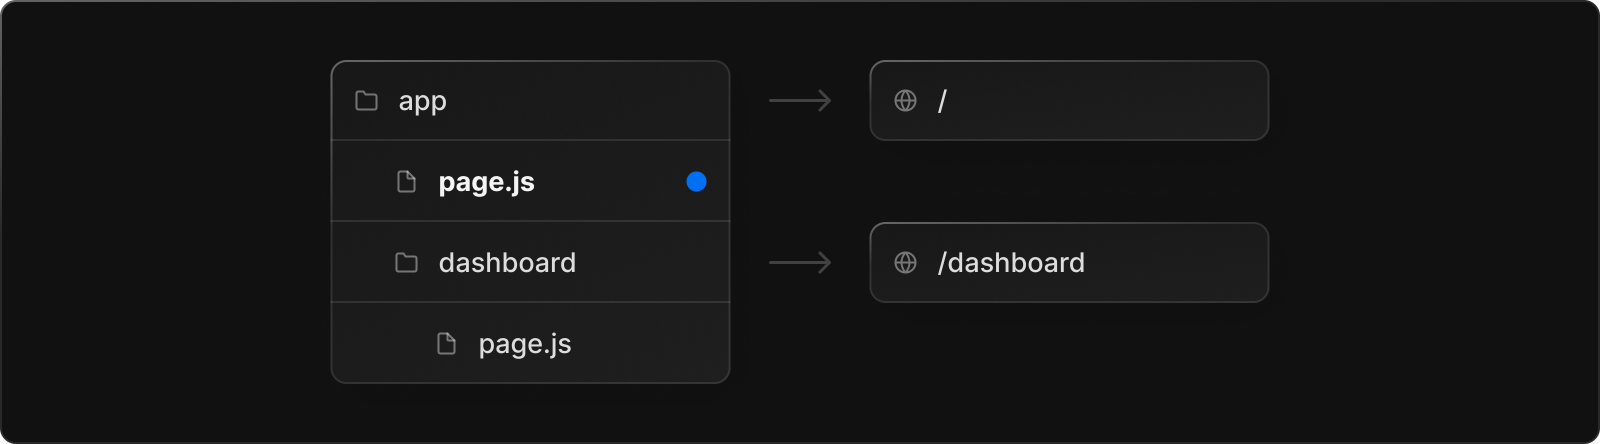
In Next.js 13 the root ("/") of the url is defined by the "page.js" file. Each route folder we create must contain a "page.js" file inside of it. 


// "app/page.js" will be available as "/"

// page.js
export default function Home() {
  return (
    <div align="center">
      <h1> Home Page </h1>
      <h3> Hello I am Deepesh I live in Mumbai </h3>
    </div>
  );
}

To create nested routes like "/dashboard" or "/setting", we need to create a new route folder and define a "page.js" file inside of it. Inside this route folder we can define all the special files provided by Next.js 13.


// "app/dashboard/page.js" will be available as "/dashboard"

// page.js
export default function Dashboard() {
    return (
      <div align="center">
        <h1> Dashboard Page </h1>
        <h3> Hello, you are at "/dashboard" path </h3>
      </div>
    );
  }

//------------------------------------------------------------------------------------

// "app/dashboard/hello/page.js" will be available as "/dashboard/hello"

// page.js
export default function Hello() {
    return (
      <div align="center">
        <h1> Hello Page </h1>
        <h3> Hello, you are at "/dashboard/hello" path </h3>
      </div>
    );
  }
 

NOTE : Since we create URL endpoints or segments through folders, we are free to store our react component files directly inside the route folders as the route folder only recognizes the "page.js" file as the active route file.


Dynamic Routes

Defining routes by using predefined paths is not always enough for complex applications. In Next.js 13 you can add square brackets ([ ]) to a route folder name to define URL parameters for a dynamic route, which are then passed to the "params" props of the component.


// "app/[username]/page.js" will be available as "/:username"

// page.js

// export default function User({params}){ }
export default function User(props) {

    const params = props.params

    return (
      <div align="center">
        <h1> User Page </h1>
        <h3> Hello {params.username}, you are at "/:username" path </h3>
      </div>
    );
  }

//------------------------------------------------------------------------------------

// "app/dashboard/[username]/page.js" will be available as "/dashboard/:username"

// page.js
export default function User(props) {

    const params = props.params

    return (
      <div align="center">
        <h1> User Dashboard Page </h1>
        <h3> Hello {params.username}, you are at "/dashboard/:username" path </h3>
      </div>
    );
  }
 

We can also further nest this dynamic behavior to the Url by creating more further variables inside the Url. Even with the use of [ ] the "page.js" still work the same.


// "app/dashboard/[username]/[profile]/page.js" available at
                                                     "/dashboard/:username/:profile"

// page.js
export default function Profile(props) {

    const params = props.params

    return (
      <div align="center">
        <h1> User Profile Page </h1>
        <h1> {params.profile} </h1>
        <h3> you are at "/dashboard/:username/:profile" path </h3>
      </div>
    );
  }
 

When using Typescript, we need to define the types for the params object too


// app/[username]/page.tsx

import React from 'react'

type Params = {
  params: { username: string };
}

export default function Page({params}:Params) {
  return (
    <>
    <h1> Hello World !</h1>
    <h1> {params.username} </h1>
    </>
  )
}


Route Groups

In Next.js 13 we create route folders for each unique URL segment we define, due to this we have alot of folder to manage. Grouping these route folders into a seperate folder is tidious since Next.js will consider them as just another route folder and add an extra URL segment.

In Next.js we can create a "Route Group" to organize multiple route folders into a seperate folder without affecting the URL. A route group can be created by wrapping a folder’s name in parenthesis . Eg - (foldername).


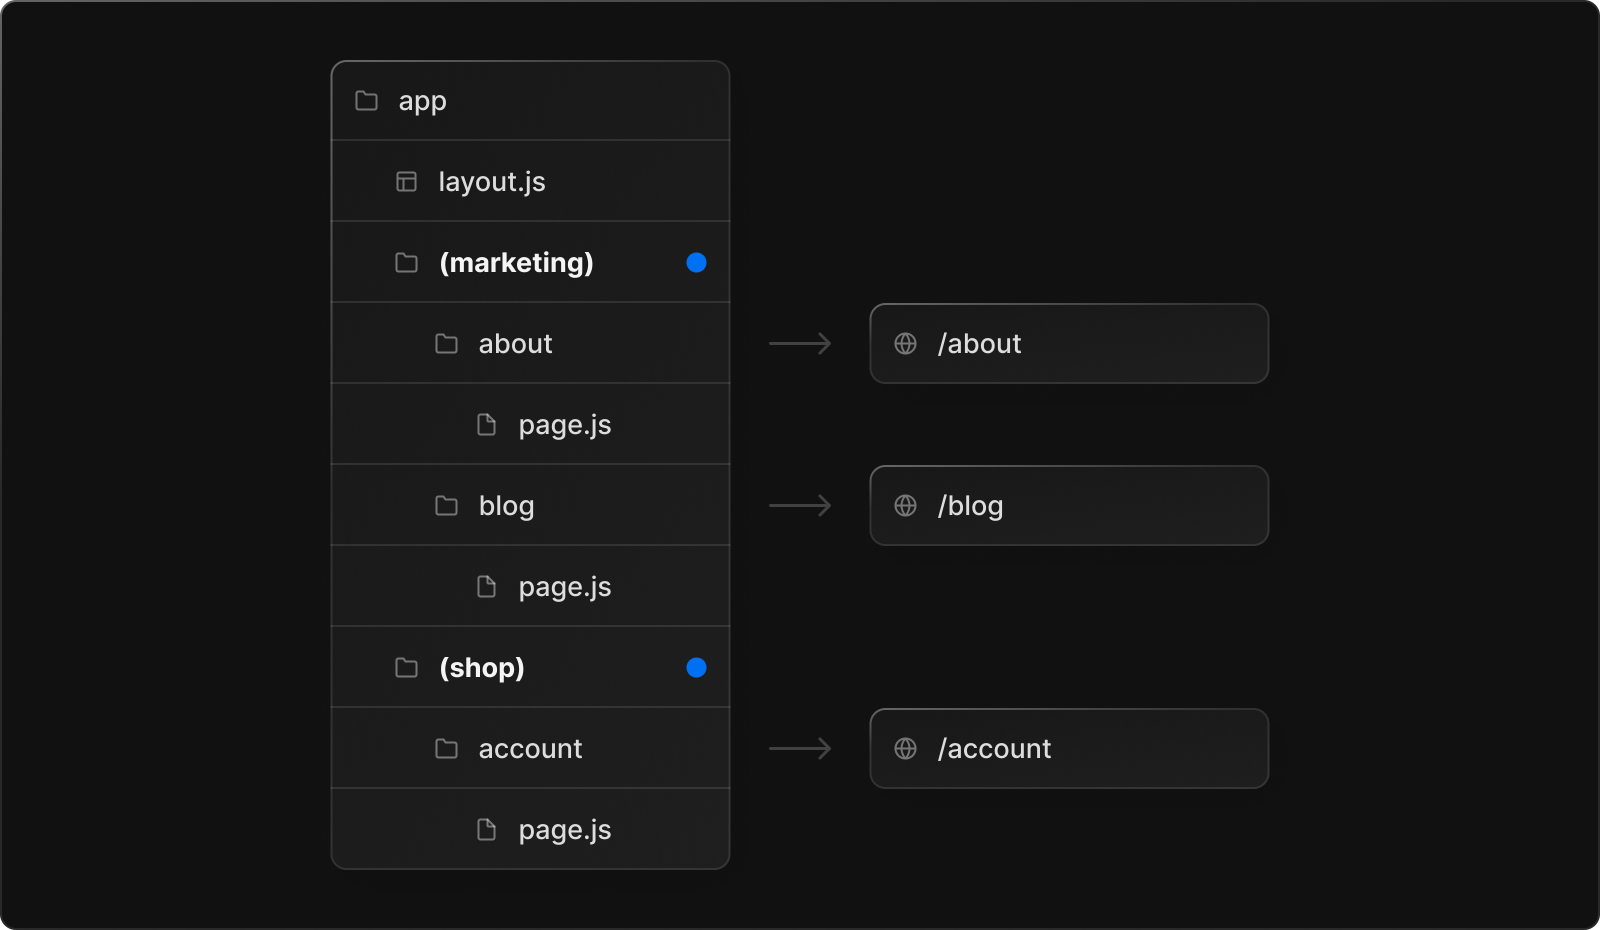
Example] Below the routes are available at "/about" and "/blog", they skip the "(marketing)" URL segment as Next.js 13 considers it as route group. 


// "app/(marketing)/about/page.js" will be available as "/about"

// page.js
export default function About() {
    return (
      <div align="center">
        <h1> About Page </h1>
        <h3> You are at /about </h3>
      </div>
    );
  }
 
//------------------------------------------------------------------------------------

// "app/(marketing)/blog/page.js" will be available as "/blog"

// page.js
export default function Blog() {
    return (
      <div align="center">
        <h1> blog Page </h1>
        <h3> You are at /blog </h3>
      </div>
    );
  }


Important

The presence of "page.js" file makes it publically acessable as a route, we can take advantage of this to define our own component folder to store reusable react components. We just create a regular folder to store our components but don't define the "page.js" file inside it and avoid it from being exposed as a route. 

Basically we have the option to colocate our own files like stylesheets, tests, components, and more inside route folders, which was not possible inside the "pages" folder.


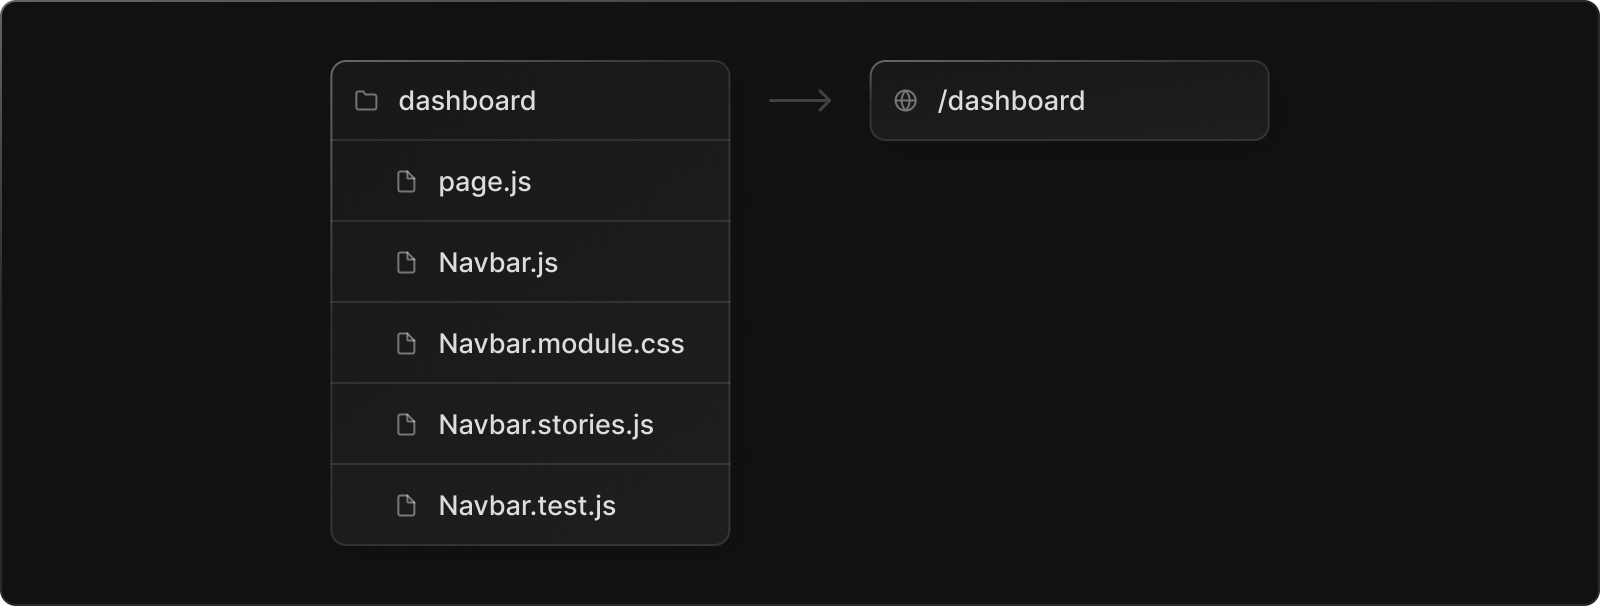
NOTE : This way we can define our reusable react components and CSS modules close to our route folders, rather than having a single global folder at the root.


// Components folder (without page.js) at "app/about/components"
import Header from "./components/header.js";

// app/about/page.js
export default function About() {
    return (
      <>
      <Header/>
      <div align="center">
        <h1> About Page </h1>
        <h3> You are at /about </h3>
      </div>
      </>
    );
  }


---------------------------------------------------------------------------------------------------------------

Layouts

The Next.js 13 introduced the concept of layouts as a replacement to "_app.js" and "_document.js" files in Next.js 12. A layout is UI that is shared between multiple pages. In Next.js 13 we define a layout through the "layout.js" file. It wraps across all the pages in it's containing route folder, which make it an essential place to define components which must be present on all pages. 

There are 2 types of layouts in Next.js 13 which are the following :

  • Root Layout - The layout present at the root of the folder.
  • Nested Layout - The layout present inside each route folder.

NOTE : Layouts preserve state, remain interactive, and don't re-render on visit, hence perfect place to define Navigation bars.


Root Layout

The layout present at the top-level or the root of the project at "app/layout.js" is the root layout. The root layout is a required file and is automatically created by Next.js if we don't create it manually. The root layout wraps all the pages and routes inside our Next.js application, we can define common UI that we want to display on all pages here.


// app/layout.js

// Add Header to all pages in application
import Header from './components/header'

export default function RootLayout({ children }) {
  return (
    <html lang="en">
      <head />
      <body>
        <Header />
        {children}
      </body>
    </html>
  )
}

NOTE : Each layout wraps the page through the "children" prop, where the main page content is rendered. The root layout enables you to modify the initial HTML returned from the server, similar to the "_document.js" file in Next.js 12.


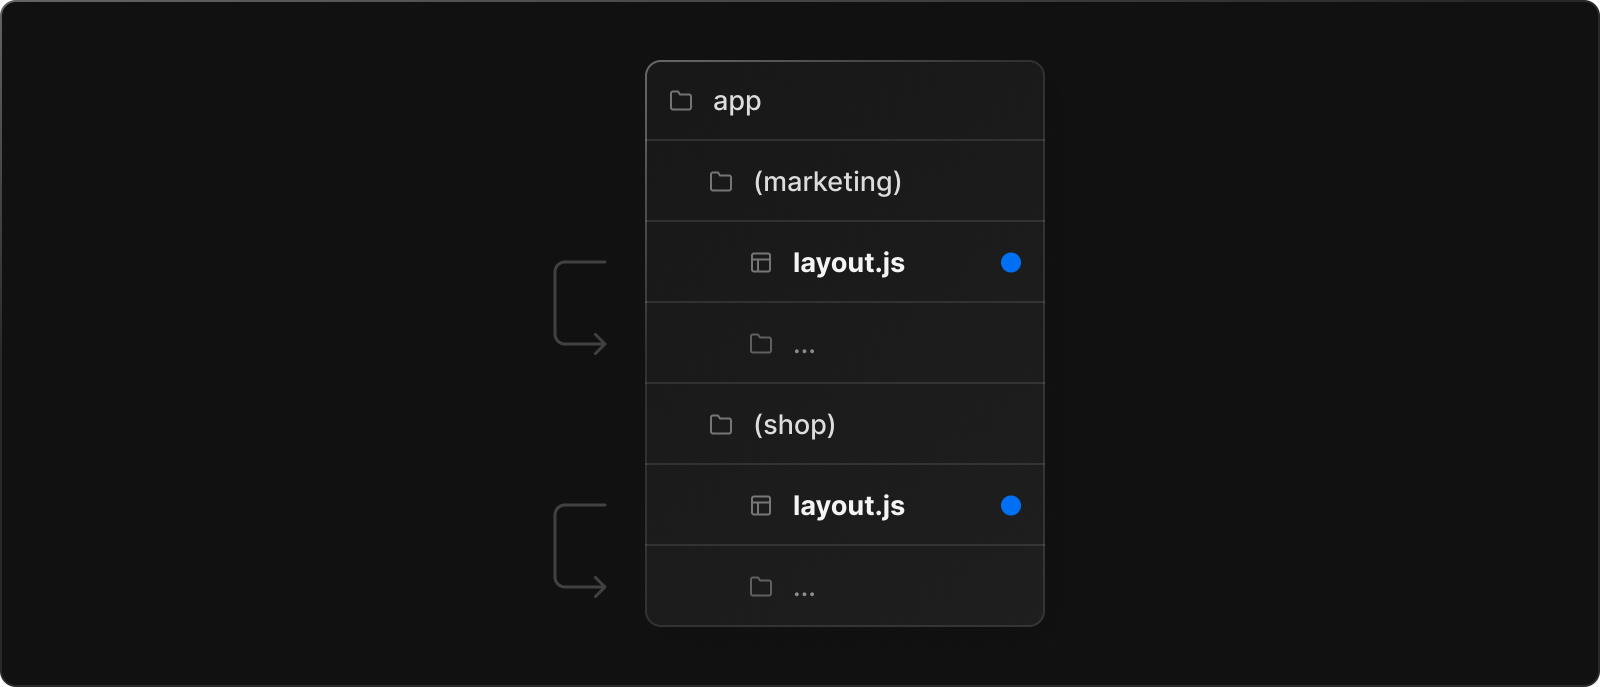
NOTE : We can also create multiple root layouts by removing the top-level "layout.js" file, and adding a "layout.js" file inside each route groups. This is useful for partitioning an application into sections that have a completely different UI or experience.


Nested Layouts

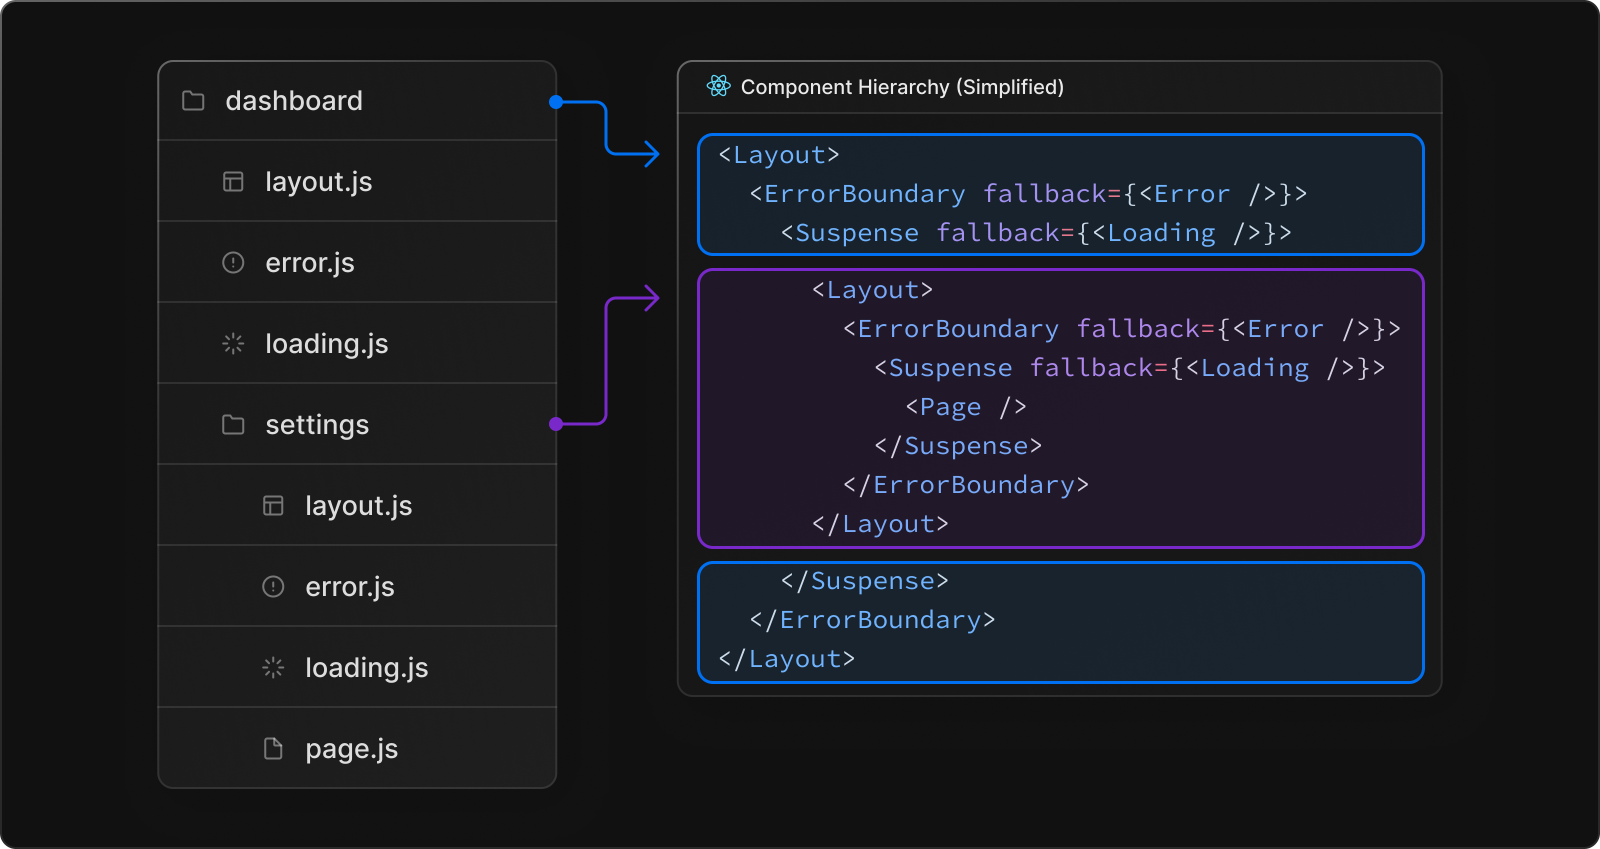
We can also define nested layouts inside each route folder which will wrap or be shared across all the pages in the scope of that route folder. These are similar to root layout but don't define <html> and <body> tags inside like root layout.


// app/home/layout.js

// Add Header to all routes under /home*
import Header from "../components/header"

export default function NestedLayout({children}) {
    return(
        <>
         <Header/>
        <section>{children}</section>
        </>
    )
  }

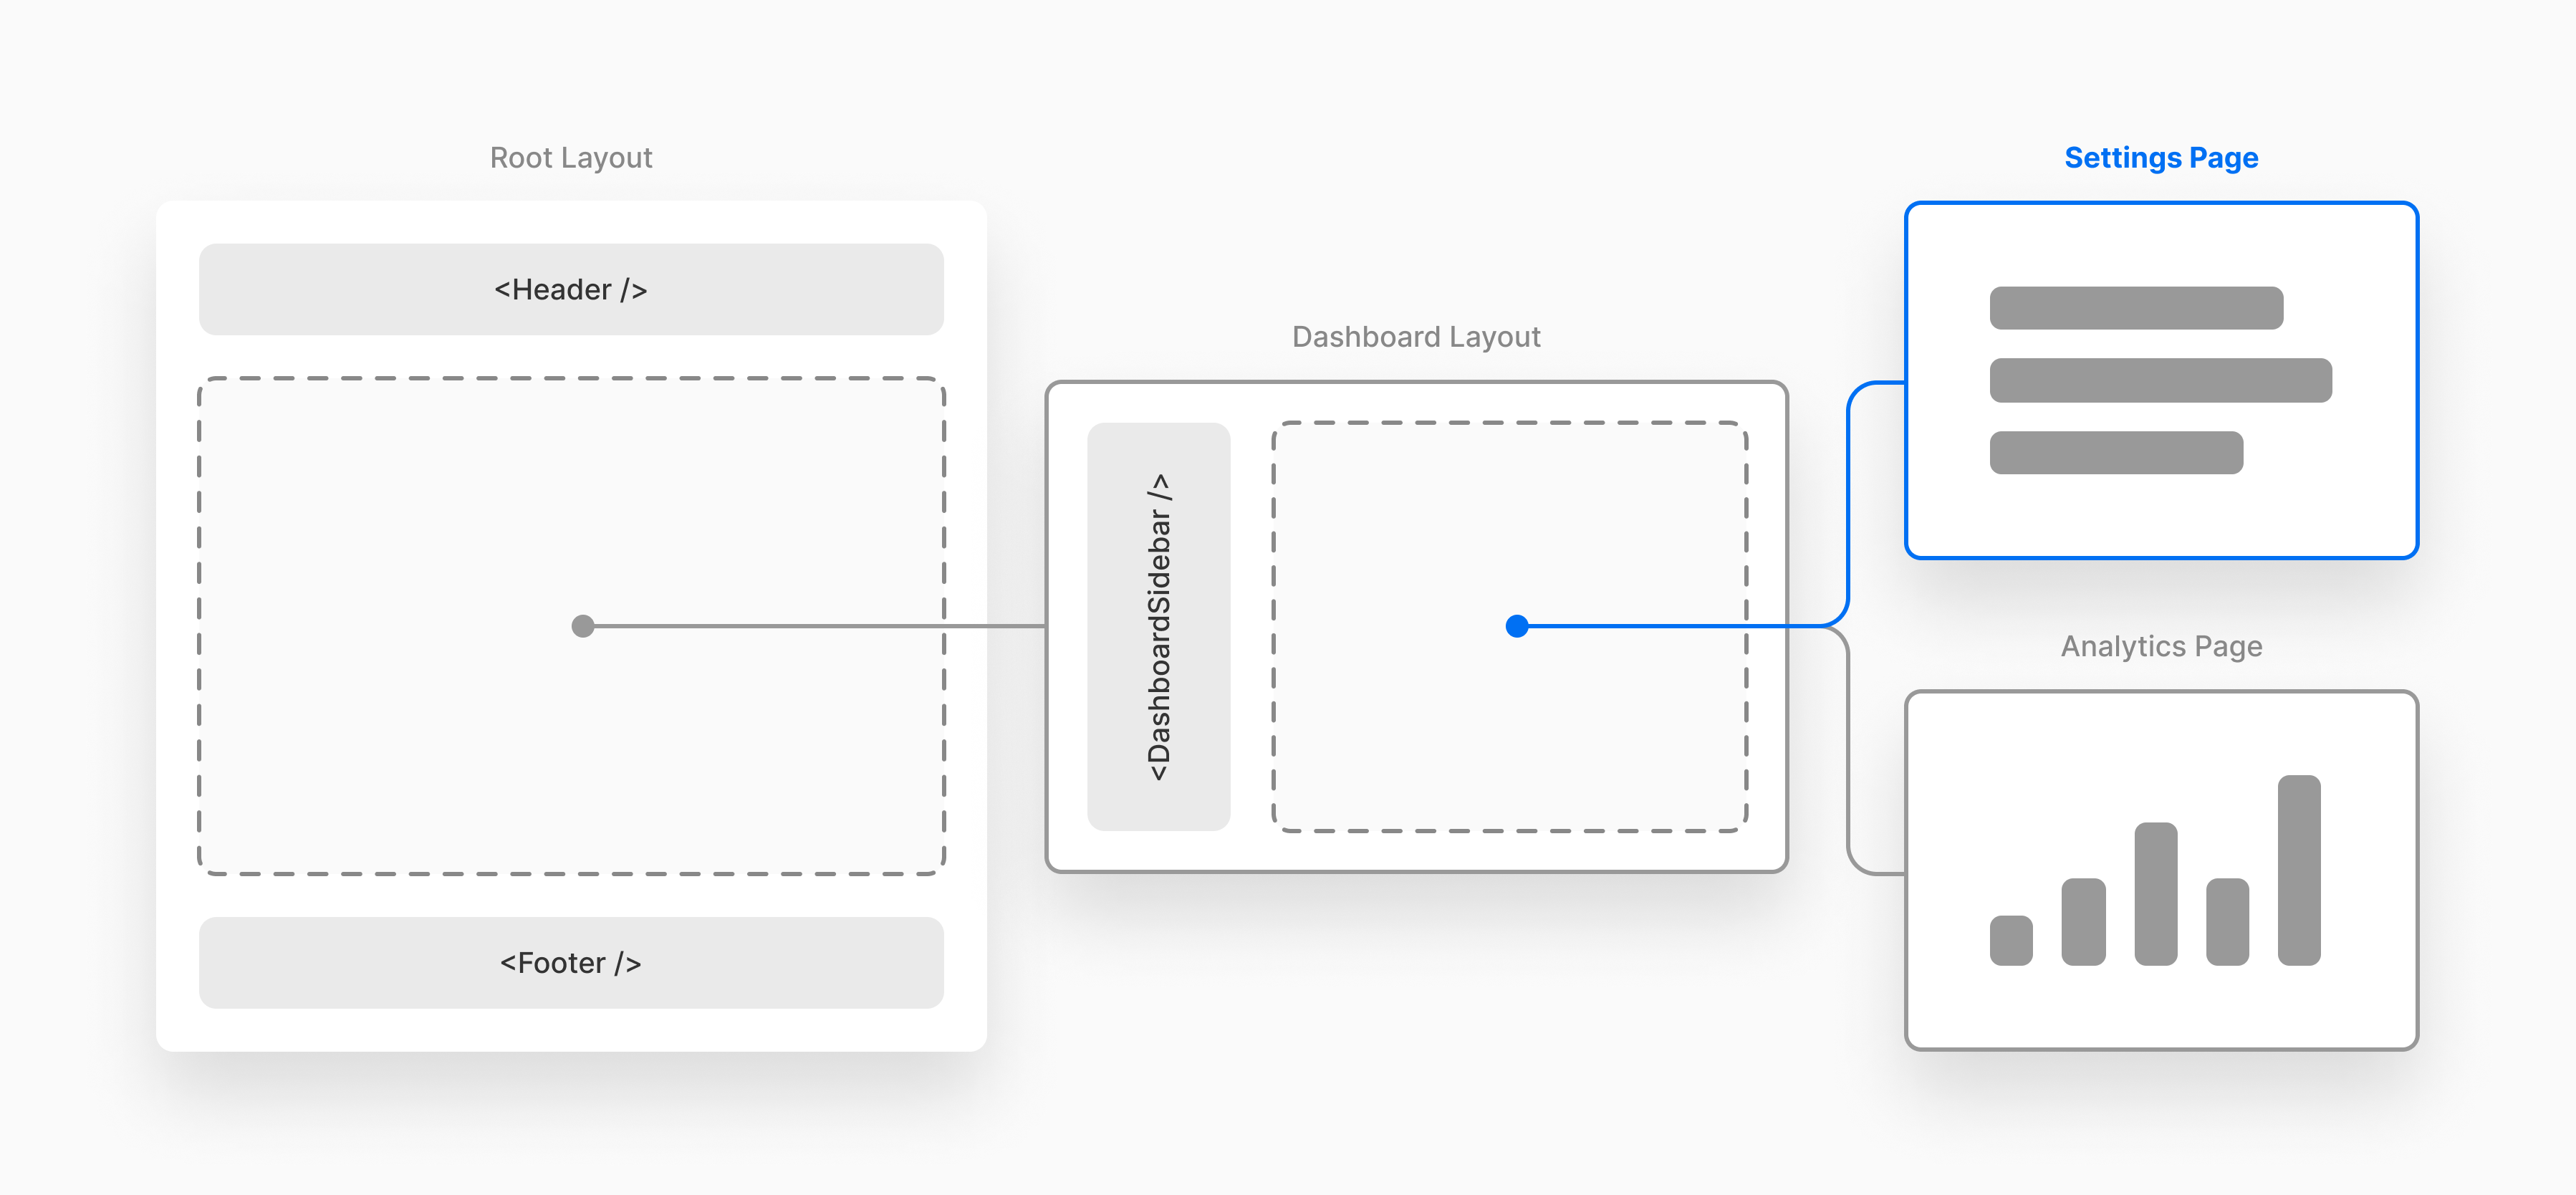
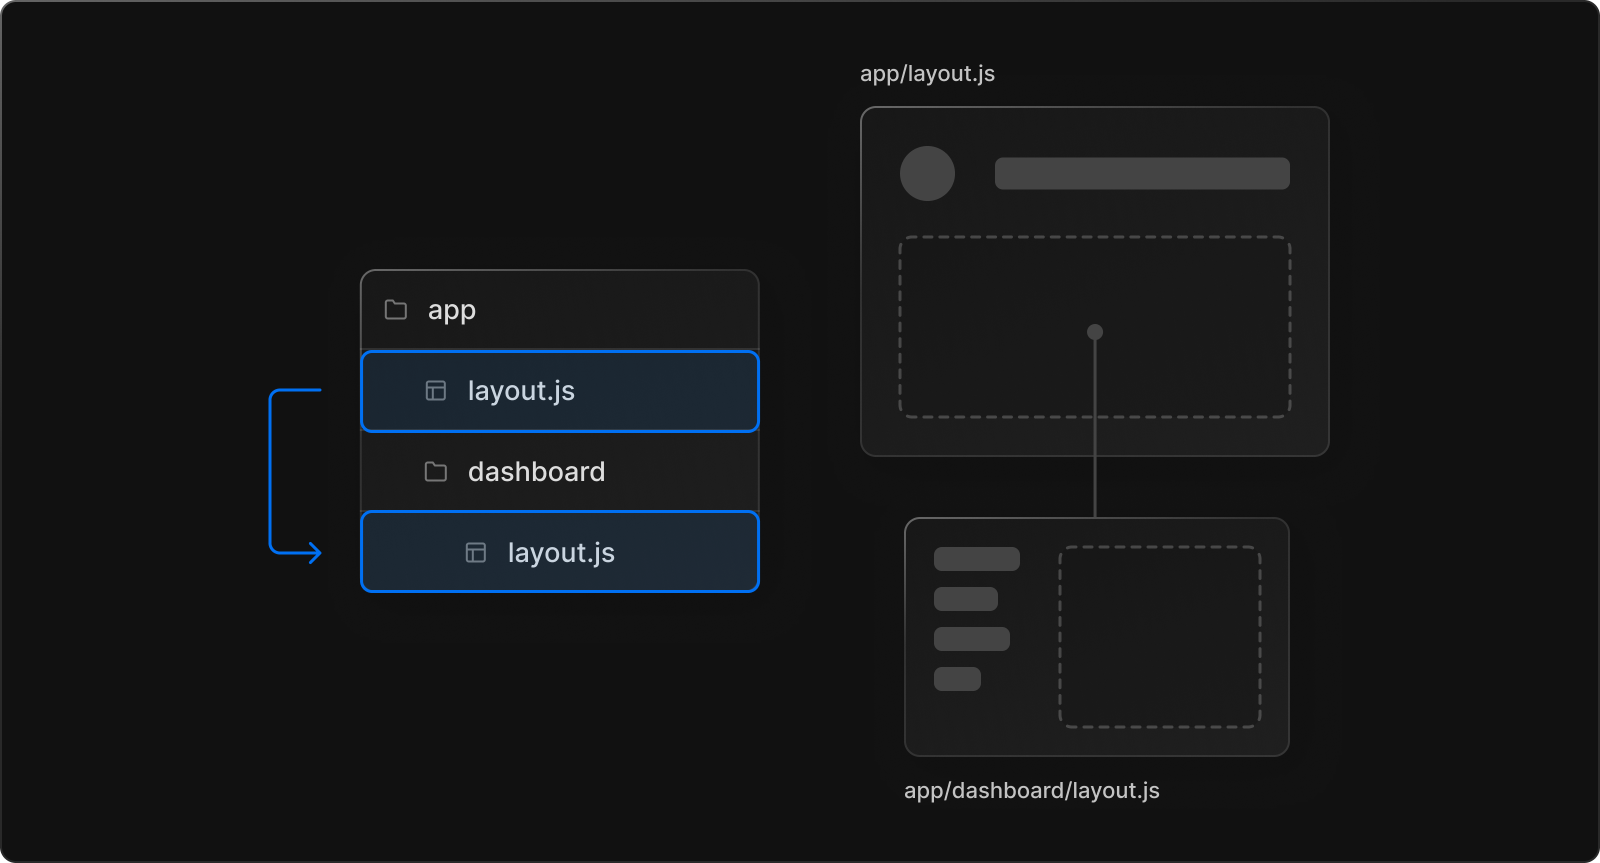
When we define root layout and nested layouts together, the root layout wraps the nested layouts and nested layouts ("layout.js") wraps the "page.js" content. The two layouts would be nested as such :


Example] In the below example we have designed the header to change the link text when clicked, since the Layout preserves state and does'nt re-render the header state remains unchanged even when we navigate to different pages.


// src/components/header.js

"use client"
import React, { useState } from 'react';
import Link from 'next/link';

const Header = () => {
  const [activeLink, setActiveLink] = useState(null);

  const handleClick = (index) => {
    setActiveLink(index);
  };

  return (
    <header style={{ backgroundColor: 'lightgray', display: 'flex',
                    justifyContent: 'center', padding: '20px' }}>
      <nav>
        <ul style={{ display: 'flex', listStyle: 'none', margin: 0, padding: 0 }}>

          <li style={{ margin: '0 10px' }}>
            <Link href="/home"
              style={{
                color: 'black',
                textDecoration: 'none',
                fontWeight: activeLink === 0 ? 'bold' : 'normal',
                textDecoration: activeLink === 0 ? 'underline' : 'none'
              }}
              onClick={() => handleClick(0)} >
              {activeLink === 0 ? 'Active Home' : 'Home'}
            </Link>

          </li>
          <li style={{ margin: '0 10px' }}>
            <Link
              href="/about"
              style={{
                color: 'black',
                textDecoration: 'none',
                fontWeight: activeLink === 1 ? 'bold' : 'normal',
                textDecoration: activeLink === 1 ? 'underline' : 'none'
              }}
              onClick={() => handleClick(1)}>
              {activeLink === 1 ? 'Active About' : 'About'}
            </Link>
          </li>

          <li style={{ margin: '0 10px' }}>
            <Link
              href="/contact"
              style={{
                color: 'black',
                textDecoration: 'none',
                fontWeight: activeLink === 2 ? 'bold' : 'normal',
                textDecoration: activeLink === 2 ? 'underline' : 'none'
              }}
              onClick={() => handleClick(2)}>
              {activeLink === 2 ? 'Active Contact' : 'Contact'}
            </Link>
          </li>

        </ul>
      </nav>
    </header>
  );
};

export default Header;

//------------------------------------------------------------------------------------

// app/about/page.js
export default function About() {
  return (
    <div align="center">
      <h1> About Page </h1>
    </div>
  );
}


// app/home/page.js
export default function Home() {
  return (
    <div align="center">
      <h1> Home Page </h1>
    </div>
  );
}


// app/contact/page.js
export default function Contact() {
  return (
    <div align="center">
      <h1> Contact Page </h1>
    </div>
  );
}


//------------------------------------------------------------------------------------


// app/layout.js

// Add Header to all pages in application
import Header from '../components/header'

export default function RootLayout({ children }) {
  return (
    <html lang="en">
      <head />
      <body>
        <Header />
        {children}
      </body>
    </html>
  )
}


---------------------------------------------------------------------------------------------------------------

Templates

Templates are similar to layouts in that they wrap each child layout or page. Unlike layouts that persist across routes and maintain state, templates create a new instance for each of their children on navigation. This means that when a user navigates between routes that share a template, a new instance of the component is mounted, DOM elements are recreatedstate is not preserved, and effects are re-synchronized.


NOTE : We define a template through the special file named "template.js" inside the route folder. We must always use Layouts unless we have reasons to use Template.

Some of the cases where you need those specific behaviors are as followed :

  • Enter/exit animations using CSS or animation libraries.
  • Features that rely on useEffect (e.g logging page views) and useState (e.g a per-page feedback form).
  • To change the default framework behavior. Suspense Boundaries inside layouts only show the fallback the first time the Layout is loaded and not when switching pages.

Example] In the below example we have designed the header to change the link text when clicked, since the Template does'nt preserves state the text reverts back to original as the header is recreated everytime we navigate to  different page.


// src/components/header.js

"use client"
import React, { useState } from 'react';
import Link from 'next/link';

const Header = () => {
  const [activeLink, setActiveLink] = useState(null);

  const handleClick = (index) => {
    setActiveLink(index);
  };

  return (
    <header style={{ backgroundColor: 'lightgray', display: 'flex',
                    justifyContent: 'center', padding: '20px' }}>
      <nav>
        <ul style={{ display: 'flex', listStyle: 'none', margin: 0, padding: 0 }}>

          <li style={{ margin: '0 10px' }}>
            <Link href="/home"
              style={{
                color: 'black',
                textDecoration: 'none',
                fontWeight: activeLink === 0 ? 'bold' : 'normal',
                textDecoration: activeLink === 0 ? 'underline' : 'none'
              }}
              onClick={() => handleClick(0)} >
              {activeLink === 0 ? 'Active Home' : 'Home'}
            </Link>

          </li>
          <li style={{ margin: '0 10px' }}>
            <Link
              href="/about"
              style={{
                color: 'black',
                textDecoration: 'none',
                fontWeight: activeLink === 1 ? 'bold' : 'normal',
                textDecoration: activeLink === 1 ? 'underline' : 'none'
              }}
              onClick={() => handleClick(1)}>
              {activeLink === 1 ? 'Active About' : 'About'}
            </Link>
          </li>

          <li style={{ margin: '0 10px' }}>
            <Link
              href="/contact"
              style={{
                color: 'black',
                textDecoration: 'none',
                fontWeight: activeLink === 2 ? 'bold' : 'normal',
                textDecoration: activeLink === 2 ? 'underline' : 'none'
              }}
              onClick={() => handleClick(2)}>
              {activeLink === 2 ? 'Active Contact' : 'Contact'}
            </Link>
          </li>

        </ul>
      </nav>
    </header>
  );
};

export default Header;

//------------------------------------------------------------------------------------

// app/about/page.js
export default function About() {
  return (
    <div align="center">
      <h1> About Page </h1>
    </div>
  );
}


// app/home/page.js
export default function Home() {
  return (
    <div align="center">
      <h1> Home Page </h1>
    </div>
  );
}


// app/contact/page.js
export default function Contact() {
  return (
    <div align="center">
      <h1> Contact Page </h1>
    </div>
  );
}


//------------------------------------------------------------------------------------


// app/template.js

// Add Header to all pages in application
import Header from '../components/header'

export default function RootTemplate({ children }) {
  return (
    <html lang="en">
      <head />
      <body>
        <Header />
        {children}
      </body>
    </html>
  )
}


---------------------------------------------------------------------------------------------------------------

Component Hierarchy

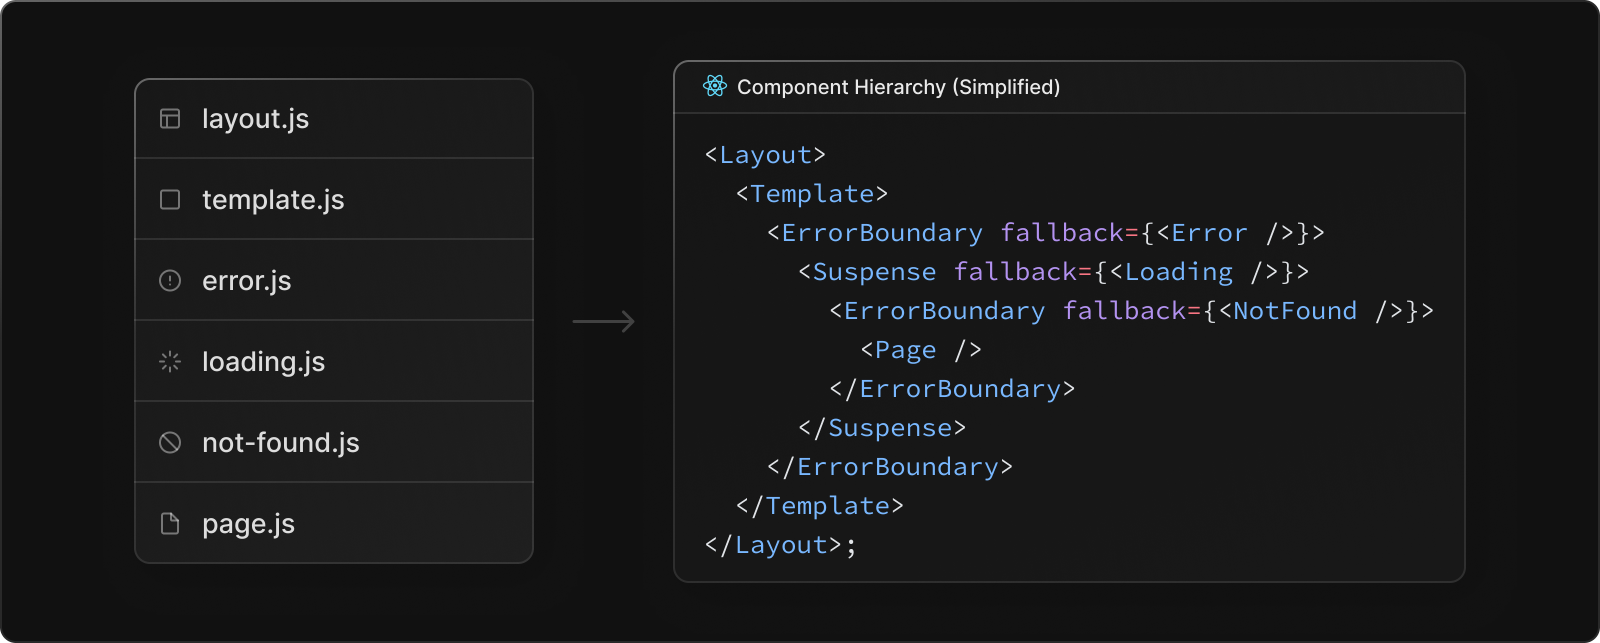
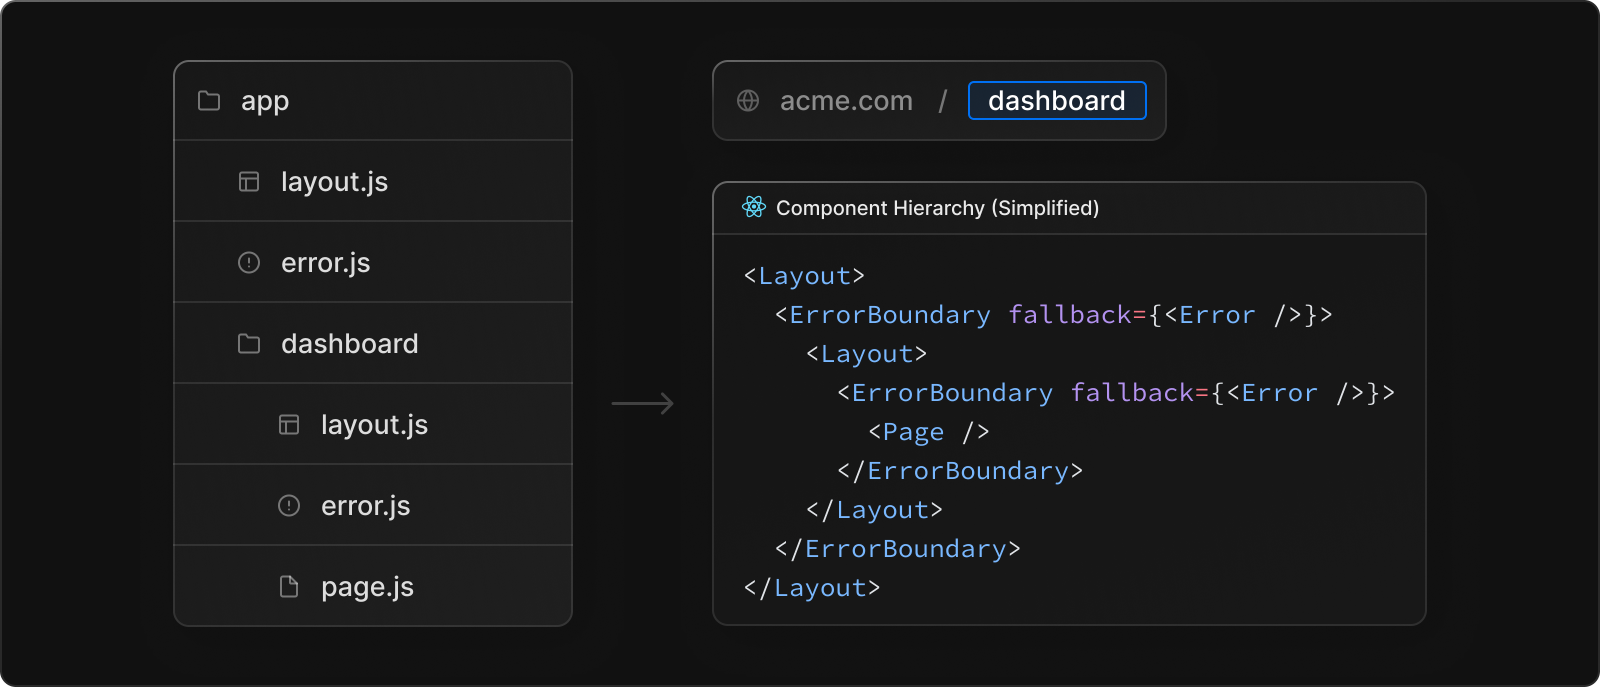
The new routing structure in Next.js 13 automatically brings all the routes and components under a hierarchy. The components defined in special files of a route segment are rendered in a specific hierarchy as shown in below list.

  1. layout.js
  2. template.js
  3. error.js (React error boundary)
  4. loading.js (React suspense boundary)
  5. not-found.js (React error boundary)
  6. page.js or nested layout.js
NOTE : Understanding this hierarchy is important as some of the components like "layout.js" and "error.js" only work for their nested child components. Eg - The "error.js" cannot catch errors inside its own "layout.js" components as its rendered below "layout.js" in hierarchy as another child component.


NOTE In a nested route folder, the components of a URL segment will be nested inside the components of its parent segment.


The new routing system makes "layout" a first-class citizen. At any level of folders under app (i.e., any level of routing), you can use a layout.js to explicitly define a container component. This container component will automatically wrap around all pages in and under that folder. If there're multiple layout.js components at different levels, a wrapping hierarchy is automatically constructed.

---------------------------------------------------------------------------------------------------------------

Modifying <head>

The Next.js 13 provides a special file "head.js" which we can define at the roor level as well as inside nested route folders. It provides us a way to modify and configure the <head> tag of our pages.

NOTE : The "head.js" file does'nt contain any <head> tag itself but only defines contents of <head> which would be then filled inside the <head> of nearest layout.


// app/layout.js

export default function RootLayout({ children }) {
  return (
    <html lang="en">
      {/* <head /> will contain the components returned by the nearest "head.js" */}
      <head />
      <body>{children}</body>
    </html>
  )
}

//------------------------------------------------------------------------------------

// app/head.js
export default function RootHead() {
    return (
      <>
        <title>My App</title>
        <meta content="width=device-width, initial-scale=1" name="viewport" />
        <meta name="description" content="Generated by create next app" />
        <link rel="icon" href="/favicon.ico" />
      </>
    )
  }
 
//------------------------------------------------------------------------------------

// app/home/head.js
export default function NestedHead() {
    return (
      <>
        <title>My Home Page </title>
        <meta content="width=device-width, initial-scale=1" name="viewport" />
        <meta name="description" content="Generated by create next app" />
        <link rel="icon" href="/favicon.ico" />
      </>
    )
  }
 

NOTE : The "head.js" file should only return the following tags: <meta>, <link>, <title> and <script> tags

---------------------------------------------------------------------------------------------------------------

Loading UI

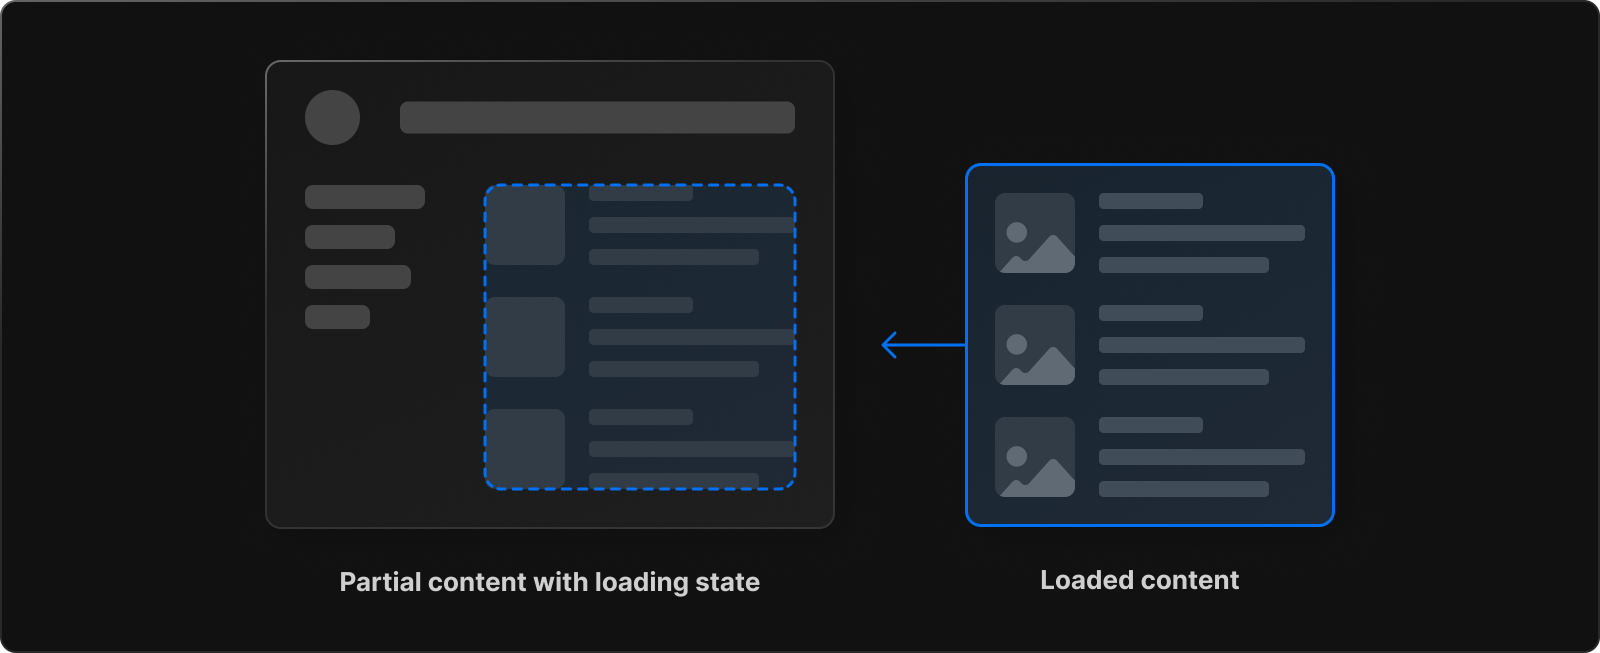
Next.js 13 introduced a special file, "loading.js" to help us create Loading UI using React Suspense without any extra configurations. With this convention, we can show an instant loading state from the server while the content of a route segment loads, the new content is automatically swapped in once rendering is complete.


Example] In the below example we define a loading UI which is automatically displayed upon navigaion while the page contents is being rendered.


// app/page.js

const api = 'https://jsonplaceholder.typicode.com/posts'

// Delay of 3 secs before we make request for posts
const delayFetch = (url, options) =>
  new Promise((resolve) => {
    setTimeout(() => resolve(fetch(url, options))
      , 3)
  })

const loadDataFromServer = async () => {
  const response = await delayFetch(api, { delay: 5000 })
  return response.json()
}

async function Home() {
  const articles = await loadDataFromServer()
  return (
    <>
      <h1>My blog</h1>
      <ul style={{ listStyleType: "none", padding: 0 }}>
        {articles.map((post) => (
          <li style={{ padding: "20px", border: "1px solid gray" }}>
            <p> Title : {post.title}</p>
            <p> Body : {post.body}</p>
          </li>
        ))}
      </ul>
    </>
  )
}

export default Home;


//------------------------------------------------------------------------------------

// app/loading.js

// Displayed while the page is being rendered
export default function Loader() {
  return (
   <>
   <h1 align="center"> Loading... </h1>
   </>
  )
}

The "loading.js" wraps the "page.js" and all the child routes. Inside nested route folders, Next.js will choose the parent loading UI if a loading UI is not defined for the child route folder.


/app
    /home
        loading.js
        page.js
    /about
        loading.js
        page.js
    loading.js
    page.js

NOTE : NextJs will first look in the directory of the requested page for a loading file, and only if it does not find it there it will search in the parent directory for one.

---------------------------------------------------------------------------------------------------------------

Error Handling

The Next.js 13 provides some special files that we can use to handle error. Below are some special files provides by Next.js to handle error UI in root and nested route folders :

  • Error.js - Define error handling UI to handle runtime errors in route folders.
  • Global-Error.js - Define error handling UI to handle errors in root Layout and Template files.
  • Not-Found.js - Define error handling UI to handle 404 or NotFound errors in route folders.

Error.js

The "error.js" file is that allows us to gracefully handle runtime errors in nested routes. It helps us create error UI tailored to specific URL paths using the file-system hierarchy to adjust granularity. We can Isolate errors to affected segments while keeping the rest of the app functional.


Example] In the below example we render the Error page by throwing an Error if the request fails.


async function getData() {

  const res = await fetch('https://api.example.com/...');
 
  // Recommendation: handle errors
  if (!res.ok) {

    // This will activate the closest `error.js` Error Boundary
    throw new Error('Failed to fetch data');
  }

  return res.json();
}

export default async function Page() {
  const data = await getData();

  return <main></main>;
}

Example] Below we try to change the value of a constant to cause a runtime error, which automatically forwards us the error page.


// app/page.js

function abc(i){ i = 123 }

async function Home() {

  const i =0
  return (
    <>
      <h1 onClick={()=> abc(i) }>My blog</h1>
    </>
  )
}

export default Home;

//------------------------------------------------------------------------------------


// This top-level "error.js" will catch all runtime
                            errors in app (except for root layout and template)
// You can also define "error.js" in nested routes for more granularity


// app/error.js

'use client';  // Error components must be Client components

export default function Error({error,reset}) {

console.log("ERROR : ",error)

  return (
    <div>
      <h2>Something went wrong!</h2>
      <p> {error.message} </p>
      <button onClick={() => reset()}>Try again</button>
    </div>
  );
}

NOTE : The "error.js" is able to handle error for all its nested child components, but it cannot handle errors inside the "layout.js" or "template.js" present at the same level. This is because in the component hierarchy the error boundary or "error.js" is nested inside that layouts component creatd by the "layout.js" file.

Errors bubble up to the nearest parent error boundary. It means that errors that occur inside the "layout.js" of nested routes will be catched by the "error.js" of their parent route folder.

NOTE :  The root app/error.js boundary does not catch errors thrown in the root app/layout.js or app/template.js component. To specifically handle errors in these root components, we use a variation of error.js called app/global-error.js located in the root app directory. 


Global-Error.js

The "global-error.js" is basically a catch-all error handling component for the whole application that wraps the entire application. It is primarily used to handle errors inside the root layout or template components as they have no error boundary as per the Next.js 13 component hierarchy.


// app/global-error.js

'use client';

export default function GlobalError({
  error,
  reset,
}) {
  return (
    <html>
      <head></head>
      <body>
        <h2>Global Error !!! Something went wrong!</h2>
        <p> {error.message} </p>
        <button onClick={() => reset()}>Try again</button>
      </body>
    </html>
  );
}

NOTE : Unlike the root error.js, the global-error.js error boundary wraps the entire application, hence it is important that global-error.js must define its own <html> and <body> tags.


Not-Found.js

The "Not-Found.js" is a special file specifically used to handle 404 or NotFound errors. It is not automatically rendered, and only triggers when the "notFound()" function is called.

NOTE : Since the "Not-Found.js" is only rendered when the notFound() function is executed, its commonly used inside dynamic routes that depend on URL parameters to render the page.

Example] Below we render the 'not-found.js' file on dynamic route for banned user.


// app/not-found.js

export default function GlobalNotFound() {
    return (
     <>
     <h1 align="center"> You are permanantely banned from platform ! </h1>
     </>
    )
  }

//-------------------------------------------------------------------------------------

// app/users/[username]/page.js

import { notFound } from 'next/navigation';

export default function Userpage({params}) {

  // Renders the "not-found.js" when visited at "/users/deepeshdm"
  if(params.username=="deepeshdm"){
    notFound()
  }

  return (
   <>
   <h1 align="center"> Welcome {params.username}, You are at /users/:username </h1>
   </>
  )
}

We can also define multiple 'not-found.js' files at nested route folders. When the notFound() is executed, Next.js will look for the closest 'not-found.js' and render it.


// app/users/[username]/not-found.js

export default function NestedNotFound() {
    return (
     <>
     <h1 align="center"> Nested Not Found ! </h1>
     <h1 align="center"> You are permanantely banned from platform ! </h1>
     </>
    )
  }

//-------------------------------------------------------------------------------------

// app/users/[username]/page.js

import { notFound } from 'next/navigation';

export default function Userpage({params}) {

  // Renders the "not-found.js" when visited at "/users/deepeshdm"
  if(params.username=="deepeshdm"){
    notFound()
  }

  return (
   <>
   <h1 align="center"> Welcome {params.username}, You are at /users/:username </h1>
   </>
  )
}

NOTE : We can still use the "pages" folder while its suported and mention the "404.js" or "500.js" files to easily handle errors, but we could miss out on the component hierarchy to create granular error page for specific URL segments.

---------------------------------------------------------------------------------------------------------------


Navigating Pages

The Next.js 13 introduces some improvement to the existing <Link> component as well as the useRoute() hook method, which makes navigating through pages much more efficient. There are two ways to navigate between routes in Next.js :

  • <Link> Component
  • useRouter() Hook


The <Link> component

The <Link> component in Next.js wraps the traditional <a> tag in order to provide some more features like pre-fetching and client-side navigation. Unlike Next.js 12 where we had to manually wrap the <a> tag with <Link>, in Next.js 13 we can simply use the <Link> as a replacement to <a> tag and pass URLs directly to it.


// app/page.js

import Link from "next/link"

export default function Home() {
  return (
   <>
   <h1 align="center"> Root Page </h1>  <br/>
   <Link href="/home"> HOME </Link>  <br/>
   <Link href="/settings"> SETTINGS </Link>
   </>
  )
}


The useRouter() Hook

The useRouter() hook is a hook that allows you to access the router object of page and provides various useful navigation methods like push(), back(), refresh() and prefetch(). It is commonly used as inplace of the <Link> component in callback functions.


// app/page.js

"use client"
import { useRouter } from 'next/navigation';
import { usePathname } from 'next/navigation';

export default function Home() {

  const router = useRouter(); // Get router object of current page
  const pathname = usePathname();  //  Get current URL pathname

  return (
   <>
   <h1 align="center"> Root Page </h1>  <br/>
   <h2 align="center"> Current Path :  {pathname}  </h2>  <br/>
   <button onClick={() => router.push('/home')}> GO HOME </button>  <br/>
   <button onClick={() => router.push('/settings')}> GO SETTINGS </button> <br/>
   <button onClick={()=> router.back() }> GO TO PREVIOUS PAGE </button> <br/>
   <button onClick={()=> router.refresh() }> REFRESH CURRENT PAGE </button>
   </>
  )
}


URL Query Parameters

The Next.js 13 provides the "useSearchParams()" hook method which we can use to acess the Query parameters pass by the user with the URL route.

NOTE : The useSearchParams() only works in Client Components. Add the "use client" directive at the top of the file to use it.


// app/home/page.js

"use client"
import { useRouter } from 'next/navigation';
import { useSearchParams } from 'next/navigation';

export default function Home() {

  const router = useRouter();
 
  const searchParams = useSearchParams();

  // E.g. 'www.google.com/home?userid=deepeshdm&orderid=5678'
  const userid = searchParams.get('userid');
  const orderid = searchParams.get('orderid');

  return (
   <>
   <h1 align="center"> Home Page </h1>
   <h2 align="center"> UserID : {userid} </h2>
   <h2 align="center"> OrderID : {orderid} </h2>
   <button onClick={() => router.push('/settings')}> GO SETTINGS </button> <br/>
   </>
  )
}

Alternativelly we can also use the "searchParams" props to acess the search parameters as shown below. The "params" prop is used with dynamic routes.


// app/home/page.js

"use client"
import { useRouter } from 'next/navigation';

export default function Home({params,searchParams,}) {

  const router = useRouter();
// E.g. 'www.google.com/home?userid=deepeshdm&orderid=5678'
  const { userid,  orderid } = searchParams;

  return (
   <>
   <h1 align="center"> Home Page </h1>
   <h2 align="center"> UserID : {userid} </h2>
   <h2 align="center"> OrderID : {orderid} </h2>
   <button onClick={() => router.push('/settings')}> GO SETTINGS </button> <br/>
   </>
  )
}

NOTE : The useSearchParams() hook is used to acess the URL queries in client components with the "use client" directive, whereas the "searcParams" prop is used to acess URL queries in server components.


Passing Data Between Pages

Sometimes we may need to pass data between pages when navigating through them. Below are some examples on how we can do it.

Example] In below example we pass data between pages when using the <Link>


// app/page.js

import Link from "next/link";

export default function Home() {

  return (
   <>
   <h1 align="center"> Root Page </h1>  <br/>
   <Link href={{ pathname: '/home', query: { userid: 'Next.js', orderid: 'hdhdhdh' } }}>
   HOME </Link>
   </>
  )
}

//------------------------------------------------------------------------------------

// app/home/page.js

export default function Home({params,searchParams,}) {

  // const { userid,  orderid } = searchParams;
  const username = searchParams.userid;
  const ordername = searchParams.orderid;

  return (
   <>
   <h1 align="center"> Home Page </h1>
   <h2 align="center"> UserID : {username} </h2>
   <h2 align="center"> OrderID : {ordername} </h2>
   </>
  )
}


// app/page.js

import Link from "next/link";

export default function Home() {

  return (
   <>
  <h1 align="center"> Root Page </h1>  <br/>
 <Link href={{ pathname: '/home', query: { userid: 'Next.js', orderid: 'hdhdhdh' } }}>
  HOME </Link>
   </>
  )
}

//------------------------------------------------------------------------------------

// app/home/page.js

"use client"
import { useSearchParams } from 'next/navigation';

export default function Home() {

  const searchParams = useSearchParams();
  const username = searchParams.get('userid');
  const ordername = searchParams.get('orderid');

  return (
   <>
   <h1 align="center"> Home Page </h1>
   <h2 align="center"> UserID : {username} </h2>
   <h2 align="center"> OrderID : {ordername} </h2>
   </>
  )
}


Example] In below example we pass data between pages using the router object's push() method. Since the "query" object has been dropped in Next.js 13, so we have to use string interpolation to pass the data as Search parameters.


// app/page.js

"use client"
import { useRouter } from "next/navigation";

export default function Home() {

  const router = useRouter();

  const handleClick = () => {
    const userid = "deepeshdm"
    const orderid = "445566"
    // Using template literal string interpolation
    router.push(`/contact?userid=${userid}&orderid=${orderid}`);
  };

  return (
   <>
   <h1 align="center"> Root Page </h1>  <br/>
   <button onClick={handleClick}> GO HOME </button>  <br/>
   </>
  )
}

//------------------------------------------------------------------------------------

 // app/contact/page.js

 export default function Contact({params,searchParams,}) {

  // const { userid,  orderid } = searchParams;
  const username = searchParams.userid;
  const ordername = searchParams.orderid;

  return (
   <>
   <h1 align="center"> Home Page </h1>
   <h2 align="center"> UserID : {username} </h2>
   <h2 align="center"> OrderID : {ordername} </h2>
   </>
  )
 }


---------------------------------------------------------------------------------------------------------------

NextJs CSS Styling

Next.js is opinionated about how to organize your JavaScript code, but it's not opinionated about how you style your components or store the CSS. There are many ways to apply CSS styling in Nextjs, some of them are as followed :

  • Global CSS
  • CSS Modules
  • Sass
  • CSS-In-JS 
  • Tailwind CSS
NOTE : There is no strict location to store css files in Next.js 13 we can either store them inside a "styles" folder or colocate them inside our route folders.

1] Global CSS

The easiest way to write CSS in a Next.js application is through traditional CSS stylesheets. Unlike Next.js 12 where we could only import CSS styles inside the "_app.js" file, in Next.js 13 CSS stylesheets can be imported into any layout, page, or component inside the app directory.


// app/page.js

import './page.css'

export default function Home() {

  return (
    <>
      <div className="container">
        <h1 className="title">My Title</h1>
        <p className="paragraph">My paragraph text goes here.</p>
      </div>
    </>
  )
}

//------------------------------------------------------------------------------------

// app/page.css

h1 {
  color: red
}

.container {
  text-align: center;
}

.title {
  font-size: 36px;
  font-weight: bold;
  margin-bottom: 24px;
}

.paragraph {
  font-size: 18px;
  margin-bottom: 24px;
}

NOTE : Inside the root layout (app/layout.js), import the global.css stylesheet to apply the styles to every route in your application.


2] CSS Modules 

CSS Modules let you write styles in CSS files but consume them as JavaScript objects for additional processing and safety. One of the main feature of css modules is that they are scoped locally by default so no worries of selector name collisions or affecting other components’ styles.

NOTE : CSS Modules is a component-level CSS, that comes built-in with NextJS and can be activated by naming the style files with the .module.css extension. It is also possible to use CSS Modules with SASS/SCSS with the .module.sass or .module.scss extension.


// app/page.js

import styles from './page.module.css';

export default function Home() {

  return (
    <>
      <div className={styles.container}>
        <h1 className={styles.title}>My Title</h1>
        <p className={styles.paragraph}>My paragraph text goes here.</p>
      </div>
    </>
  )
}

//-------------------------------------------------------------------------------------


// app/page.module.css

.container {
  text-align: center;
}

.title {
  font-size: 36px;
  font-weight: bold;
  margin-bottom: 24px;
  color: blue
}

.paragraph {
  font-size: 18px;
  margin-bottom: 24px;
}


3] SaSS Styling

Next.js also allows styling with SASS with the .sass or .scss extension. Installing Sass is a requirement. Just like regular CSS styles, they can be imported into any layout, page, or component inside the app directory.


// app/page.js

import styles from './page.scss';

export default function Home() {

  return (
    <>
      <div className={styles.container}>
        <h1 className={styles.title}>My Title</h1>
        <p className={styles.paragraph}>My paragraph text goes here.</p>
      </div>
    </>
  )
}

//--------------------------------------------------------------------------------------------

// app/page.scss

$primary-color: #64ff00;

h1 {
    color: $primary-color;
}

.container {
    text-align: center;
}

.title {
    font-size: 36px;
    font-weight: bold;
    margin-bottom: 24px;
}

.paragraph {
    font-size: 18px;
    margin-bottom: 24px;
}


4] Tailwind CSS

Tailwind is a popular utility first CSS framework for rapidly building custom User Interfaces. It provides low-level classes, those classes combine to create styles for various components.


// app/page.js

export default function Home() {

  return (
    <>
      <div className="text-center">
        <h1 className="text-red-500 text-lg">My Title</h1>
        <p className="text-blue-500 text-3xl">My paragraph text goes here.</p>
      </div>
    </>
  )
}


---------------------------------------------------------------------------------------------------------------

Client & Server Components

In Next.js 13, components can be either server components or client components, depending on how they are used in the application. In server components the Javascript code we write inside them is executed on the server itself, whereas in client component the javascript code is executed on the browser.

Server and Client components allow you to choose whether to render components on the client or server-side on a per-component basis, whereas, with SSR, you get to do this on a per-page basis. 


Client and server components can be considered a hybrid approach between CSR and SSR. In traditional CSR, the entire page is rendered on the client browser, using JavaScript. In traditional SSR, the entire page is rendered on the server and the generated HTML along with some hydration code is sent to the browser. With client and server components, parts of the page can be rendered on the server, while other parts can be rendered on the client.

This allows for the benefits of both CSR and SSR to be combined, resulting in improved performance and user experience. For example, heavy or critical components can be rendered on the server for faster initial load times, while interactive components can be rendered on the client for improved interactivity.

Below are 2 main benefits of new approach of client and server components :

  • Write server-side javascript naturally without depending on data fetching methods like getServerSideProps() or getStaticProps()
  • Keep our large third-party packages on the server, so only their output is included in the JS bundle, reducing the overall bundle size.
  • Server components contribute zero to the overall bundle size of your application since most of the JS is executed on the server.

NOTE : In Next.js all components (client & server components) are pre-rendered on the server and then hydrated on the client. The difference between client & server components is where the JS we write is executed. By using a combination of client-side and server-side JavaScript, Next.js provides a balance between fast initial render and dynamic updates, allowing developers to create performant and interactive applications.


Server Components

Server components, put simply, are components that get rendered on the server, as opposed to regular components (client components) that need the browser for that. The JS inside these components is executed on the server.

The most significant benefit is you can freely access any backend resource and secrets in server components. It's safer (data don't leak) and faster (code doesn't leak). The most important thing to remember is that server components are for rendering non-interactive content only, so there can be no event handlers, React hooks, and browser-only APIs inside the server components.


// pages/index.js (Next.js 12)

export async function getServerSideProps(context) {
   // CODE HERE IS EXECUTED ON SERVER
  console.log("Executed inside getServerSideProps...")
  return { props: {} }
}

function Page() {
   // CODE HERE IS EXECUTED ON CLIENT BROWSER
  console.log("Executed inside Page component...")
  return (
      <>
        <h1 align="center"> Hello !!! </h1>
      </>
    )
}

export default Page;

//------------------------------------------------------------------------------------

// app/page.jsx   (Next.js 13)

let i = 1

export default function Home() {

  // CODE HERE IS EXECUTED ON SERVER
  console.log("Code executed on server : ", i)
  i+=1

  return (
    <>
    <h1 align='center'> Hello World !!! </h1>
    </>
  )
}

Since we cannot include any interactive components like event handler or state hooks into server components, these should mainly be used for data fetching.

NOTE : All components inside the "app" directory are server somponents by default, including special files and colocated components. This allows you to automatically adopt Server Components with no extra work, and achieve great performance out of the box

Example] In the below example we demonstrate data fetching using older and the latest way with server components by fetching posts data on the server-side.


// pages/index.js  (Next.js 12)

let i = 0
export async function getServerSideProps(context) {

    let posts = await fetch('https://jsonplaceholder.typicode.com/posts')
        .then(res => res.json())
        .then(json => {
            i += 1
            console.log("Request was made : ", i)
            return json
        })

    return {
        props: {
            posts: posts
        }
    }
}


function PostsPage(props) {

    // Tailwind CSS
    let head_styles = "text-6xl font-bold text-blue-400 mt-5"
    let post_styles = "bg-red-500 hover:bg-red-600 active:bg-red-500 m-5 p-5
                       text-white rounded-md"

    return (
        <>
            <h1 align="center" className={head_styles}> POSTS </h1>
            <ul>
                {
                    props.posts.map((post) => (
                        <li key={post.id} className={post_styles}>
                            <h3 className="font-bold"> {post.title} </h3>
                            <p className="font-light"> {post.body} </p>
                        </li>
                    ))
                }
            </ul>
        </>
    )
}

export default PostsPage;

Below is how we can do it in a more natural way with latest server components.


// app/posts/page.jsx  (Next.js 13)

let i = 0
async function getPosts() {
  const res = await fetch('https://jsonplaceholder.typicode.com/posts',
                                                            { cache: "no-store" })
  i += 1
  console.log("Request was sent !!! - ", i)
  return res.json()
}

async function PostsPage() {

  const posts = await getPosts();

  // Tailwind CSS
  let head_styles = "text-6xl font-bold text-blue-400 mt-5"
  let post_styles = "bg-red-500 hover:bg-red-600 active:bg-red-500 m-5 p-5
                                                            text-white rounded-md"

  return (
    <>
      <h1 align="center" className={head_styles}> POSTS </h1>
      <ul>
        {
          posts.map((post) => (
            <li key={post.id} className={post_styles}>
              <h3 className="font-bold"> {post.title} </h3>
              <p className="font-light"> {post.body} </p>
            </li>
          ))
        }
      </ul>
    </>
  )
}

export default PostsPage;


Client Components

In Next.js, client components are prerendered on the server and hydrated on the client. You can think of Client Components as how Next.js 12 and previous versions worked (i.e. the pages/ directory). The HTML will be pre-rendered on the server but Javascript inside client components is executed into the client browser, giving the similar effect as regular CSR application.

By default all the components inside the "app" directory is server component, but we can insert the "use client" directive at the top of the file (before any imports), and convert the server components to become client components.


// app/page.jsx

'use client'

let i = 1

export default function Home() {

  // CODE HERE IS EXECUTED ON CLIENT BROWSER
  console.log("Code executed on client : ", i)
  i+=1

  return (
   <>
   <h1 align='center'> Hello World !!! </h1>
     <button onClick={()=> console.log("Hi")}> Click </button>
   </>
  )
}

It's best to leave components that do not depend on client hooks without the directive so that they can automatically be rendered on server, this ensures the smallest amount of client-side JavaScript. 

Some of the cases where we would use client components are as followed :

  • When we use event listeners (eq: onClickonChange) in our components
  • When we use hooks like useState()useReducer()useEffect(), or other custom hooks that are depending on the state or lifecycle hooks
  • When we use browser-only APIs (eq: windowdocument) or hooks that use these APIs

Example] Below we fetch posts data on the client-side. It works exactly like it used to in Next.js 12. Since it's not a sever component we need states to update values.


// app/posts/page.jsx  (Next.js 13)

'use client'

import { useEffect, useState } from "react";

// Tailwind CSS
let load_styles = "text-6xl font-bold text-purple-400"
let head_styles = "text-6xl font-bold text-blue-400 mt-5"
let post_styles = "bg-red-500 hover:bg-red-600 active:bg-red-500 m-5 p-5
                                                            text-white rounded-md"

function PostPage() {

  const [posts, setPosts] = useState()

  useEffect(() => {
    fetch("https://jsonplaceholder.typicode.com/posts/")
      .then(response => response.json())
      .then(json => {
        setPosts(json)
        console.log("Request was made for posts !!!")
      })
  }, [])

  if (!posts) {
    return <h1 align="center" className={load_styles}> Loding...</h1>
  }

  return (
    <>
      <h1 align="center" className={head_styles}> POSTS </h1>
      <ul>
        {
          posts.map((post) => (
            <li key={post.id} className={post_styles}>
              <h3 className="font-bold"> {post.title} </h3>
              <p className="font-light"> {post.body} </p>
            </li>
          ))
        }
      </ul>
    </>
  )
}

export default PostPage;


---------------------------------------------------------------------------------------------------------------

Importing Client components into Server components

In Next.js 13, importing client components into server component remains same. We can import them normally like other react components as shown below.

Example] In below example we import a client component into server component.


// app/posts/posts.jsx

'use client'

import { useRouter } from "next/navigation";

function Posts({ posts }) {

    const router = useRouter();

    const post_tailwind = "bg-red-500 hover:bg-red-600 active:bg-red-500 m-5 p-5
                                                            text-white rounded-md"

    const handeClick = (postid) => { router.push(`/posts/${postid}`) }

   return (
   <>
    <ul>
    {
     posts.map((post) => (
     <li key={post.id} className={post_tailwind} onClick={() => handeClick(post.id)}>
      <h3 className="font-bold"> {post.title} </h3>
       <p className="font-light"> {post.body} </p>
        </li>
        ))
      }
    </ul>
    </>
    )
}

export default Posts;

//-----------------------------------------------------------------------------------------------------------------------

// app/posts/page.jsx

import Posts from "./posts.jsx"; // Importing Client Component into Server Component

let i = 0

async function getPosts(){

  const res = await fetch('https://jsonplaceholder.typicode.com/posts',
                                                            { cache: "no-store" })
  i+=1
  console.log("Request was sent !!! - ",i)
  return res.json()
}

async function PostsPage() {

  const posts = await getPosts();

  return (
    <>
    <h1 align="center" className="text-6xl font-bold text-blue-400 mt-5"> POSTS </h1>
    <Posts posts={posts} />
    </>
  )
}

export default PostsPage;

To improve the performance of your application, we recommend moving Client Components to the leaves of your component tree where possible. The general idea is to keep client components as the last child in the component tree.


    import './ClientComponent1.jsx'
    import './ClientComponent2.jsx'

    export default function Page() {
        return (
            <>
                <ServerComponent1>
                    <ServerComponent2>
                        <ClientComponent1>
                            <ServerComponent2>
                                <ClientComponent2 />
                            </ServerComponent2>
                        </ClientComponent1>
                    </ServerComponent2>
                </ServerComponent1>
            </>
        )
    }

In other words, you should aim to have as few client components as possible and make them as small and simple as possible. This will reduce the amount of work the client has to do and result in a faster, more responsive application.

---------------------------------------------------------------------------------------------------------------

Importing Server components into Client components

In NextJs 13, wcannot directly import a Server Component into Client Component. The reason for this is that the server component may contain server-side code for things like reading/writing files or databases on the server side. 


'use client';

// ❌ This pattern will not work. You cannot import a Server
// Component into a Client Component
import ServerComponent from './ServerComponent';

export default function ClientComponent() {
  return (
    <>
      <ServerComponent />
    </>
  );
}

To be able to use a server component in a client component we first need to render the server component and include just the resulting HTML in the client component. For this we need to wrap the Server component as a child (or property) for the Client component. In summary we can pass a Server Component as a child or prop of a Client Component by wrapping both components in another Server Component.


// app/ClientComponent.js

'use client';

export default function ClientComponent({children}) {
  return (
    <>
      {children}
    </>
  );
}

//------------------------------------------------------------------------------------

// app/page.js

// ✅ This pattern works. You can pass a Server Component
// as a child or prop of a Client Component.

import ClientComponent from "./ClientComponent";
import ServerComponent from "./ServerComponent";

// Pages are Server Components by default
export default function Page() {
  return (
    <ClientComponent>
      <ServerComponent />
    </ClientComponent>
  );
}

NOTE : See how the client component automatically become leaves when we wrap both the components into another server component. With this pattern, React will know it needs to render <ServerComponent /> on the server before sending the result (which doesn't contain any server-only code) to the client.

---------------------------------------------------------------------------------------------------------------

Importing Props from Server components into Client components

The serialization is the process whereby an object or data structure is translated into a format suitable for transfer over a network. When data is passed from the server to the client, it needs to be serialized, which means converting it into a format that can be transmitted over the network and reconstructed on the other end. In JavaScript, for example, you can serialize an object to a JSON string throughJSON.stringify().

Functions and objects like Dates are not serializable and cannot be directly passed to client components. Instead, you need to pass only the data that can be serialized, such as strings, numbers, and arrays. For example, you can pass a string representation of a date instead of a Date object, and then use JavaScript on the client side to parse it into a Date object again.

In Next.js 13, Props passed from the Server Components to Client components need to be serializable. This means that values such as functions, Dates, etc, cannot be passed directly to client components.

NOTE : When simply passing objects as props we don't need to think about this restriction, we can pass props normally. But when passing other data structures like dates or arrays etc we just serialize them and then we can use them normally.

---------------------------------------------------------------------------------------------------------------

Third-party packages in Client components

The "use client" directive is a new React feature that was introduced as part of Server Components. Since Server Components are so new, third-party npm packages are just beginning to add it to components that use client-only features like useStateuseEffect and createContextThese third-party packages that use these client-side features will work inside our client component, but won't work inside server components and give us an error since they don't use the "use client" directive yet.


// app/OldClientComponent.js

'use client';

// importing old package with client-side features
import { OldClientComponent } from '.../some/folder';

export default OldClientComponent;

//------------------------------------------------------------------------------------

// app/page.js

import OldClientComponent from '.../some/folder';

export default function Page() {
  return (
    <div>
      <p> Using third-paty package inside server component </p>

      {/* 🟢 Works, since it's a Client Component */}
      <OldClientComponent />
    </div>
  );
}

NOTE : To use these third-party packages with client-side fetures (that don't use "use client" directive yet), we can wrap third-party components that rely on client-only features in our own Client Components.

---------------------------------------------------------------------------------------------------------------

Request Headers

The headers() function allows you to read the HTTP incoming request headers from a server component. This API extends the Web Headers API. It is read-only, meaning you cannot set / delete the outgoing request headers.

NOTE : The headers() function can only be used inside "server components".


// app/posts/page.jsx  (Next.js 13)

import { headers } from 'next/headers';

let i = 0
export default function Page() {

  // Acess header values
  const headersList = headers();
  const userAgent = headersList.get('user-agent');
  const host = headersList.get('host');
  const referer = headersList.get('referer');

  i +=1
  console.log("Rendering the component ========> ", i)

  // Go over all header values
  headersList.forEach((value, key)=>{
    console.log(key,"-------->",value)
  })

  return(
    <>
   <h1 align='center'> User Agent : {userAgent} </h1>
   <h1 align='center'> HOST : {host} </h1>
   <h1 align='center'> Referer : {referer} </h1>
    </>
  )
}


Cookies

The cookies() function allows you to read the HTTP incoming request cookies from a server component. It is read-only, meaning you cannot set / delete the outgoing request cookies.

NOTE : The cookies() function can only be used inside "server components".


// app/page.jsx

'use client'
import React, { useState } from 'react';
import Cookies from 'js-cookie';

const Page = () => {

  const [cookieName, setCookieName] = useState('');
  const [cookieValue, setCookieValue] = useState('');

  const handleCookieNameChange = (event) => {
    setCookieName(event.target.value);
  };

  const handleCookieValueChange = (event) => {
    setCookieValue(event.target.value);
  };

  const handleClick = () => {
    Cookies.set(cookieName, cookieValue, { expires: 7 });
    console.log("Cookies set : ", cookieName, cookieValue )
    setCookieName('');
    setCookieValue('');
  };

  return (
    <div>
      <input type="text" placeholder="Cookie Name" value={cookieName}
        onChange={handleCookieNameChange} />
      <input type="text" placeholder="Cookie Value" value={cookieValue}
        onChange={handleCookieValueChange} />
      <button onClick={handleClick}> Set Cookie </button>
    </div>
  );
};

export default Page;

//------------------------------------------------------------------------------------

// app/posts/page.jsx  (Next.js 13)

import { cookies } from 'next/headers';

let i = 0
export default function Page() {

  // Acess cookie values
  const cookieStore = cookies();
  const username = cookieStore.get('username')
  const bikenumber = cookieStore.get('bikenumber')
  console.log("UNAME : ",username)

  i +=1
  console.log("Request was made ===> ", i)


  return(
    <>
    <h1 align='center'> USERNAME : {username.value} </h1>
    <h1 align='center'> BIKENUMBER : {bikenumber.value} </h1>
    </>
  )
}


---------------------------------------------------------------------------------------------------------------

(Read "Automatic Static Optimization" before it)


Data Fetching (NextJS 13)

Next.js 13 introduced a new way to fetch data in your application. The API has been simplified to align with React and the Web Platform. In Next.js 13 we enable various data fetching strategies through the "fetch()" web API. The new data fetching system is built on top of the native fetch() Web API and Next.js extends the fetch() options object to allow each request to set its own caching and revalidating rules.


The new pattern for data fetching allows us to write server-side code naturally without depending on data fetching functions like the getServerSideProps() or getStaticProps() methods. It is recommended to always fetch data inside "server components" in Next.js 13. The fetch() web API in Next.js provides the following caching options :

  • force-cache (default) - Executed once at build and the result is cached for subsequent requests. This behaviour is similar to getStaticProps() method.
  • no-store - Executed everytime for a new request from the client. This behaviour is similar to getServerSideProps() method.
  • revalidate - Executed after specific time-intervals. This is similar to getStaticProps() method with revalidation.
NOTE : In Next.js 13, we can use the fetch() API with its caching options to enable various rendering strategies like SSR,SSG,ISR into pages they are being used in.


  // Fetched on the server for every user request (Similar to SSR)
  const res = await fetch("https://api.example.com/data/", {cache:'no-store'});

  // Fetched once during build-time and cached. (Similar to SSG) // default
  const res = await fetch("https://api.example.com/data/", {cache:'force-cache'});

  // Fetched every given time interval. (Similar to ISR)
  const res = await fetch("https://api.example.com/data/", {next:{revalidate: 60}});

NOTE : If we try to use multiple fetch() methods with different rendering options inside a single component or page, we'll get an error due to collision of both.

NOTE : Inside the new "/app" directory previous data fetching methods such  are not supported.If we want to fetch data on client-side, we can still do it like we used to using third-party libraries like Axios or SWR with the state hooks like useState(), useEffect() etc.

Static Data Fetching

In Next.js, a static page is a page that is rendered at build-time. It could be rendered only once (like SSG) and the same cached version would be served on every request or it could be rendered after specific intervals (like ISR). Both ISR and SSG based pages can be considered as static pages.

In Next.js 13, by default every page is a static page , including client & server component pages, or pages that don't contain fetch() API. This bevahiour is also because by default Next.js 13 will cache the result of fetch() requests that do not specifically opt out of caching behavior through the options object.

Example] Below we configure the page to be static by using the "force-cache" option on the fetch() API. The entire page is rendered at build time as static page.


// app/posts/page.jsx  (Next.js 13)

let i = 0
async function getPosts() {
 
  // Executed ONCE at build-time and cached.
  const res = await fetch('https://jsonplaceholder.typicode.com/posts',
                                                               {cache:'force-cache'})
  i += 1
  console.log("Request was sent !!! - ", i)
  return res.json()
 }

async function PostsPage() {

  const posts = await getPosts();

  // Tailwind CSS
  let head_styles = "text-6xl font-bold text-blue-400 mt-5"
  let post_styles = "bg-red-500 hover:bg-red-600 active:bg-red-500 m-5 p-5
                                                            text-white rounded-md"

  return (
    <>
      <h1 align="center" className={head_styles}> POSTS </h1>
      <ul>
        {
          posts.map((post) => (
            <li key={post.id} className={post_styles}>
              <h3 className="font-bold"> {post.title} </h3>
              <p className="font-light"> {post.body} </p>
            </li>
          ))
        }
      </ul>
    </>
  )
}

 export default PostsPage;

Example] Below we configure the page to be static by using the "revalidate" option on the fetch() API. The entire page is rendered at build time and then re-rendered on the server after every 20 seconds. The rendering rules are similar to ISR.


// app/posts/page.jsx  (Next.js 13)

let i = 0
async function getPosts() {
 
  // Executed and re-rendered every 20 secs and cached.
  const res = await fetch('https://jsonplaceholder.typicode.com/posts',
                                                            {next:{revalidate:20}})
  i += 1
  console.log("Request was sent !!! - ", i)
  return res.json()
 }

async function PostsPage() {

  const posts = await getPosts();

  // Tailwind CSS
  let head_styles = "text-6xl font-bold text-blue-400 mt-5"
  let post_styles = "bg-red-500 hover:bg-red-600 active:bg-red-500 m-5 p-5
                                                            text-white rounded-md"

  return (
    <>
      <h1 align="center" className={head_styles}> POSTS </h1>
      <ul>
        {
          posts.map((post) => (
            <li key={post.id} className={post_styles}>
              <h3 className="font-bold"> {post.title} </h3>
              <p className="font-light"> {post.body} </p>
            </li>
          ))
        }
      </ul>
    </>
  )
}

 export default PostsPage;

NOTE : In development (npm run dev) the fech() will be executed on every request even if we set the "forche-cache" or "revalidate" option. In production (npm run start) it will behave exactly as it's supposed to behave with caching.


Dynamic Data Fetching

In Next.js, a dynamic page is a page that is rendered at every request. It is mainly used when we always want updated data or if we need information to render page that's only available at request time (like a dynamic route). By default every page in Next.js 13 is a static page (rendered and cached at build-time), to have a dynamic page we need to opt out of caching behavior.

Some ways we can make a page dynamic in Next.js 13 are as followed :

  • Dynamic Data Fetches - In this we use the fetch() API with "no-store" cache option which will re-fetch the values and re-render the page for every request.
  • Segment Config Options - We can export config variables like "revalidate" or "dynamic" to change the page behaviour.

Example] Below we configure the page to be dynamic by using the "no-store" option on the fetch() API. The entire page pre-renders for every request from user.


// app/posts/page.jsx  (Next.js 13)

let i = 0
async function getPosts() {
 
  // Executed for every request from user.
  const res = await fetch('https://jsonplaceholder.typicode.com/posts',
                                                               {cache:'no-store'})
  i += 1
  console.log("Request was sent !!! - ", i)
  return res.json()
 }

async function PostsPage() {

  const posts = await getPosts();

  // Tailwind CSS
  let head_styles = "text-6xl font-bold text-blue-400 mt-5"
  let post_styles = "bg-red-500 hover:bg-red-600 active:bg-red-500 m-5 p-5
                                                            text-white rounded-md"

  return (
    <>
      <h1 align="center" className={head_styles}> POSTS </h1>
      <ul>
        {
          posts.map((post) => (
            <li key={post.id} className={post_styles}>
              <h3 className="font-bold"> {post.title} </h3>
              <p className="font-light"> {post.body} </p>
            </li>
          ))
        }
      </ul>
    </>
  )
}

 export default PostsPage;


Generating Static Params/ Static Site Generaton (SSG)

In Next.js 13 every page is a static page by default until we pot-out of it, but that's not true for dynamic routes since they contain URL parameters only available during request time. A dynamic route is adaptable so it's just not possible to generate the pages for all the paths created by a dynamic route during build-time,but if we know some URL parameters first-hand we can generate static pages based on them. 

So we need to limit the number of paths for which to generate the pages with SSG. To apply SSG on a dynamic route we need to define a list of known URL parameters for which to generate and pre-render the pages on the server during build-time. Similar to the getStaticPaths() function we have in Next.js 12, we have the "generateStaticParams()" function in Next.js 13 to generate static pages for dynamic routes. It's used in combination with dynamic routes to define the list of route parameters that will be statically generated at build time instead of on-demand at request time.

Example] Below we generate static pages for each post based on it's userID, now when we visit the dynamic route it'll serve the prebuild static pages.


// app/posts/[postid]/page.jsx

// NOTE : Generate static pages for paths like /posts/1, /posts/8,...

// Tailwind CSS
let head_styles = "text-6xl font-bold text-blue-400 mt-5"
let post_styles = "bg-red-500 hover:bg-red-600 active:bg-red-500 m-5 p-5
                                                               text-white rounded-md"

// Generates static pages at build for each params object in the returned array.
export async function generateStaticParams() {
  const response = await fetch('https://jsonplaceholder.typicode.com/posts');
  const posts = await response.json();
  // Array of UserIDs inside posts. Eg - [11,12,31,44,...]
  const postIDs = posts.map(post => post.userId);
  // Array of params objects. Eg - [{postid:11},{postid:22},...]
  return postIDs.map((postid) => ({ postid: postid.toString() }))
}

async function PostIDPage({ params }) {

  let post;
  await fetch(`https://jsonplaceholder.typicode.com/posts/${params.postid}`)
    .then(response => response.json())
    .then(json => {
      console.log("Request for post : ", params.postid)
      post = json;
    })

  return (
    <>
      <h1 align="center" className={head_styles}> Welcome to /posts/:postID !!! </h1>
      <div key={post.id} className={post_styles}>
        <h3 className="font-bold"> {post.title} </h3>
        <p className="font-light"> {post.body} </p>
      </div>
    </>
  )
}

export default PostIDPage;

NOTE : The 'generateStaticParams()' method is executed once at build-time and is used to get all URL parameters that can be used to build the static pages. It must return an array of objects containing URL params for each static page we want to generate.

NOTE : The generated static pages behave in similar way as our regular static pages, so much so that we can even apply "revalidate" option on them to re-render these pages at specific intervals at runtime.

NOTE : The "fallback" feature is built-in to the generateStaticParams() function, so if we try to acess a path that is not generated, Next.js 13 will fetch it dynamically the first-time and then cache it (make static page) for subsequent requests.

---------------------------------------------------------------------------------------------------------------

Data Fetching without fetch() API

We might not always have the ability to use fetch() directly if we're using a third-party library such as an ORM or database client. In cases where we cannot use fetch() but still want to control the caching or revalidating behavior of a layout or page, we can rely on the following ways.


1] Default Caching Behaviour

By default Next.js 13 renders every page as static page if we don't manually configure it. We can utilize this default behaviour to make static pages that render only once at build-time.

NOTE : If the route is static (default), the output of the request will be cached and revalidated (if configured) alongside the rest of the segment. If the route is dynamic, the output of the request will not be cached and will be re-fetched on every request when the segment is rendered.

Example] Below we use Axios to fetch posts, but since Axios does'nt use fetch() and the Route is static the page is rendered only once at build-time.


// app/posts/page.jsx

// NOTE : Rendered ONCE at build-time

import axios from 'axios';

let i = 0;
async function getPosts() {
  // Executed for every request from user.
  const res = await axios.get('https://jsonplaceholder.typicode.com/posts');
  i += 1;
  console.log("Request was sent !!! - ", i);
  return res.data;
}

async function PostsPage() {
  const posts = await getPosts();

  // Tailwind CSS
  let head_styles = "text-6xl font-bold text-blue-400 mt-5";
  let post_styles = "bg-red-500 hover:bg-red-600 active:bg-red-500 m-5 p-5
                                                              text-white rounded-md";

  return (
    <>
      <h1 align="center" className={head_styles}> POSTS </h1>
      <ul>
        {
          posts.map((post) => (
            <li key={post.id} className={post_styles}>
              <h3 className="font-bold"> {post.title} </h3>
              <p className="font-light"> {post.body} </p>
            </li>
          ))
        }
      </ul>
    </>
  );
}

export default PostsPage;

Example] Below we use Axios to fetch posts, but since the Route is dynamic the page is rendered for every new request, overriding the default caching behaviour.


// app/[username]/page.jsx

// NOTE : Rendered at every request.

import axios from 'axios';

let i = 0;
async function getPosts() {

  // Executed for every request from user.
  const res = await axios.get('https://jsonplaceholder.typicode.com/posts');
  i += 1;
  console.log("Request was sent !!! - ", i);
  return res.data;
}

async function PostsPage({params}) {

  const posts = await getPosts();

  // Tailwind CSS
  let head_styles = "text-6xl font-bold text-blue-400 mt-5";
  let post_styles = "bg-red-500 hover:bg-red-600 active:bg-red-500 m-5 p-5
                                                            text-white rounded-md";

  return (
    <>
     <h1 align="center" className={head_styles}> Welcome {params.username} !!! </h1>
      <h1 align="center" className={head_styles}> POSTS </h1>
      <ul>
        {
          posts.map((post) => (
            <li key={post.id} className={post_styles}>
              <h3 className="font-bold"> {post.title} </h3>
              <p className="font-light"> {post.body} </p>
            </li>
          ))
        }
      </ul>
    </>
  );
}

export default PostsPage;


2] Route Segment Config Options

These are special variables that allows us configure the behavior of a Page or Layout by directly exporting them from the page. As a temporary solution, until the caching behavior of third-party packages can be configured, we can use segment configuration to manage cache behavior of pages. Some of them are the following :


export const dynamic = 'auto'

export const revalidate = false

export const fetchCache = 'auto'

export const runtime = 'nodejs'

export const preferredRegion = 'auto'

Example] Below we use Axios to fetch posts and we export the "revalidate" config option to re-render the entire page every 60 seconds.


// app/posts/page.jsx

import axios from 'axios';
export const revalidate = 60; // revalidate every minute

let i = 0;
async function getPosts() {
  const res = await axios.get('https://jsonplaceholder.typicode.com/posts');
  i += 1;
  console.log("Request was sent !!! - ", i);
  return res.data;
}

async function PostsPage() {

  const posts = await getPosts();
  let head_styles = "text-6xl font-bold text-blue-400 mt-5";
  let post_styles = "bg-red-500 hover:bg-red-600 active:bg-red-500 m-5 p-5
                                                            text-white rounded-md";

  return (
    <>
      <h1 align="center" className={head_styles}> POSTS </h1>
      <ul>
        {
          posts.map((post) => (
            <li key={post.id} className={post_styles}>
              <h3 className="font-bold"> {post.title} </h3>
              <p className="font-light"> {post.body} </p>
            </li>
          ))
        }
      </ul>
    </>
  );
}

export default PostsPage;


---------------------------------------------------------------------------------------------------------------


Comments

Popular posts from this blog

React Js + React-Redux (part-2)

React Js + CSS Styling + React Router (part-1)

ViteJS (Module Bundlers, Build Tools)