Dart Language (Part 2)
Streams
A Stream in Dart is a way to handle a sequence of asynchronous events. Instead of waiting for a single value, a stream allows you to work with multiple values over time. It handles asynchronous events over time, useful for data that arrives incrementally, like user inputs or network responses.
After creation, events like data or errors are added to stream, and subscribers listen to these events. The stream emits events until it is closed, signaling the end of its lifecycle and notifying listeners that no more events will be added.
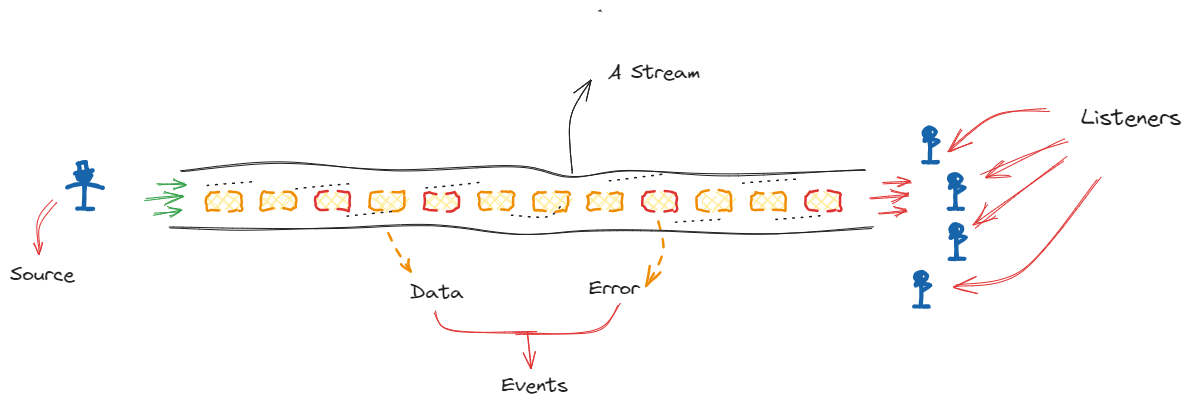
Streams are categorized into 2 types based on how they handle listeners :
Single-Subscription Streams:
- These streams can have only one subscriber at a time. Once a listener subscribes, no additional listeners can be added. They are typically used for one-time data sources, such as reading from a file or making a single HTTP request.
Broadcast Streams:
- These streams allow multiple listeners to subscribe concurrently. Each listener receives the same stream of events independently. Broadcast streams are ideal for scenarios where multiple subscribers need to react to the same set of events, such as real-time updates or live notifications.
StreamController
A StreamController is a class that provides a way to create a stream and control its events. You can add data, handle errors, and close the stream. It’s useful when you need to generate events dynamically or manage stream-related tasks more directly.
We can pass various types of data through a stream, including basic data types like int, double, String, and bool, as well as custom objects, collections such as List and Map, and even null if the stream is nullable.
NOTE: By default, StreamController creates a single-subscription stream. If you need a broadcast stream, you have to specify this explicitly when creating stream.
Example] Below we create a single subscription stream and listen to various types of events like when data is passed, errors added or stream closed.
Example] Below we create a broadcast stream and listen to various types of events like when data is passed, errors added or stream closed.
In Dart, streams can also be paused and resumed to control the flow of data to listeners. This feature is especially useful when you need to manage how data is processed or handle scenarios where the rate of incoming data might need to be adjusted.
1. Pausing a Subscription
- Purpose: Temporarily halts delivery of events to a listener, allowing you to manage or buffer data without processing it immediately.
- How It Works: When a subscription is paused, the stream stops sending data events to that listener. Events added to the stream during this pause are buffered (stored), meaning they are held until the subscription is resumed. This allows you to temporarily stop processing without losing any data.
2. Resuming a Subscription
- Purpose: Resumes the delivery of data events to a listener that was previously paused.
- How It Works: When a subscription is resumed, it starts receiving any buffered (stored) events that were added while it was paused. After processing these buffered events, the subscription continues to handle new events from the stream as they are emitted.
Example] Below example demonstrates how to create a stream, add data to it, pause the subscription, resume it, and handle events accordingly.
Example] Below we create two different listeners (subscriptions) to a broadcast stream. One listener will be paused and then resumed while the other continues processing the stream’s events independently.
NOTE : Each subscription has its own stream of events, so pausing or resuming one does not affect others. A paused listener stops receiving data temporarily, but other listeners continue to process events.
Stream.fromIterable()
The Stream.fromIterable constructor allows you to create a stream from an iterable collection (such as a list, set, or any iterable). It emits each element of the iterable sequentially as separate events in the stream.
When you pass an iterable to Stream.fromIterable, it iterates through the collection and adds each element to the stream. Each item is emitted one by one to any listeners.
NOTE : The Stream.fromIterable is a single-subscription stream. This means that it supports only one listener at a time.
NOTE: With Stream.fromIterable, you cannot add more data to stream after its initial creation. This method creates a stream that only emits the items from the provided iterable, and once those items have been emitted, the stream completes.
If you need a stream where you can add new data over time, you should use a StreamController. This allows you to dynamically add data to the stream at any point during its lifecycle.
Stream.periodic()
The Stream.periodic constructor creates a stream that emits events at specified intervals. This is useful for generating a stream of events or values at regular time intervals, like a ticker or a periodic task.
When you use Stream.periodic, you specify 2 main things:
- Interval (
Duration): The time between each emission of an event.
- Callback Function (Optional): A function that generates the value to be emitted and executed at intervals. This function receives an integer representing current iteration of emit (starting from
0) and returns the value to be emitted.
The Stream.periodic creates an infinite stream that does not complete on its own. The stream continues to emit events at regular intervals indefinitely until you explicitly cancel the subscription.
To stop receiving events and effectively "end" the stream, you need to cancel the subscription. This is done using the cancel method on the subscription object obtained from the listen method.
---------------------------------------------------------------------------------------------------------------
Classes
A class in Dart is defined using the "class" keyword. Inside a class, you can declare fields (variables) and methods (functions) that define the state and behavior of the objects created from the class. Once a class is defined, you can create instances (objects) of that class using the "new" keyword or directly with the constructor.
Constructors
In Dart, a constructor is a special method in a class that is used to create and initialize objects. Constructors allow you to assign values to the fields (properties) of the class when an object is created. They have the same name as the class and are automatically called when an object is instantiated.
Dart implements many types of constructors. Except for default constructors, these functions use the same name as their class :
- Default constructors: Used to create a new instance when a constructor hasn't been specified. It doesn't take arguments and isn't named.
- Generative constructors: Creates new instances and initializes instance variables.
- Named constructors: Clarifies the purpose of a constructor or allows the creation of multiple constructors for the same class.
- Constant constructors: Creates instances as compile-type constants.
- Factory constructors: Either creates a new instance of a subtype or returns an existing instance from cache.
- Redirecting constructor: Forwards calls to another constructor in the same class.
Default Constructor
In Dart, a default constructor is automatically provided by the language when a constructor is not explicitly defined in a class. It is a constructor that takes no arguments and is not named. The default constructor simply creates a new instance of the class without performing any specific initialization tasks.
Generative Constructor
A generative constructor in Dart is the most common type of constructor used to create and initialize new instances of a class. It allows you to set the initial state of an object by assigning values to its instance variables when the object is created.
The primary role of a generative constructor is to initialize the instance variables (fields) of an object. You can pass arguments to a generative constructor to initialize the instance variables. A generative constructor must have the same name as the class.
The shorthand version of a generative constructor simplifies the process of initializing instance variables. Instead of manually assigning parameters to instance variables within the constructor body, Dart allows you to initialize them directly within the constructor's parameter list.
Named Constructor
In Dart, named constructors provide a way to create multiple constructors for a single class, each with a different name. This allows for more flexible object creation and better readability, as you can use different constructor names to clearly indicate the purpose or type of initialization.
NOTE : Dart does not support constructor overriding like other languages because constructors are not inherited in Dart. However, you can achieve similar functionality using named constructors and factory constructors.
Redirecting Constructor
Redirecting constructors in Dart provide a way to delegate the initialization logic of one constructor to another constructor within the same class. This feature is useful for simplifying complex object creation scenarios and ensuring consistent initialization logic across multiple constructors.
A redirecting constructor in Dart is primarily used to call another constructor within the same class. It does not have its own initialization logic but simply forwards the parameters to another constructor.
NOTE : The syntax for redirecting constructors uses the colon syntax : this(...), allowing you to forward parameters from one constructor to another.
Within the context of a constructor, this is used in the : this(...) syntax to call another constructor within the same class. Outside of constructors, this refers to the current instance of the class. It is used to access instance variables and methods.
---------------------------------------------------------------------------------------------------------------
Inheritance
Inheritance in Dart is a fundamental object-oriented programming concept that allows you to create a new class based on an existing class. The new class, called the subclass or derived class, inherits properties and methods from the existing class, known as the superclass or base class.
The "extends" keyword is used to establish an inheritance relationship. Subclasses can override methods of the superclass and call superclass methods using the "super" keyword.
The "super" keyword is used to access members of the superclass from within a subclass. This includes calling superclass constructors, methods, and accessing superclass properties.
NOTE : In Dart, a class can extend only one other class. This is known as single inheritance.
We can use the "final" keyword to declare a class that cannot be extended. This means that no other class can inherit from a final class. Declaring a class as final ensures that it cannot be subclassed. This can be useful for classes that are intended to be used as-is and should not be extended.
Overriding Members
Overriding in Dart allows a subclass class to provide a specific implementation of a method, getter, setter, or operator that is already defined in its parent class. The overridden member in the subclass class has the same name and parameters as the member in the parent class. We can override the following thinsg in Dart :
Method Overriding: You can provide a new implementation of a method that is defined in the base class. The derived class method must match the method signature of the base class method.
Getter and Setter Overriding: You can override getters and setters to provide custom logic for property access and modification.
Operator Overriding: Allows customization of operators such as
+,-,*, etc., for instances of a class.
@override annotation to indicate that a method, getter, setter, or operator is overriding a base class member.- Method Signature: The overriding method must have the same name and parameter types as the method in the base class.
- Return Type: The return type of the overriding method must be the same or a subtype of the return type in the base class.
- Annotations: Use the
@overrideannotation to indicate that a method, getter, setter, or operator is overriding a base class member.
In Dart, we can override operators to define custom behavior for the standard operators when applied to instances of your classes. This allows you to tailor the behavior of operators like +, -, *, ==, and more to fit the specific needs of your class.
By overriding operators we define the specific behavior of operations when they are applied to instances of your class. This means that when you use an operator like +, -, ==, or others on objects of your class, it will execute the logic you’ve defined.
To override an operator in Dart, you use the operator keyword followed by the operator symbol. Below is an general syntax for overriding any operator in Dart classes :
Example] In below examples we override the + and == operators and define what happens when used among 2 different instances of a class.
It's a good practice to override toString(), hashCode, and == in custom classes, especially when dealing with equality checks or printing object information.
---------------------------------------------------------------------------------------------------------------
Abstraction
NOTE : The "abstract" keyword is used to define abstract classes and abstract methods. Any method declared inside an abstract class without a body or implementation is considered an abstract method.
---------------------------------------------------------------------------------------------------------------
Interfaces
An interface is a class that defines a contract of methods and properties. Classes that implement this interface must provide concrete implementations for all the methods and properties declared in the interface.
In Dart, we use the "interface" keyword to define an interface class. To implement an interface, use the "implements" keyword followed by the interface class name. This indicates that the implementing class must provide implementations for all abstract methods and properties defined in the interface.
NOTE : The "interface" keyword is supported in Dart only after Dart version 3.0.
A class can implement multiple interfaces by listing them separated by commas after the implements keyword. An Interface is similar to an Abstract class , but it can only consists of abstract methods.
---------------------------------------------------------------------------------------------------------------
Mixins
Mixins in Dart provide a way to reuse code across multiple classes without using traditional inheritance. A mixin is a special type of class in Dart that is intended to be used for adding functionality to other classes.
Unlike inheritance, which creates an "is-a" relationship, mixins create a "has-a" or "can-do" relationship, allowing classes to share behavior. Mixins are a way of defining code that can be reused in multiple class hierarchies.
Some rules to keep in mind while using Mixins :
- No Constructors : Mixins cannot have constructors as they are used solely for adding functionality.
- No Direct Instantiation : You cannot create instances of a mixin directly.
- Cannot Be Abstract : Mixins cannot be declared as abstract; they provide concrete implementations.
- Must Be Applied to a Class : Mixins must be used with a class; they cannot be used standalone.
- No Super Calls : Mixins cannot use
superto call methods from other mixins or classes.
NOTE : A mixin is defined using the "mixin" keyword. To use a mixin, apply it to a class using the "with" keyword. The mixin will then provide its functionality to the class.
NOTE : The Mixins are supported in Dart only after Dart version 3.0.
If multiple mixins define fields with the same name, the field from the mixin listed last in the sequence will be used. Dart does not allow multiple mixins to define fields with the same name unless there is a specific need to override.
The order in which mixins are applied determines method and field resolution. Be careful with the sequence if mixins provide methods or fields with the same names.
---------------------------------------------------------------------------------------------------------------
Generics
Generics enable you to define a class or function with placeholders for types. Instead of specifying a concrete type, you use a generic type parameter. This parameter can then be replaced with a specific type when you create an instance of the class or call the function.
- Type Safety: Generics ensure that you are working with the correct types, reducing runtime errors and type mismatches.
- Code Reusability: Write generic code that can handle different types without duplicating code for each type.
- Flexibility: Create data structures and algorithms that can work with a variety of types.
Examples] Below we define generic class and methods which can work with different types.
Constraints with Generics
In Dart, you can use constraints with generic types to restrict the types that can be used as type arguments for a generic class or method. Constraints are useful when you want to ensure that the generic type T adheres to certain requirements or inherits from a specific class.
To apply constraints, you use the "extends" keyword to specify that the generic type T must extend a particular class or implement a specific interface.
---------------------------------------------------------------------------------------------------------------
Access Modifiers
In Dart, access modifiers control the visibility and accessibility of classes, methods, properties, and variables within a program. Unlike some other languages like Java, C#, or C++, Dart does not use explicit keywords like private, protected, or public.
Instead, Dart uses a simpler convention where a member's visibility is determined by whether its name starts with an underscore ( _ ). Dart only has 2 levels of visibility:
- Public (default): When the name of a class, method, or variable does not start with an underscore (
_), it is public.
- Private: When the name of a class, method, or variable starts with an underscore (
_), it is private to its library.
The private members in Dart are private to the library, not to the class. A library in Dart refers to a single file or a collection of related files that are grouped together.
- Public members: Accessible from anywhere in the code, including other libraries.
- Private members: Accessible only within the same library. A member prefixed with an underscore (
_) cannot be accessed outside the file or library it is defined in.
- The underscore
_is the only way to define private members in Dart. There are no explicit keywords likeprivateorprotected.
NOTE: Underscore fields, classes and methods will only be available in the .dart file where they are defined.
---------------------------------------------------------------------------------------------------------------


Comments
Post a Comment