Go, also known as Golang, is an open-source programming language created by Google in 2007. It was designed to address issues such as slow build times, inefficiency, and the complexity of modern software architectures. It combines the performance of low-level languages like C and C++ with the ease of use and simplicity of modern languages like Python.
Go is statically typed compiled, meaning types are checked at compile time, ensuring better performance and fewer runtime errors. Go includes automatic garbage collection, which simplifies memory management while maintaining high performance. It has built-in support for concurrency through goroutines and channels, allowing developers to efficiently write multi-threaded applications.
Why Golang is so fast ?
Go is a statically typed compiled language, meaning its code is translated directly into machine code by the Go compiler before execution. Statically typed languages tend to be faster because they do type checking at compile time, reducing runtime overhead of type checking.
Go's garbage collector is optimized for low-latency performance, minimizing pauses and interruptions during program execution. The garbage collector automatically frees up unused memory but is designed to do so efficiently so that it doesn't slow down the application, even under heavy memory use.
Go avoids complex language features that can introduce overhead, such as:
- No inheritance (favoring composition over inheritance).
- No dynamic typing (ensuring type-checking happens at compile-time).
- No complex features like generics (until Go 1.18, and even the introduction of generics is lightweight and focused).
Go's concurrency is one of its strongest features. The goroutines (lightweight threads) are highly efficient compared to traditional threads. They are managed by the Go runtime instead of the operating system.
Below is list of common Go CLI commands as followed :
// Compiles and runs a Go program in one step.
go run <file.go>
// Compiles the current package and its dependencies into an executable binary.
go build
// Builds and installs the Go binary into the $GOPATH/bin directory.
go install
// Formats the Go source code according to Go's standard formatting rules.
go fmt
// Checks and reports style errors without fixing them.
go vet
// Runs all the unit tests in the current package or project.
go test
// Displays test coverage information after running tests.
go test -cover
// Downloads and installs all the required modules as per the go.mod file.
go mod tidy
// Displays a list of available modules and their versions.
go list -m all
// Initializes a new Go module in the current directory.
go mod init <module_name>
// Adds a dependency on another module or updates it.
go get <package_path>
// Removes unused dependencies from the go.mod and go.sum files.
go mod tidy
// Lists all available Go commands and their usage options.
go help
// Runs benchmarks within the code for performance testing.
go test -bench .
// Cleans up files generated by the build process.
go clean
// Cross-compiles a Go program for different platforms.
go build -o <output_binary> <file.go>
// Shows all currently installed packages in your GOPATH.
go list ./...
// Prints the Go version installed on your machine.
go version
---------------------------------------------------------------------------------------------------------------
Syntax
Every Go file begins with a package declaration, indicating which package the file belongs to. The main function is the entry point of a Go application and must be in the main package. This helps organize code into modular components and allows for better management and reuse of code.
package main
import "fmt"
func main() {
fmt.Println("Hello, World!") // Print a greeting to the console
}
// go run <filename>
When you run a Go program, the Go runtime looks for this function to start execution, it must be declared in a file that is part of the main package. A Go executable program can only have one main function in the main package. This structure ensures that the Go runtime knows where to start executing the program.
NOTE : Golang files use the ".go" file extension, this allows the Go tools to recognize and compile them correctly.
---------------------------------------------------------------------------------------------------------------
Variables
Variables in Go are used to store data values that can be manipulated throughout a program. Go is a statically typed language, meaning variable types are determined at compile time. In Go (Golang), variables can be defined in several ways, each serving specific use cases and levels of convenience.
- Using the
'var' - Short Variable Declaration (
:=)
The var keyword is a fundamental way to declare variables. It provides flexibility in defining variable types, initialization, and scope. If you don't provide an initial value, the variable is assigned a zero value based on its type.
package main
import "fmt"
// Package-level variables
var globalVar int = 42 // Initialized with a value
var packageVar string // Declared without initialization (zero value)
func main() {
// 1. Declaring a variable with explicit type
var age int // Declaration without initialization
age = 25 // Assigning a value
fmt.Println("Age:", age)
// 2. Declaring and initializing a variable
var name string = "Alice" // Declaration with initialization
fmt.Println("Name:", name)
// 3. Type inference
var height = 5.9 // Type inferred as float64
fmt.Println("Height:", height)
// 4. Zero value demonstration
fmt.Println("Global Variable (zero value):", packageVar)
// packageVar is an empty string
}
NOTE : If you initialize a variable without explicitly specifying the type, Go can infer the type based on the assigned value. This can only be done when the variable is declared with the var keyword.
We can define variables using the var keyword at different scopes, including package-level and function-level scopes.
- Package-level scope: Variables declared at the package level are accessible across the entire package. These variables are declared outside of any functions and are often used when you need shared or global state across different functions or files within the same package.
- Function-level scope: Variables declared inside a function are only accessible within that function. They are local to the function, and once the function completes execution, these variables are no longer accessible.
- Block-level scope: Variables declared inside blocks such as
if, for, switch, or else blocks have block-level scope. These variables are only accessible within the block in which they are declared.
Example] Below we declare a package-level variable and access it across different file in same package.
// file2.go
package main
import "fmt"
// Package-level variable
var sharedVar string = "I am shared across the package"
func printFromFirstFile() {
fmt.Println("From first file:", sharedVar)
}
//------------------------------------------------------------------------
package main
import "fmt"
func printFromSecondFile() {
// Accessing sharedVar from another file
fmt.Println("From second file:", sharedVar)
}
func main() {
printFromFirstFile()
printFromSecondFile()
}
Example] Below we declare a function-level and block-level variables in same file.
package main
import "fmt"
func demonstrateScope() {
var functionVar string = "I am a function-level variable"
fmt.Println(functionVar)
if true {
var blockVar string = "I am a block-level variable"
fmt.Println(blockVar)
}
for i := 0; i < 1; i++ {
var loopVar string = "I am a block-level variable inside the for loop"
fmt.Println(loopVar)
}
}
func main() {
demonstrateScope()
}
NOTE : The package-level variables are accessible across different files within the same package, making them useful for sharing data between multiple files in the same package. But if multiple files modify the same variable, it can be difficult to track where changes are happening, leading to unexpected behavior or hard-to-find bugs.
Short Variable Declaration
In Go, the short variable declaration is a convenient way to declare and initialize variables using the ":=" syntax. When using the ":=" syntax, the Go compiler automatically infers the type of the variable based on the assigned value. This eliminates the need to explicitly specify the type.
The short variable declaration combines declaration and initialization into one step. It reduces the amount of code you need to write, making it easier to declare and initialize variables in a single step.
package main
import "fmt"
func main() {
// Short variable declarations
x := 5
y := 10.5
message := "Welcome to Go!"
// Multiple declarations
a, b := 1, 2
c, d := "Hello", "World"
// Using the variables
fmt.Println("x:", x)
fmt.Println("y:", y)
fmt.Println("Message:", message)
fmt.Println("a + b:", a + b)
fmt.Println("Concatenated:", c + " " + d)
}
NOTE : Short variable declarations can ONLY be used inside functions, not at the package level. They create variables that are scoped to the surrounding block.
If you want to declare a variable without initializing it (or initialize it later), you should use the var keyword. Use := when you want to declare and initialize a new variable in a single step.
Zero Values
In Go, when a variable is declared but not explicitly initialized, it is automatically assigned a zero value based on its type. The zero value is the default value assigned to variables that ensures they are always in a well-defined state, even if not manually initialized. Here are default zero values for different data types in Go :
- Integer types (
int, int8, int32, etc.): 0 - Floating-point types (
float32, float64): 0.0 - Boolean:
false - String:
"" (empty string) - Pointer, Slices, Maps, Channels, Interfaces, and Functions:
nil
package main
import "fmt"
func main() {
var a int // Zero value is 0
var b float64 // Zero value is 0.0
var c bool // Zero value is false
var d string // Zero value is "" (empty string)
var e *int // Zero value is nil (for pointers)
var f []int // Zero value is nil (for slices)
var g map[string]int // Zero value is nil (for maps)
var h chan int // Zero value is nil (for channels)
fmt.Println("Zero values:")
fmt.Println("int:", a) // Output: int: 0
fmt.Println("float64:", b) // Output: float64: 0
fmt.Println("bool:", c) // Output: bool: false
fmt.Println("string:", d) // Output: string:
fmt.Println("pointer:", e) // Output: pointer: <nil>
fmt.Println("slice:", f) // Output: slice: <nil>
fmt.Println("map:", g) // Output: map: <nil>
fmt.Println("channel:", h) // Output: channel: <nil>
}
Benefits of Zero Values :
- Go ensures that variables are never left uninitialized or in an undefined state. Even if you forget to explicitly assign a value, the variable will have a meaningful, predictable value, preventing common bugs that occur in other languages due to uninitialized variables.
- For types like pointers, slices, and maps, the zero value is
nil. This makes it easier to check if these data structures are empty or uninitialized.
- In some cases, the zero value is exactly what you want. Instead of writing extra lines to initialize variables with zeros, false, or empty values, you can rely on Go's zero values to handle this for you.
NOTE: Go (Golang) does not have a concept of null as seen in some other programming languages (like JavaScript or Java). Instead, Go uses nil to represent the absence of a value for certain types.
In Go, constants are immutable values that are known at compile-time and cannot be changed once defined. Constants are declared using the "const" keyword and must be initialized with a value when they are declared.
Constants follow the same scoping rules as variables. Constants declared at the package level have package scope, and constants declared inside a function or block have function or block scope.
Constants Cannot Be:
- Declared using the
:= syntax (that's only for variables). - Assigned a value that is computed at runtime (must be a compile-time constant).
- Changed once declared.
package main
import "fmt"
const Pi = 3.14 // Package-level constant
func main() {
const Greeting = "Hello" // Function-level constant
if true {
const Local = "Inside block" // Block-level constant
fmt.Println(Local) // Accessible only within the block
}
fmt.Println(Pi, Greeting) // Accessible in the entire function
}
In Go, constants can be Typed or Untyped. Untyped constants can be used with multiple types, as long as the kind (integer, floating-point, etc.) is compatible. Typed constants are restricted to the exact type they are declared with and cannot be assigned to variables of a different type without an explicit conversion.
package main
import "fmt"
// Typed constants
const Pi float64 = 3.14159
const Answer int = 42
// Untyped constants
const x = 3.14159
const y = 42
func main() {
// Typed constants
var radius float64 = Pi
var answer int = Answer
fmt.Println("Typed Constants:", radius, answer)
// Untyped constants
var untypedFloat float32 = x
var untypedFloat2 float64 = x
var untypedInt int64 = y
fmt.Println("Untyped Constants:", untypedFloat, untypedInt, untypedFloat2)
}
Use typed constants in Go when you need strict type enforcement to ensure consistency and avoid accidental type conversions. On the other hand, use untyped constants when flexibility is required, allowing the constant to adapt to different types in various contexts, reducing the need for type-specific constants and making the code more versatile.
---------------------------------------------------------------------------------------------------------------
Data Types
Go is a statically typed programming language, which means each variable has a type defined at first and can only hold values with that type. Data types dictate how much memory is allocated, the operations that can be performed on the data, and the range of values that can be represented.
In Golang, data types are categorized into 2 main categories as followed :
- Basic Data Types
- Composite Data Types
Basic Data Types
Basic data types in Go are the fundamental types that serve as the building blocks for data representation in the language. They are predefined by Go and provide a way to store simple values.
Below are the basic data types in Go as followed :
Integer Types:
int: A signed integer that is platform-dependent (either 32 or 64 bits).int8: An 8-bit signed integer (range: -128 to 127).int16: A 16-bit signed integer (range: -32,768 to 32,767).int32: A 32-bit signed integer (range: -2,147,483,648 to 2,147,483,647).int64: A 64-bit signed integer (range: -9,223,372,036,854,775,808 to 9,223,372,036,854,775,807).uint: A platform-dependent unsigned integer type (non-negative values).uint8: An 8-bit unsigned integer (range: 0 to 255).uint16, uint32, uint64: Unsigned integers with corresponding bit sizes.
Floating-Point Types:
float32: A 32-bit floating-point number.float64: A 64-bit floating-point number (default for floating-point literals).
Boolean Type:
bool: Represents a value that can be either true or false.
String Type:
string: A sequence of characters used to represent text.
Complex Types:
complex64: A complex number with float32 real and imaginary parts.complex128: A complex number with float64 real and imaginary parts.
package main
import "fmt"
func main() {
// Integer Types
var a int = 42 // Platform-dependent signed integer
var b int8 = -120 // 8-bit signed integer
var c int16 = 30000 // 16-bit signed integer
var d int32 = -2000000000 // 32-bit signed integer
var e int64 = 9223372036854775807 // 64-bit signed integer
var f uint = 42 // Platform-dependent unsigned integer
var g uint8 = 255 // 8-bit unsigned integer
var h uint16 = 65000 // 16-bit unsigned integer
var i uint32 = 4294967295 // 32-bit unsigned integer
var j uint64 = 18446744073709551615 // 64-bit unsigned integer
// Floating-Point Types
var k float32 = 3.14 // 32-bit floating-point number
var l float64 = 3.141592653589793 // 64-bit floating-point number
// Boolean Type
var m bool = true // Boolean type (true or false)
// String Type
var n string = "Hello, Go!" // String type for text
// Complex Types
var o complex64 = 1 + 2i // Complex number with float32 real & imaginary parts
var p complex128 = 1.5 + 2.5i // Complex number with float64 real & imaginary parts
// Output all values
fmt.Println("Integer Types:")
fmt.Printf("int: %d, int8: %d, int16: %d, int32: %d, int64: %d\n", a, b, c, d, e)
fmt.Println("\nFloating-Point Types:")
fmt.Printf("float32: %.2f, float64: %.15f\n", k, l)
fmt.Println("\nBoolean Type:")
fmt.Printf("bool: %t\n", m)
fmt.Println("\nString Type:")
fmt.Printf("string: %s\n", n)
fmt.Println("\nComplex Types:")
fmt.Printf("complex64: %v, complex128: %v\n", o, p)
}
Signed data types can store both positive and negative numbers.A portion of the bits in a signed type is used to represent the sign (positive or negative).
Unsigned data types can store only non-negative numbers (positive and zero). No bit is reserved for a sign, so all bits are used to represent the magnitude of the number, effectively doubling the range of positive numbers compared to signed types with the same bit size.
In Go, you don't need to specify the size of a variable every time you declare it. You only need to explicitly specify the size when you have specific memory or range requirements. Go provides default types that you can use without worrying about exact bit-size :
int: Default signed integer type, which is platform-dependent (either 32 or 64 bits).float64: Default floating-point type for decimal numbers.string: Default for representing text.
package main
import "fmt"
func main() {
// Using default types
var a int = 100 // Default integer type (platform-dependent)
var b float64 = 3.14 // Default floating-point type
var c string = "Hello, Go!" // Default string type
fmt.Println(a, b, c)
}
Go automatically adjusts the size of int and uint based on the system's architecture to optimize performance and memory usage. This is what makes them platform-dependent types.
In the context of Go's data types (like int and uint), it means that the actual size (bit-width) of the type can vary based on the architecture of the machine on which your Go program is running. On a 32-bit system, int and uint are typically 32 bits (4 bytes), Whereas on a 64-bit system, int and uint are typically 64 bits (8 bytes).
Composite Data Types
Composite data types in Go are types that are composed of other types, allowing for the creation of more complex data structures. They enable developers to group related values and represent more intricate data relationships. Here are some common composite data types in Go:
- Array: A fixed-size collection of elements of the same type.
- Slice: A dynamic-size, flexible array that can grow or shrink in size.
- Map: A collection of key-value pairs, allowing fast lookup by keys.
- Struct: A collection of fields (variables) that can hold values of different types, allowing you to create more complex data structures.
package main
import "fmt"
// Struct definition
type Person struct {
Name string
Age int
}
func main() {
// Arrays
var arr [3]int = [3]int{1, 2, 3}
fmt.Println("Array:", arr)
// Slices
var slice []int = []int{4, 5, 6}
fmt.Println("Slice:", slice)
// Maps
var m map[string]int = map[string]int{"one": 1, "two": 2}
fmt.Println("Map:", m)
// Structs
var p Person = Person{Name: "Alice", Age: 30}
fmt.Println("Struct:", p)
}
Composite data types are essential for organizing and managing complex data structures in Go. They provide a way to group related values, enabling developers to model real-world entities effectively.
---------------------------------------------------------------------------------------------------------------
Arrays
In Go, an array is a fixed-size, ordered collection of elements of the same type. Once an array is defined, its size cannot be changed. Arrays are useful when you know the exact number of elements you want to store, and they provide fast access to elements based on their index.
package main
import "fmt"
func main() {
// SYNTAX
// var arrayName = [size]elementType{ }
// 1. Integer Array
var intArray [5]int
intArray = [5]int{10, 20, 30, 40, 50}
fmt.Println("Integer Array:", intArray)
// 2. String Array
stringArray := [3]string{"Go", "Python", "Java"}
fmt.Println("String Array:", stringArray)
// 3. Float Array
var floatArray = [4]float64{3.14, 2.71, 1.41, 1.61}
fmt.Println("Float Array:", floatArray)
// 4. Boolean Array
boolArray := [2]bool{true, false}
fmt.Println("Boolean Array:", boolArray)
// 5. Array with Initial Values and Inferred Size
inferredSizeArray := [...]int{100, 200, 300}
fmt.Println("Inferred Size Integer Array:", inferredSizeArray)
// 6. Array with Default Values (not initialized)
var defaultArray [3]string // default to empty strings
fmt.Println("Default String Array (not initialized):", defaultArray)
// 7. Multi-dimensional Array
multiArray := [2][2]int{{1, 2}, {3, 4}}
fmt.Println("Multi-dimensional Array:", multiArray)
}
Arrays in Go are relatively low-level data structures, and they do not come with convenience functions for ike insertion, updating, or deletion like in some other languages (e.g., Python or JavaScript) Instead, you perform these operations manually.
package main
import (
"fmt"
)
func main() {
// Create: Initialize an array with values
arr := [5]int{10, 20, 30, 40, 50}
fmt.Println("Original array:", arr)
// Read: Display the array elements
fmt.Println("Array elements:")
for i, v := range arr {
fmt.Printf("Index %d: %d\n", i, v)
}
// Update: Modify an element at a specific index
indexToUpdate := 2
newValue := 99
if indexToUpdate >= 0 && indexToUpdate < len(arr) {
arr[indexToUpdate] = newValue
}
fmt.Println("\nAfter updating index", indexToUpdate, "to", newValue)
fmt.Println("Updated array:", arr)
// Delete: Shift elements to "remove" an element at a specific index
indexToDelete := 1
if indexToDelete >= 0 && indexToDelete < len(arr) {
for i := indexToDelete; i < len(arr)-1; i++ {
arr[i] = arr[i+1] // Shift elements to the left
}
arr[len(arr)-1] = 0 // Optional: Reset the last element
}
fmt.Println("\nAfter deleting element at index", indexToDelete)
fmt.Println("Array after deletion:", arr)
// Final state of the array
fmt.Println("\nFinal array state:", arr)
}
Since arrays have a fixed size, they're often replaced with slices, which are more flexible and widely used in Go. However, arrays are still useful when the size is known and performance is critical.
Slices
In Go, slices are a more flexible and powerful alternative to arrays. Unlike arrays, slices are dynamically-sized and can grow and shrink as needed. They provide a more convenient way to work with sequences of data, making them one of the most commonly used data structures in Go.
package main
import (
"fmt"
)
func main() {
// SYNTAX
// var arrayName = []elementType{ }
// Slice of integers
intSlice := []int{1, 2, 3, 4, 5}
fmt.Println("Integer Slice:", intSlice)
// Slice of strings
stringSlice := []string{"apple", "banana", "cherry"}
fmt.Println("String Slice:", stringSlice)
// Slice of floats
floatSlice := []float64{3.14, 2.71, 1.41}
fmt.Println("Float Slice:", floatSlice)
// Slice of booleans
boolSlice := []bool{true, false, true}
fmt.Println("Boolean Slice:", boolSlice)
// Slice of empty interface to hold mixed types
mixedSlice := []interface{}{42, "hello", 3.14, true, []int{1, 2, 3}}
fmt.Println("Mixed Type Slice:", mixedSlice)
}
The zero value of a slice is nil, and it has a length and capacity of 0. You can append to a nil slice, and it will grow automatically. Go provides several built-in functions for working with slices, including append, copy, and slicing operations.
package main
import (
"fmt"
)
func main() {
// Initializing a slice of integers
numbers := []int{1, 2, 3, 4, 5}
fmt.Println("Original Slice:", numbers)
// Appending elements to the slice
numbers = append(numbers, 6, 7, 8)
fmt.Println("After Appending:", numbers)
// Slicing the slice (getting a sub-slice)
subSlice := numbers[2:5] // gets elements from index 2 to 4
fmt.Println("Sliced Portion (index 2 to 4):", subSlice)
// Modifying an element in the slice
numbers[0] = 10 // changing the first element
fmt.Println("After Modifying First Element:", numbers)
// Length and capacity of the slice
fmt.Println("Length of Slice:", len(numbers))
fmt.Println("Capacity of Slice:", cap(numbers))
// Removing an element (removing the element at index 2)
numbers = append(numbers[:2], numbers[3:]...) // removes the element at index 2
fmt.Println("After Removing Element at Index 2:", numbers)
// Iterating over a slice
fmt.Println("Iterating over Slice:")
for index, value := range numbers {
fmt.Printf("Index: %d, Value: %d\n", index, value)
}
}
In Go, slices are references to arrays, meaning they point to the same underlying data rather than containing a copy of it. When you pass a slice to a function, both the original slice and the function parameter reference the same array.
Consequently, modifications to the slice inside the function (like changing values or appending elements) will affect the original slice, as they share the same underlying array.
---------------------------------------------------------------------------------------------------------------
Maps
Maps in Go are built-in data structures that allow you to store and retrieve data in key-value pairs. Maps provide an efficient way to look up values based on unique keys, making them an essential part of data management in Go.
Maps are dynamically sized, meaning you can add or remove entries without needing to specify a fixed size beforehand. Maps in Go are type-safe, meaning you define the types of keys and values when you create a map. This ensures that only compatible types can be used as keys and values.
package main
import "fmt"
func main() {
// SYNTAX
// var myMap = map[keyType]valueType{ }
// Map with string keys and int values
intMap := map[string]int{
"Alice": 85,
"Bob": 90,
}
// Map with int keys and string values
stringMap := map[int]string{
1: "One",
2: "Two",
3: "Three",
}
// Map with string keys and float64 values
floatMap := map[string]float64{
"pi": 3.14,
"e": 2.71,
"gold": 1.618,
}
// Map with string keys and boolean values
boolMap := map[string]bool{
"IsAdmin": true,
"IsActive": false,
}
// Print the maps
fmt.Println("Integer Map:", intMap)
fmt.Println("String Map:", stringMap)
fmt.Println("Float Map:", floatMap)
fmt.Println("Boolean Map:", boolMap)
// Accessing values
fmt.Println("Alice's score:", intMap["Alice"])
fmt.Println("Number 2 in words:", stringMap[2])
fmt.Println("Value of pi:", floatMap["pi"])
fmt.Println("Is Active:", boolMap["IsActive"])
}
If you try to access a key that doesn’t exist in the map, it returns the zero value for the value type (e.g., 0 for int, "" for string, etc.).
package main
import "fmt"
func main() {
// Creating a map using a map literal
myMap := map[string]int{
"Alice": 1,
"Bob": 2,
}
// Adding/Updating key-value pairs
myMap["Charlie"] = 3
myMap["Alice"] = 10 // Updating Alice's value
// Accessing values
fmt.Println("Alice's value:", myMap["Alice"]) // Output: Alice's value: 10
// Checking if a key exists
value, exists := myMap["Bob"]
if exists {
fmt.Println("Bob's value:", value) // Output: Bob's value: 2
} else {
fmt.Println("Bob not found")
}
// Deleting a key-value pair
delete(myMap, "Bob") // Removes Bob from the map
// Iterating over the map
fmt.Println("Current map contents:")
for key, value := range myMap {
fmt.Println(key, ":", value)
}
// Getting the length of the map
length := len(myMap)
fmt.Println("Number of key-value pairs in the map:", length)
// Output: 2 (Alice and Charlie)
// Copying the map (manual copy)
newMap := map[string]int{}
for k, v := range myMap {
newMap[k] = v
}
// Showing the copied map
fmt.Println("Copied map contents:")
for key, value := range newMap {
fmt.Println(key, ":", value)
}
}
Maps are not safe for concurrent use. If multiple goroutines access a map concurrently without synchronization, it can lead to race conditions. Use synchronization mechanisms like mutexes when working with maps in concurrent programs.
---------------------------------------------------------------------------------------------------------------
Structs
In Go, a struct is a composite data type that allows you to group different types of variables (called fields) into a single unit. Structs are similar to classes in OOP but without methods like constructors or inheritance. They are mainly used to organize and structure related data efficiently, particularly when working with complex data.
Fields: Structs can contain any number of fields, each with a specific type. You can mix different types, like string, int, bool, or even other structs.
Value Types: Structs are value types, meaning that when you assign a struct to another variable, a copy is created. If you want to modify the original struct, you need to use pointers.
Zero Values: When a struct is initialized without values, each field is set to its zero value (e.g., 0 for integers, "" for strings, nil for pointers).
NOTE : We use the "type" keyword followed by the name of the struct and the "struct" keyword. Inside the curly braces {}, you define the fields that make up the struct.
type StructName struct {
field1 fieldType
field2 fieldType
// Add more fields as needed
}
Example] Below we create a struct and create instances from the struct.
package main
import "fmt"
// Define a struct
type Person struct {
name string
age int
email string
}
func main() {
// Creating an instance of the struct (struct value)
person1 := Person{
name: "Alice",
age: 25,
email: "alice@example.com",
}
// Accessing fields
fmt.Println("Name:", person1.name)
fmt.Println("Age:", person1.age)
fmt.Println("Email:", person1.email)
// Creating another instance with different values
person2 := Person{
name: "Bob",
age: 30,
email: "bob@example.com",
}
fmt.Println("\nAnother person:")
fmt.Println("Name:", person2.name)
fmt.Println("Age:", person2.age)
fmt.Println("Email:", person2.email)
}
Example] Below we initialize a struct in different ways as followed.
package main
import "fmt"
// Define a struct type
type Person struct {
Name string
Age int
City string
}
func main() {
// 1. Initialize using field names (recommended, more readable)
person1 := Person{
Name: "Alice",
Age: 25,
City: "New York",
}
// 2. Initialize without field names
// (fields must be in the same order as defined in the struct)
person2 := Person{"Bob", 30, "Los Angeles"}
// 3. Initialize an empty struct (all fields will have zero values)
var person3 Person
// 4. Initialize a pointer to a struct using new
// (returns a pointer to an empty struct)
person4 := new(Person) // All fields are zero values
// 5. Initialize a struct with a pointer using field names
person5 := &Person{
Name: "Charlie",
Age: 22,
}
fmt.Println("Person 1:", person1)
fmt.Println("Person 2:", person2)
fmt.Println("Person 3 (default values):", person3)
fmt.Println("Person 4 (using new):", person4)
fmt.Println("Person 5 (pointer to struct):", person5)
}
In Go, when you assign a struct to a new variable or pass it to a function, a copy of the struct is made. This means any changes made to the copy will not affect the original struct. However, if you pass a pointer to the struct instead, modifications will directly impact the original instance. This is particularly useful when working with large structs, as it avoids the overhead of copying all the data.
package main
import "fmt"
// Address struct for nested struct example
type Address struct {
City string
State string
}
// Person struct with nested Address struct
type Person struct {
Name string
Age int
Address Address
}
// Function to update person's age (uses pointer to modify original struct)
func updateAge(p *Person, newAge int) {
p.Age = newAge
}
// Function to update the city in the Address (also modifies the original)
func updateCity(addr *Address, newCity string) {
addr.City = newCity
}
func main() {
// Initialize a Person with nested Address struct
person1 := Person{
Name: "Alice",
Age: 30,
Address: Address{City: "New York", State: "NY"},
}
// Make a copy of person1 (person2 is a separate instance)
person2 := person1
// Modifying the copy person2, won't affect person1
person2.Name = "Bob"
person2.Age = 40
person2.Address.City = "Los Angeles" // Changing nested struct in person2
fmt.Println("person1 after modifying person2:", person1)
fmt.Println("person2 (copy):", person2)
// Update the age of person1 by passing a pointer
updateAge(&person1, 35)
// Update the city in person1's Address by passing a pointer
updateCity(&person1.Address, "San Francisco")
fmt.Println("person1 after updating age and city:", person1)
}
package main
import "fmt"
// Address struct for nested struct example
type Address struct {
City string
State string
}
// Person struct with nested Address struct
type Person struct {
Name string
Age int
Address Address
}
func main() {
// Initialize a Person with nested Address struct
person1 := Person{
Name: "Alice",
Age: 30,
Address: Address{City: "New York", State: "NY"},
}
// Make a copy of person1 (person2 is a separate instance)
person2 := person1
// Modifying the copy person2, won't affect person1
person2.Name = "Bob"
person2.Age = 40
person2.Address.City = "Los Angeles" // Changing nested struct in person2
fmt.Println("person1 after modifying person2:", person1)
fmt.Println("person2 (copy):", person2)
// Use a pointer to modify person1's Age directly
personPtr := &person1
personPtr.Age = 35
// Modify the City in person1's Address using a pointer
personPtr.Address.City = "San Francisco"
fmt.Println("person1 after modifying via pointer:", person1)
}
Languages where everything is passed by reference can lead to hidden mutability, where changes to one variable inadvertently affect other parts of the program. Go avoids this confusion by defaulting to copies, ensuring that data is immutable unless explicitly modified via a pointer.
In Go, you can embed one struct within another struct to achieve composition. This allows you to model relationships between structs and simulate inheritance-like behavior, though Go does not support traditional inheritance.
package main
import "fmt"
// First struct: Address
type Address struct {
City string
Country string
}
// Second struct: Job
type Job struct {
Title string
Company string
}
// Outer struct embedding both Address and Job
type Person struct {
Name string
Age int
Address // Embedded Address struct
Job // Embedded Job struct
}
func main() {
// Creating an instance of Person with embedded structs
p1 := Person{
Name: "Alice",
Age: 30,
Address: Address{City: "New York", Country: "USA"},
Job: Job{Title: "Software Engineer", Company: "Tech Corp"},
}
// Creating another instance of Person
p2 := Person{
Name: "Bob",
Age: 25,
Address: Address{City: "London", Country: "UK"},
Job: Job{Title: "Data Scientist", Company: "Data Inc"},
}
// Accessing fields and printing details for the first person
fmt.Println("Person 1:")
fmt.Println("Name:", p1.Name)
fmt.Println("Age:", p1.Age)
fmt.Println("City:", p1.City) // Accessing City from Address
fmt.Println("Country:", p1.Country) // Accessing Country from Address
fmt.Println("Job Title:", p1.Title) // Accessing Title from Job
fmt.Println("Company:", p1.Company) // Accessing Company from Job
// Accessing fields and printing details for the second person
fmt.Println("\nPerson 2:")
fmt.Println("Name:", p2.Name)
fmt.Println("Age:", p2.Age)
fmt.Println("City:", p2.City)
fmt.Println("Country:", p2.Country)
fmt.Println("Job Title:", p2.Title)
fmt.Println("Company:", p2.Company)
}
Adding Methods to Structs
In Go, you can define methods on structs by associating functions with them. They enable you to associate behavior (functions) with data (fields in structs) and help organize your code in a more meaningful and structured way.
NOTE : In Go, there are no this or self keywords like in some other programming languages (such as Python or Java).
To define a method for a struct, you specify the method name and the receiver type. The receiver acts as a placeholder for the struct instance on which the method is called. When you define a method for a struct, the receiver is defined in parentheses before the method name. This receiver acts like a reference to the struct instance itself.
/*
func function_name() int {
}
type type_name struct {
}
func (m type_name) function_name() int {
}
*/
There are 2 primary types of receivers:
Value Receiver: When you define a method with a value receiver, a copy of the struct instance is made. Any modifications made within the method do not affect the original instance.
Pointer Receiver: When you define a method with a pointer receiver, the method operates on a reference to the original struct instance. This means any modifications made within the method will affect the original instance.
Example] Below we add methods to a struct using the "value receiver" type.
package main
import "fmt"
// Define the Rectangle struct
type Rectangle struct {
Length float64
Width float64
}
// Method to calculate the area of the rectangle
func (r Rectangle) Area() float64 {
return r.Length * r.Width
}
// Method to calculate the perimeter of the rectangle
func (r Rectangle) Perimeter() float64 {
return 2 * (r.Length + r.Width)
}
func main() {
// Create an instance of Rectangle
rect := Rectangle{Length: 5, Width: 3}
// Call the methods
fmt.Println("Area of Rectangle:", rect.Area()) // Area of Rectangle: 15
fmt.Println("Perimeter of Rectangle:", rect.Perimeter()) //Perimeter of Rectangle:16
}
Example] Below we add methods to a struct using the "pointer receiver" type.
package main
import "fmt"
// Define the Circle struct
type Circle struct {
Radius float64
}
// Method to calculate the area of the circle using a pointer receiver
func (c *Circle) Area() float64 {
return 3.14 * c.Radius * c.Radius // πr²
}
// Method to calculate the circumference of the circle using a pointer receiver
func (c *Circle) Circumference() float64 {
return 2 * 3.14 * c.Radius // 2πr
}
// Method to change the radius of the circle using a pointer receiver
func (c *Circle) Resize(newRadius float64) {
c.Radius = newRadius
}
func main() {
// Create an instance of Circle
circle := Circle{Radius: 5}
// Call the methods
fmt.Println("Area of Circle:", circle.Area())
// Output: Area of Circle: 78.5
fmt.Println("Circumference of Circle:", circle.Circumference())
// Output: Circumference of Circle: 31.400000000000002
// Resize the circle
circle.Resize(10)
// Call the methods again after resizing
fmt.Println("New Area of Circle:", circle.Area())
// Output: New Area of Circle: 314
fmt.Println("New Circumference of Circle:", circle.Circumference())
// Output: New Circumference of Circle: 62.8
}
NOTE : Use a pointer receiver only when the struct is large, and copying it would be costly or when you want to modify the original struct. Pointer receivers can also be more memory efficient when dealing with large structs since only a pointer is passed instead of a copy.
---------------------------------------------------------------------------------------------------------------
Functions
In Go, functions are first-class citizens, meaning they can be assigned to variables, passed as arguments, and returned from other functions. Functions are the building blocks in Go for organizing code into reusable pieces.
A function in Go is defined using the "func" keyword, followed by a function name, parameter list, return type(s), and a function body.
package main
import "fmt"
// func functionName(parameterName parameterType, ...) returnType {
// return value
// }
func add(x int, y int) int {
return x + y
}
func greet(name string) {
fmt.Println("Hello,", name)
}
func main() {
// Calling the add function
sum := add(5, 7)
fmt.Println("Sum:", sum)
// Calling the greet function
greet("Alice")
}
If a function returns a value then it's compulsory to mention return type, but if you don’t mention the return type, it will result in a compilation error.
If a function doesn't return any value, you simply omit the return type. This type of function is called a "void" function, which performs some operations without returning a result.
package main
import "fmt"
// This function should return an int, but the return type is missing.
// This will cause a compilation error.
func add(a int, b int) { // Missing return type
return a + b
}
// A void function: performs an operation but does not return any value.
func printHello() {
fmt.Println("Hello, Go!")
}
func main() {
// Uncomment the line below to test the invalid function
// sum := add(5, 7) // Compilation error due to missing return type
// Correct usage of a void function
printHello()
}
In Go, functions can return multiple values, which is a convenient feature for situations where you want to return more than one result.
package main
import "fmt"
// Function that returns multiple values: sum and product of two integers
func calculate(a int, b int) (int, int) {
sum := a + b
product := a * b
return sum, product
}
func main() {
// Calling the calculate function
sum, product := calculate(3, 5)
// Output the results
fmt.Printf("Sum: %d, Product: %d\n", sum, product)
}
In Go, a variadic function is a function that can accept a variable number of arguments of the same type. To declare a variadic function, you use an ellipsis (...) before the parameter type. This tells Go that the function can accept zero or more values of that type.
package main
import (
"fmt"
)
// func functionName(param ...type) {
// }
// Variadic function that sums integers
func sum(numbers ...int) int {
total := 0
for _, num := range numbers {
total += num
}
return total
}
// Function with a regular parameter and a variadic parameter
func greet(prefix string, names ...string) {
for _, name := range names {
fmt.Printf("%s %s\n", prefix, name)
}
}
// Variadic function that accepts different types using an interface
func printValues(values ...interface{}) {
for _, value := range values {
fmt.Println(value)
}
}
func main() {
// Using the sum function
fmt.Println("Sum of 1, 2, 3:", sum(1, 2, 3)) // Output: 6
fmt.Println("Sum of 10, 20, 30:", sum(10, 20, 30)) // Output: 60
// Using the greet function
greet("Hello", "Alice", "Bob", "Charlie")
// Using the printValues function
printValues("Go", 42, 3.14, true, []int{1, 2, 3})
}
NOTE : A variadic parameter must always be the last parameter in the function. You can have other parameters before it, but no other parameters after it.
In Go, anonymous functions (also known as lambda functions or closures) are functions that are defined without a name. They are often used as function literals, which can be useful in various scenarios, such as callbacks, closures, or when you need a quick function without needing to define it separately.
package main
import "fmt"
func main() {
add := func(a int, b int) int {
return a + b
}
greet := func(name string) {
fmt.Printf("Hello, %s!\n", name)
}
sum := add(5, 3) // Calls the add function
greet("Alice") // Calls the greet function
fmt.Println("Sum:", sum) // Output: Sum: 8
}
Named Returns
Named return values in Go are a feature that allows you to specify the names and types of return values in the function signature. This can enhance code readability and provide a clear indication of what values the function will return.
If you use named return values, you can return from the function without explicitly specifying the return variables. You can simply use a bare return statement, which returns the current values of the named return variables.
package main
import "fmt"
// Function with named return values
func divide(x, y float64) (quotient float64, remainder float64) {
// Perform division
quotient = x / y // Assigning value to named return variable
remainder = x - (quotient * y) // Assigning value to named return variable
// returns named return values
return
}
func main() {
q, r := divide(10, 3)
fmt.Printf("Quotient: %.2f, Remainder: %.2f\n", q, r)
// Output: Quotient: 3.33, Remainder: 1.00
}
NOTE : Go automatically returns the current values of those named return variables when you hit a return statement without any arguments.
---------------------------------------------------------------------------------------------------------------
Conditionals
In Go, conditionals allow you to execute different blocks of code based on specific conditions using if, else if, and else statements. You can also declare variables within the if condition, which limits their scope to that block.
package main
import "fmt"
func main() {
num := 7
// Using if-else
if num > 10 {
fmt.Println("num is greater than 10")
} else if num > 5 {
fmt.Println("num is greater than 5 but less than or equal to 10")
} else {
fmt.Println("num is 5 or less")
}
// Using switch statement
day := "Wednesday"
switch day {
case "Monday":
fmt.Println("Start of the week")
case "Friday":
fmt.Println("End of the week")
case "Saturday", "Sunday":
fmt.Println("It's the weekend")
default:
fmt.Println("Middle of the week")
}
}
Short Variable Declaration with If
In Go, the short variable declaration can be used within the if statement to both declare and initialize a variable in a concise manner. This is done using the := syntax, which allows you to create a new variable that is scoped to if statement itself.
It allows you to declare and initialize variables in a single, concise line, reducing the amount of boilerplate code. This can make your code cleaner and easier to read.
package main
import "fmt"
// Function to calculate the average of a slice of integers
func calculateAverage(nums []int) float64 {
sum := 0
for _, num := range nums {
sum += num
}
return float64(sum) / float64(len(nums))
}
func main() {
if variable := expression; condition {
// Code to execute if condition is true
} else {
// Code to execute if condition is false
}
// Using short variable declaration in if to check if number is even/odd
if value := 42; value%2 == 0 {
// This block executes because 42 is even
fmt.Println(value, "is even")
} else {
fmt.Println(value, "is odd")
}
// Using short variable declaration to calculate average of slice of numbers
numbers := []int{10, 20, 30, 40, 50}
if avg := calculateAverage(numbers); avg > 25 {
fmt.Printf("The average is %.2f, which is greater than 25.\n", avg)
} else {
fmt.Printf("The average is %.2f, which is not greater than 25.\n", avg)
}
}
We can use a short variable declaration within an if statement to execute a function and check its return values. This approach is idiomatic in Go and encourages handling errors immediately after function calls, improving code readability and maintainability.
package main
import (
"errors"
"fmt"
)
// A function that returns an integer and an error
func getValue() (int, error) {
// Simulating a condition that may cause an error
return 0, errors.New("an error occurred while getting the value")
}
// A function that returns a successful integer value
func getValueWithSuccess() (int, error) {
return 42, nil // No error, returning a successful value
}
func main() {
// Using short variable declaration to call the function and check for an error
if value, err := getValue(); err != nil {
fmt.Println("Error:", err) // Handle the error if one occurred
} else {
fmt.Println("Value:", value) // Use the value if there was no error
}
// You can use another example that succeeds
if value, err := getValueWithSuccess(); err != nil {
fmt.Println("Error:", err) // Handle the error if one occurred
} else {
fmt.Println("Value:", value) // Use the value if there was no error
}
// Error: an error occurred while getting the value
// Value: 42
}
In Go, loops are used to repeatedly execute a block of code until a specified condition is met. The primary loop construct in Go is the for loop, which can take various forms to accommodate different looping needs.
Go only has the for loop as its primary looping construct, and it DOES NOT HAVE while or do-while loops like some other programming languages. However, the for loop in Go is quite versatile and can be used to replicate the functionality of both while and do-while loops.
package main
import "fmt"
func main() {
// 1. Basic For Loop
fmt.Println("Basic For Loop:")
for i := 0; i < 5; i++ {
fmt.Println(i) // Outputs: 0 1 2 3 4
}
// 2. For Loop with a Condition (Like While Loop)
fmt.Println("\nFor Loop with a Condition:")
j := 0
for j < 5 { // This acts like a while loop
fmt.Println(j) // Outputs: 0 1 2 3 4
j++
}
// 3. Infinite For Loop
fmt.Println("\nInfinite For Loop:")
k := 0
for { // Infinite loop
if k >= 5 {
break // Exit condition
}
fmt.Println(k) // Outputs: 0 1 2 3 4
k++
}
// 4. For Loop with Range
fmt.Println("\nFor Loop with Range:")
numbers := []int{1, 2, 3, 4, 5}
for index, value := range numbers {
fmt.Printf("Index: %d, Value: %d\n", index, value)
}
// 5. For Loop without the Index Variable
fmt.Println("\nFor Loop without the Index Variable:")
for _, value := range numbers { // Ignore the index
fmt.Println(value) // Outputs: 1 2 3 4 5
}
}
In Go, the "for range" loop is a special form of the for loop that allows you to iterate over elements in various data structures. It simplifies the process of accessing each element and its index or key without needing to manage the loop counter.
package main
import "fmt"
func main() {
// Example with a slice
numbers := []int{10, 20, 30, 40, 50}
fmt.Println("Iterating over a slice:")
for index, value := range numbers {
fmt.Printf("Index: %d, Value: %d\n", index, value)
}
// Example with a map
ages := map[string]int{"Alice": 25, "Bob": 30, "Charlie": 35}
fmt.Println("\nIterating over a map:")
for name, age := range ages {
fmt.Printf("%s is %d years old\n", name, age)
}
// Example with a string
str := "Hello"
fmt.Println("\nIterating over a string:")
for index, char := range str {
fmt.Printf("Index: %d, Character: %c\n", index, char)
}
}
---------------------------------------------------------------------------------------------------------------
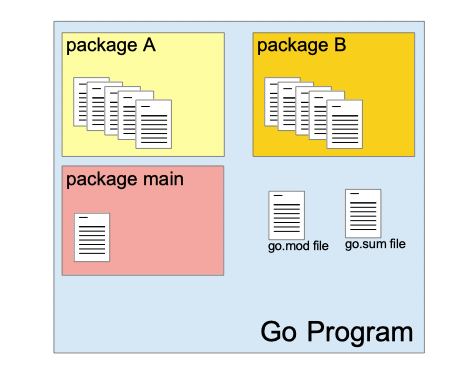
Packages
In Go, packages are a fundamental way to organize and manage code. A package in Go is a collection of Go source files that are compiled together. Each package has a unique name and can contain functions, types (including structs and interfaces), variables, and constants.
Every Golang source file starts with a "package" declaration that specifies the name of the package. To use the functions or types defined in another package, you need to import it. Use the "import" statement at the beginning of your Go file to import the package.
Go comes with a rich standard library that provides a wide range of packages for various things, below are some commonly used packages in Go :
fmt: Provides formatted I/O functions for outputting text to the console.
net/http: Implements HTTP client and server functionalities for building web applications and APIs.
os: Offers platform-independent access to operating system functionalities, like file operations and environment variables.
strconv: Contains functions for converting strings to basic data types and vice versa.
NOTE : The main package is a special package that serves as the entry point for executable Go programs. When you compile a Go program, the Go compiler looks for the main package to generate the executable. If there is no main package in the program, it cannot be built as an executable.
Custom Packages
In Go, custom packages allow you to organize your code into reusable modules, making it easier to manage and maintain large projects. By creating custom packages, you can group related functionality together, encapsulate logic, and improve the modularity of your code.
How to Create a Custom Package
Directory Structure:
Each package is typically represented by a folder. Inside the folder, the Go files that make up the package contain a package declaration at the top.
Naming:
The name of the folder usually matches the name of the package declared in the Go file, and the package name is declared with the package keyword.
Exporting and Importing:
Functions, variables, or types that start with an uppercase letter are exported, meaning they are accessible from other packages. Lowercase items are unexported and are private to the package.
Using Custom Packages:
You can import your custom package in other Go files using the import statement, followed by the package path. Then you can access exported functions, types, or variables from the package.
Example] Below we create a custom package and import it inside main package.
// myapp/utils/utils.go
package utils
// Add function (exported function, starts with uppercase letter)
func Add(a int, b int) int {
return a + b
}
// subtract function (unexported function, starts with lowercase letter)
func subtract(a int, b int) int {
return a - b
}
//--------------------------------------------------------------------
// myapp/main.go
package main
import (
"fmt"
"myapp/utils" // Import custom package
)
func main() {
result := utils.Add(3, 5) // Using the exported function from utils package
fmt.Println("Sum:", result)
}
NOTE : Defining a module is required for custom packages in Go, especially when working on larger projects or using Go modules for dependency management.
In Go, exported and unexported entities determine visibility across packages:
Exported: Entities (functions, variables, types, etc.) that start with an uppercase letter are accessible from other packages. These are meant to be shared and used externally.
Unexported: Entities that start with a lowercase letter are only accessible within the same package, making them private to that package and hidden from external use.
// utils/utils.go
package utils
// Exported function (uppercase)
func ExportedFunction() string {
return "I am exported and can be accessed from other packages."
}
// Unexported function (lowercase)
func unexportedFunction() string {
return "I am unexported and cannot be accessed from other packages."
}
//-----------------------------------------------------------------------------------
package main
import (
"fmt"
"gotest/utils" // Importing the utils package
)
func main() {
// Calling the exported function
fmt.Println(utils.ExportedFunction())
// This line will cause a compile-time error
// fmt.Println(utils.unexportedFunction()) // Cannot access unexported function
}
When importing a package, the import path is based on the module name defined in go.mod, followed by the relative path to the package folder. This is crucial for clarity when working in larger projects or when sharing code.
---------------------------------------------------------------------------------------------------------------
Go Modules
Go modules are the standard way to manage dependencies in Go projects, introduced in Go 1.11. A module is defined as a collection of related Go packages that are versioned together. A Go project will commonly consist of one module, which can contain multiple packages organized in a directory structure.
This is different from the traditional GOPATH-based approach, where dependencies were handled globally, making version conflicts more common. With Go modules, each module is self-contained, reducing the chances of version conflicts and improving project organization.
NOTE : The "go mod init <module-name>" command is used to create a new Go module in a directory. When you run this command, it initializes the directory as a module and generates a "go.mod" file.
// Initialize a new module
// Creates a new 'go.mod' file in the current directory
go mod init <module_name>
// Add a dependency to the module
// Updates 'go.mod' with the specified package
go get <package_path>
// Remove unused dependencies
// Cleans up go.mod and go.sum files
go mod tidy
// Verify that dependencies match the expected versions
// Checks hashes in go.sum against the actual dependencies
go mod verify
// Upgrade a dependency to the latest version
// Updates go.mod to the latest compatible version
go get -u <package_path>
// Remove a specific dependency
// Deletes the specified package from go.mod
go mod edit -dropreplace <module>
The "go.mod" file is a fundamental part of Go modules. It contains metadata about the module, including its dependencies, module name, and version information. The go.mod file serves as the source of truth for your module’s dependencies, making it easy to manage and update them.
NOTE : When you add package to your Go project using commands like "go get", the package is automatically added to the "go.mod" file. Thus, go.mod acts as a manifest for your Go module, automatically updating to reflect any packages you add or remove.
Below are the main platforms and resources for discovering Go packages:
pkg.go.dev: The official Go package directory for searching packages and viewing documentation.
GitHub: Many Go packages are hosted here; you can search for repositories using the Go language filter.
Go Modules: Use go get to fetch packages from their source, often hosted on public repositories like GitHub.
Awesome Go: A curated list of Go packages and resources organized by categories.
Go.dev Blog: Highlights new and popular packages along with useful tools in the Go ecosystem.
NOTE : Unlike javascript which has node_modules, in Golang you don't have a local directory for each project containing its dependencies. Instead, Go uses the shared module cache, which allows multiple projects to share the same versions of dependencies, reducing duplication and saving space.
Dependencies are downloaded and stored in a central cache (usually in ~/go/pkg/mod or %USERPROFILE%\go\pkg\mod), which can be accessed by different Go projects on the same machine.
When you import a package in a Go project, if it's already cached, Go uses the cached version instead of downloading it again, making dependency management faster and more efficient. The "go.mod" file specifies which versions of packages your project depends on. Go ensures that the correct versions are used by referencing the cached packages.
NOTE : The "go.sum" file contains checksums (cryptographic hashes) for each module dependency specified in the go.mod file. These checksums ensure that the code you download is exactly what was intended by the module authors, protecting against tampering and corruption.
When you or someone else builds your project, Go checks the "go.sum" file to verify that the dependencies have not changed since the last time they were downloaded. This adds a layer of security and guarantees that you are using the same versions of dependencies as intended.
---------------------------------------------------------------------------------------------------------------
Defer Function
In Go, a defer statement is used to ensure that a function call is performed later in the program's execution, typically for purposes of cleanup. The deferred function is executed just before the surrounding function returns, regardless of whether the surrounding function returns normally or via a panic.
In Go, the defer statement is used to schedule a function call to be executed just before the surrounding function returns. This allows for a clean and structured way to manage resource cleanup, such as closing files or releasing locks.
Key Characteristics of defer:
Execution Timing: The deferred function call is executed after the surrounding function returns, but before any return values are sent back to the caller.
Stacked Execution: If multiple defer statements are encountered, they are executed in LIFO (Last In, First Out) order. This means the last deferred function added will be the first one executed when the surrounding function returns.
Error Handling: defer is commonly used in combination with recover to handle panics gracefully.
package main
import "fmt"
func lifoExample() {
defer fmt.Println("First deferred")
defer fmt.Println("Second deferred")
defer fmt.Println("Third deferred")
fmt.Println("Function is executing")
}
func lifoWithReturn() int {
defer fmt.Println("First deferred")
defer fmt.Println("Second deferred")
defer fmt.Println("Third deferred")
fmt.Println("Function is executing")
return 10
}
func main() {
lifoExample()
// Function is executing
// Third deferred
// Second deferred
// First deferred
result := lifoWithReturn()
fmt.Println("Returned value:", result)
// Function is executing
// Third deferred
// Second deferred
// First deferred
// Returned value: 10
}
Go automatically checks for any deferred functions before returning or finishing a function. When a function is about to return (either due to an explicit return statement or simply reaching the end of the function), Go ensures that all the deferred functions are executed in LIFO order.
---------------------------------------------------------------------------------------------------------------
Error Handling
In Go, you have to manually return and handle errors. Go DOES NOT HAVE EXCEPTIONS like some other languages (e.g., try/catch blocks in Java or Python). Instead, Go follows a pattern of returning errors as second value from a function, and it's up to you to check and handle these errors manually.
Go forces you to handle errors explicitly, which improves code readability and reliability. For handling critical errors or unexpected situations, Go uses the panic and recover mechanism. This approach focuses on explicit error handling and makes it clear to the programmer when and how to handle errors instead of relying on exceptions.
Returning Errors: In Go, functions return an error as the last return value, which can be nil (meaning no error) or an actual error value if something went wrong.
Checking Errors: The caller checks the returned error and takes appropriate action based on whether it’s nil or not.
The error Type: In Go, errors are values of type error, which is a built-in interface with a single method Error() string. You can create custom error types or use the standard errors.
package main
import (
"errors"
"fmt"
)
// Division function that returns an error for division by zero
func divide(a, b float64) (float64, error) {
if b == 0 {
return 0, errors.New("cannot divide by zero")
}
return a / b, nil
}
func main() {
result, err := divide(10, 0) // Attempt to divide 10 by 0
if err != nil {
fmt.Println("Error:", err)
} else {
fmt.Println("Result:", result)
}
}
NOTE : In Go, you cannot handle an error outside the if condition directly because Go doesn't have a try-catch mechanism like some other languages.
package main
import (
"errors"
"fmt"
)
// Function that returns a result and an error
func myFunction(value int) (string, error) {
if value < 0 {
return "", errors.New("negative value not allowed")
}
return "Success", nil // Return the result and nil for no error
}
func main() {
// Calling myFunction
result, err := myFunction(-1) // Passing a negative value
// Handling the error separately
if err != nil {
fmt.Println("Error occurred:", err)
return // Exit early if there's an error
}
// If no error, continue with the result
fmt.Println("Function executed successfully:", result)
}
Panic & Recover
In Go, error handling is different from many other programming languages. Instead of using exceptions, Go utilizes two primary mechanisms: panic and recover. These features help manage runtime errors and exceptional conditions in a controlled manner.
When you call panic(), you are signaling that something has gone very wrong, and the program cannot continue as normal. For instance, accessing out-of-bounds array indices or attempting to read from a nil pointer. On the other hand, recover() provides a way to intercept that panic at a specific point, allowing for controlled termination and resource management.
Below are sequence of steps that occur when a panic() is called :
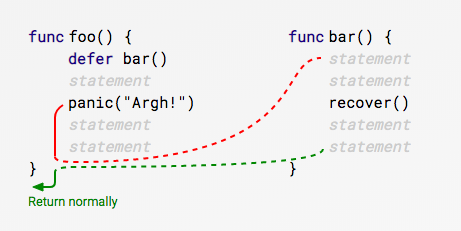
Panic Triggered: When panic() is called, the normal flow of the program is interrupted, and it starts unwinding the call stack. Any deferred functions in the current function are executed in LIFO (Last In, First Out) order.
Recovering: If recover() is called in one of the deferred functions, it captures the panic value and prevents the panic from propagating further. This allows the program to regain control.
Continuing Execution: Once recover() has been called, the program resumes execution immediately after the point where the panic occurred. Any code following the call that triggered the panic can then be executed.
NOTE : When you call panic() in Go and pass a value to it, that same value can be retrieved by the recover() function when it is called within a deferred function. This allows us to decide if to terminate the function execution or continue execution after recover() finishes.
package main
import (
"fmt"
)
func divide(a, b int) int {
if b == 0 {
panic("cannot divide by zero") // Trigger a panic if b is zero
}
return a / b
}
func main() {
// Use defer to recover from panic
defer func() {
if r := recover(); r != nil { // Recover from the panic
fmt.Println("Recovered from:", r)
}
}()
fmt.Println("Result of division:", divide(10, 2)) // Normal case
// Attempt to divide by zero
divide(10, 0) // This will cause a panic
// This line will be executed after recovering
fmt.Println("This line gets printed after recovery.")
// Result of division: 5
// Recovered from: cannot divide by zero
// This line gets printed after recovery.
}
NOTE : When an error occurs inside a function Golang stops further execution. You typically call panic() explicitly within if conditions when you want to handle known error cases. Use recover() in deferred functions to regain control after a panic occurs, allowing your program to continue running instead of terminating abruptly.
package main
import (
"fmt"
)
// A function that performs division and may panic
func divide(a, b int) int {
if b == 0 {
panic("cannot divide by zero") // Trigger a panic if b is zero
}
return a / b
}
// A function to demonstrate panic and recover
func safeDivide(a, b int) {
defer func() {
if r := recover(); r != nil { // Recover from panic
fmt.Println("Recovered from:", r)
}
}() // This defer will execute in case of panic
// Attempt to divide, which may panic
result := divide(a, b)
fmt.Println("Result of division:", result) // Print the result if no panic occurs
}
func main() {
// Normal division
safeDivide(10, 2) // Should work fine
// Division that will panic
safeDivide(10, 0) // This will cause a panic
// Code after the panic and recovery
fmt.Println("Execution continues after recovery.")
// Result of division: 5
// Recovered from: cannot divide by zero
// Execution continues after recovery.
}
NOTE : When a function panics, it will unwind the stack, meaning that all deferred functions are executed in LIFO (Last In, First Out) order before the program crashes. The recover() is oftne called inside a deferred function, this ensure that it can successfully catch a panic when it occurs, allowing you to handle the error and prevent the entire program from crashing.
The recover() function only works if it is called within the same goroutine where the panic occurred. If a panic happens in one goroutine, another goroutine cannot recover from it.
It's generally considered better practice to handle errors gracefully rather than panicking unless you are in a situation where you can't continue execution. Below we demonstrate using panic along with the regular error pattern.
package main
import (
"errors"
"fmt"
)
// A function that returns an error instead of panicking
func safeDivide(a, b int) (int, error) {
if b == 0 {
return 0, errors.New("cannot divide by zero") // Return error instead of panicking
}
return a / b, nil
}
// A function that demonstrates panic and recover
func riskyDivide(a, b int) {
defer func() {
if r := recover(); r != nil { // Recover from panic
fmt.Println("Recovered from:", r)
}
}()
result := divide(a, b)
fmt.Println("Result of division:", result) // Print the result if no panic occurs
}
func divide(a, b int) int {
if b == 0 {
panic("cannot divide by zero") // Trigger a panic if b is zero
}
return a / b
}
func main() {
// Normal division
if result, err := safeDivide(10, 2); err == nil {
fmt.Println("Safe division result:", result)
} else {
fmt.Println("Error:", err)
}
// Attempt to divide by zero gracefully
if result, err := safeDivide(10, 0); err == nil {
fmt.Println("Safe division result:", result)
} else {
fmt.Println("Error:", err)
}
// Using panic and recover
riskyDivide(10, 0) // This will cause a panic
fmt.Println("Execution continues after recovery.") // Should still execute
// Safe division result: 5
// Error: cannot divide by zero
// Recovered from: cannot divide by zero
// Execution continues after recovery.
}
---------------------------------------------------------------------------------------------------------------


Comments
Post a Comment