Golang (GO Language) - Part 2
Memory Address: Every variable in Go is stored in a specific memory location. A pointer holds the address of that memory location, allowing access to the variable's value indirectly.
Pointer Declaration : Pointers are declared using the
*symbol before the type. For example,var p *intdeclares a pointer to an integer.&Operator : The address-of operator (&) is used to obtain the memory address of a variable. For example, ifxis an integer variable,&xreturns the address ofx.*Operator : The dereference operator (*) is used to access the value stored at the memory address that a pointer holds. For example,*pretrieves the value at the address pointed to byp.

While using variables directly is simpler in many cases, pointers provide flexibility and efficiency in situations where memory management and data manipulation are critical. In Go, the choice between using pointers and direct variables often depends on the specific use case :
- Avoiding Copies: When you pass large structs or arrays to functions, using pointers avoids copying the entire data structure. This can save memory and improve performance, especially for large data types. For example, passing a pointer to a struct instead of a full struct reduces the overhead of copying all its fields.
- Modify Original Data: Pointers allow functions to modify the original variable's value directly. If you pass a variable by value, the function receives a copy, and any changes made won't affect the original variable. With pointers, changes made in the function will reflect in the original variable.
NOTE : A pointer can be nil, which means it doesn't point to any valid memory address. Always check if a pointer is nil before dereferencing it to avoid runtime panics.
Slices and maps in Go are reference types. When you pass them to functions, you're passing a pointer to the underlying data. Modifying a slice or map inside a function will affect the original.
JSON Marshalling/UnMarshalling
- Maps: You can marshal maps directly into JSON objects.
- Slices: You can marshal slices (arrays) into JSON arrays.
- Basic Data Types: You can marshal basic data types like strings, numbers and nil.
encoding/json package in Go, which provides powerful tools for working with JSON. Use struct tags to control JSON field names, omitting fields, or ignoring fields.NOTE : The "struct tags" are not compulsory. If you don't use tags, Go will use the struct field names directly as the keys in the JSON output. The names will be case-sensitive, meaning Go will use the exact case of the struct fields in the JSON.
JSON unmarshalling is the process of converting JSON data into Go data structures like structs or maps. The encoding/json package provides functions to handle this, such as json.Unmarshal() for decoding JSON data into Go types.
It converts JSON data into Go data structures. You pass the JSON data (as a byte slice) and a pointer to the data structure where the results should be stored.
Interfaces
implements, Go uses implicit implementation. A type in Go is said to implement an interface if it has all the methods specified by the interface. There is no need to explicitly declare the relationship.In Go, you don't need an implements or extends keyword. The relationship between a struct and an interface is established implicitly based on method implementation.
In Go, Interfaces are commonly used with Structs. You can assign a struct to an interface if the struct implements all the methods of the interface. In Go, if a struct does not implement all the methods required by an interface, it will not satisfy that interface. This means that you cannot assign an instance of that struct to a variable of the interface type, and the Go compiler will raise an error if you try to do so.
- Method Implementation: A struct must implement all methods declared in an interface to be considered a type that satisfies that interface.
- Compile-Time Check: Go performs this check at compile time, ensuring that your code is safe and consistent regarding type usage.
- Error Messages: If a struct is missing a method, the compiler will provide an error message indicating that the struct does not satisfy the interface.
A single struct can implement multiple interfaces, allowing it to be used in different contexts. This enables more reusable and modular code.
Empty Interfaces
In Go, an empty interface is a special type of interface that can hold values of any type. It is defined as an interface with no methods, which allows it to be used as a universal container for any value. The empty interface is represented as interface{}.
Since the empty interface does not specify any methods, every type in Go satisfies the empty interface. This means you can assign any value to a variable of an empty interface type.
- Generic Data Structures: The empty interface is commonly used in data structures like maps, slices, and functions that need to handle multiple types.
- Dynamic Types: It allows you to create functions or methods that can accept values of any type, enabling more flexibility.
- Interfacing with Other Packages: When working with packages that require a generic input or output type, you can use empty interfaces to conform to their requirements.
- Type Assertions: When using empty interfaces, you often perform type assertions or type switches to retrieve the concrete value and work with it.
Empty interfaces are often used in data structures that can hold different types of values, such as a generic container or a collection. For example, you might create a slice or a map that can hold values of any type.
Functions that need to accept any type of argument often use empty interfaces. For instance, utility functions like fmt.Println() can accept any type because they take an interface{} parameter.
An empty interface can hold values of any type. It is used when the specific type is not known at compile time. It is similar to the any type in TypeScript. Both allow you to work with values of any type without specifying a concrete type, thus providing flexibility in your code.
interface{}), which can hold values of any type. This is useful for functions and data structures that are designed to handle various types.They allow you to check whether the dynamic type of an interface value matches a specific type and, if it does, to extract that value. The "ok" is a boolean that indicates whether the assertion was successful or not.
make()
The make() function in Go is specifically used for allocating and initializing slices, maps, and channels, which are complex data types that require an underlying structure to function. Unlike basic types (like integers or strings), these types need initialization before use, and that's where make() comes in.
Only for slices, maps, and channels:
make()is specifically designed to initialize slices, maps, and channels. For other types like arrays or structs,new()or literals are used.Allocates and initializes:
make()not only allocates memory but also initializes the object to be ready for use.Returns the initialized object: After calling
make(), the returned object is fully usable, and you can add elements to slices and maps or send data into channels.
Slice Initialization:
- Using Literal:
sliceLiteral := []int{1, 2, 3}creates a slice with predefined values. - Using
make():sliceMake := make([]int, 3)creates a slice of length 3, where all elements are initialized to zero. This shows that even when the slice is initialized, it can be manipulated later.
Map Initialization:
- Using Literal:
mapLiteral := map[string]int{"key1": 100, "key2": 200}creates a map with predefined key-value pairs. - Using
make():mapMake := make(map[string]int)initializes an empty map. You can then add key-value pairs without causing a panic, which would happen if you tried to use anilmap.
Nil Slices and Maps:
- Attempting to add an entry to a
nilmap or access an index of anilslice would lead to a runtime panic, demonstrating that you cannot use these types until they are properly initialized withmake()or a literal.
Goroutines
Goroutines and threads are both mechanisms for achieving concurrency in programming, but they have different characteristics, management systems, and use cases. Threads are the basic unit of CPU utilization managed by the operating system. Threads are heavier than goroutines and require more resources to create and manage. Goroutines are lightweight threads managed by the Go runtime.
Goroutines have a small initial stack size (typically around 2 KB) that can grow and shrink dynamically. This allows you to create thousands of goroutines without significant memory overhead. Threads usually have a larger fixed stack size (often around 1 MB), which limits the number of threads you can create in a typical application.
The Go runtime scheduler manages goroutines, allowing it to schedule many goroutines on a few OS threads. It uses a work-stealing algorithm that can efficiently distribute workloads across CPU cores.
NOTE : Using goroutines for tasks that need to be handled in parallel and involve waiting or sleeping. While one goroutine is waiting (for I/O, a network response, or other blocking operations), others can continue executing. This prevents the entire program from halting and allows for better time and resource utilization.
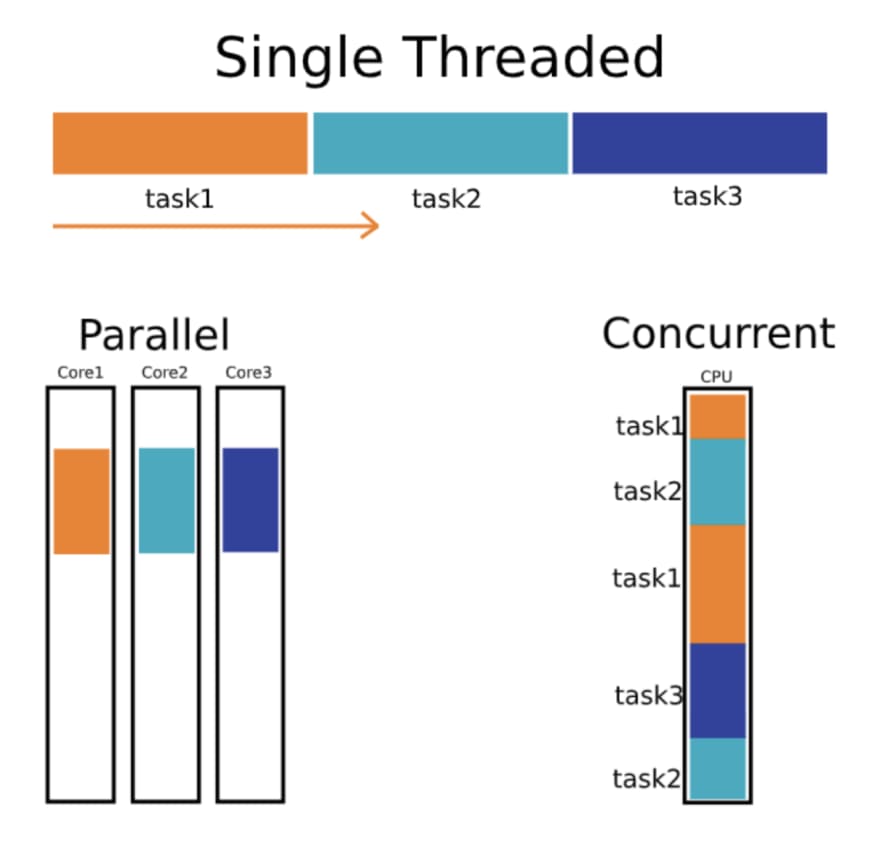
When you run multiple functions in separate goroutines, they can be executed concurrently, but they may not necessarily run at the exact same time. Here’s a breakdown:
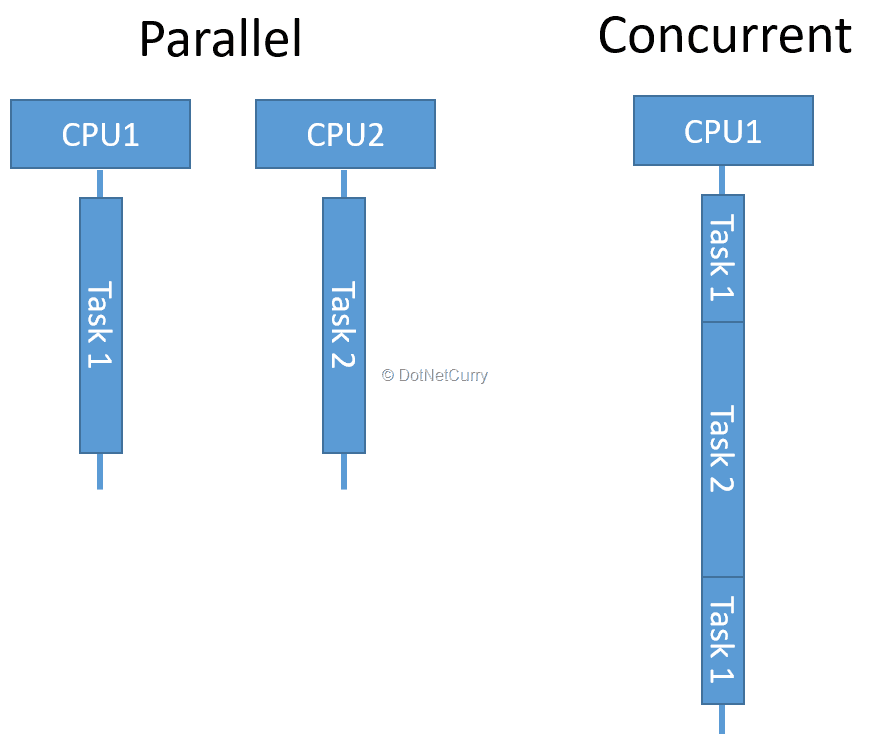
Concurrency: When you start multiple goroutines, they can be interleaved, meaning the Go runtime might switch between them as they run. This allows them to make progress without blocking each other, but they may not actually be executing simultaneously.
Parallelism: If your machine has multiple CPU cores, the Go runtime can schedule goroutines to run in parallel on different cores. This means they can be executed at the exact same time.
In essence, goroutines provide a way to manage multiple tasks that can work together concurrently, but whether they run simultaneously (in parallel) depends on the underlying hardware and how the Go scheduler decides to allocate resources.
Golang handles the scheduling of goroutines automatically using its built-in Go scheduler. By default, the Go runtime decides how to allocate goroutines across available CPU cores, balancing concurrency and parallelism without manual intervention.
For server-side applications, goroutines are ideal for handling multiple client requests concurrently. Each incoming request can be handled in its own goroutine, keeping the server responsive without blocking other requests. As most web servers spend a lot of time waiting for I/O (like database queries or network responses), goroutines allow efficient handling of large numbers of requests concurrently by utilizing time that would otherwise be wasted.
Goroutines achieve concurrency, which means that multiple tasks (like handling requests) can progress independently, even if they aren’t executing simultaneously on different CPU cores.
While parallelism (multiple tasks executing at the same time on different cores) might not always occur, concurrency ensures that each request is handled quickly and efficiently without unnecessary waiting.When you’re running a web server with multiple requests, a traditional thread-based model might result in one thread blocking while waiting for a database query. With goroutines, even while one request is waiting for a database, the Go scheduler will keep running other requests that are ready to be processed, ensuring smooth and efficient handling of high traffic.
To create a goroutine, you simply use the "go" keyword followed by a function call. The function starts executing concurrently as a goroutine.
Example] While one goroutine is waiting (sleeping), Go's scheduler allows other goroutines to run. So when printNumbers() or printLetters() is sleeping, Go switches to the other goroutine and lets it run.
Go achieves this task-switching automatically, providing the illusion of parallel execution (even though it's concurrent). If your machine has multiple CPUs, some goroutines may indeed run in parallel.
NOTE : If the main() function finishes before other goroutines have a chance to complete, the program will exit and all goroutines will be terminated.When the main function finishes executing, the Go program will exit, even if there are active goroutines still running in the background.
If you want your program to wait for goroutines to finish their tasks, you need to introduce some form of synchronization to prevent the main function from exiting prematurely.
Using
time.Sleep(): You can add a sleep in the main function to keep it alive for a set amount of time, but this is not ideal for production code as it's error-prone and doesn't ensure goroutines are finished.Using
sync.WaitGroup: The recommended way to synchronize goroutines is to use thesync.WaitGroupfrom the standard library, which allows the main function to wait until all goroutines have completed their execution.
If one goroutine is not waiting or sleeping, other goroutines can still be executed even if that one is actively running. The Go scheduler will switch between them to ensure that all goroutines get a chance to run.
Go's runtime scheduler uses preemptive scheduling for goroutines, meaning that even if a goroutine is not waiting or sleeping (for example, it's executing a long-running computation), the scheduler can still switch to other goroutines to run them. The Go runtime interrupts long-running goroutines to allow other goroutines a chance to execute.
sync.WaitGroup
In Go, goroutines run independently, but often you need to wait for multiple goroutines to finish before the main function exits or moves on to the next step. The sync.WaitGroup is a synchronization mechanism provided by Go to wait for a collection of goroutines to complete their execution.
Key Methods of sync.WaitGroup
Add(delta int): This method increments (or decrements) the wait counter by thedeltavalue. Typically,deltais the number of goroutines you are going to wait for.
Done(): This method decrements the wait counter by 1 when a goroutine finishes. It should be called at the end of each goroutine's execution, often usingdeferto ensure it's always called.
Wait(): This method blocks the execution of the main thread until the wait counter becomes zero, meaning all goroutines have finished their work.
WaitGroup, which acts like a counter to track how many goroutines are running. Before starting each goroutine, you increment this counter using Add(). Each goroutine, when it completes its task, calls Done(), which decreases the counter. Wait(), which pauses execution until the counter reaches zero, indicating that all goroutines have finished their work. GOMAXPROCS
GOMAXPROCS is a crucial setting in Go that controls the maximum number of OS threads that can execute goroutines simultaneously. By default, GOMAXPROCS is set to the number of logical CPUs available on the machine running the Go program. You can check this using the runtime.NumCPU() function. For example, if your machine has 8 logical CPUs, GOMAXPROCS will be set to 8 by default.Go supports both concurrency and parallelism. While goroutines allow for concurrent execution of tasks, GOMAXPROCS controls how many of those goroutines can run in parallel on multiple CPU cores. It’s important to distinguish between concurrency and parallelism:
- Concurrency is about dealing with many tasks at once, even if they don’t execute at the same instant.
- Parallelism is about executing multiple tasks simultaneously. Adjusting
GOMAXPROCSinfluences parallelism, as it limits how many goroutines can run at the same time across available threads.
Example, Imagine you have a machine with 3 CPU cores, and you set GOMAXPROCS to 3. Now, let’s explore what happens when you run 5 goroutines in this scenario:
- Concurrent Execution: With
GOMAXPROCSset to 3, the Go scheduler allows up to 3 goroutines to run in parallel on the available CPU cores. This means that the first three goroutines you start will be executed simultaneously, each on its own core, similar to multi-threading.
- Handling Additional Goroutines: Since you are running 5 goroutines, there will be 2 additional goroutines that cannot execute immediately because all 3 cores are occupied.
- Progressive Execution: As soon as one of the first three goroutines completes its execution or blocks (e.g., due to waiting for I/O, sleeping, or yielding), the Go scheduler will pick one of the remaining two goroutines to run. This process continues until all 5 goroutines have finished executing.
By adjusting GOMAXPROCS, you can control how much parallelism you want in your Go program. For example, setting it to 1 would mean only one OS thread will run at a time, even if you have multiple goroutines. Setting it higher increases concurrency.
If GOMAXPROCS = 1: Only one goroutine will run at any given time, simulating a single-threaded execution model. If GOMAXPROCS = runtime.NumCPU(): You get full concurrency based on no. of available cores, allowing goroutines to run in parallel.
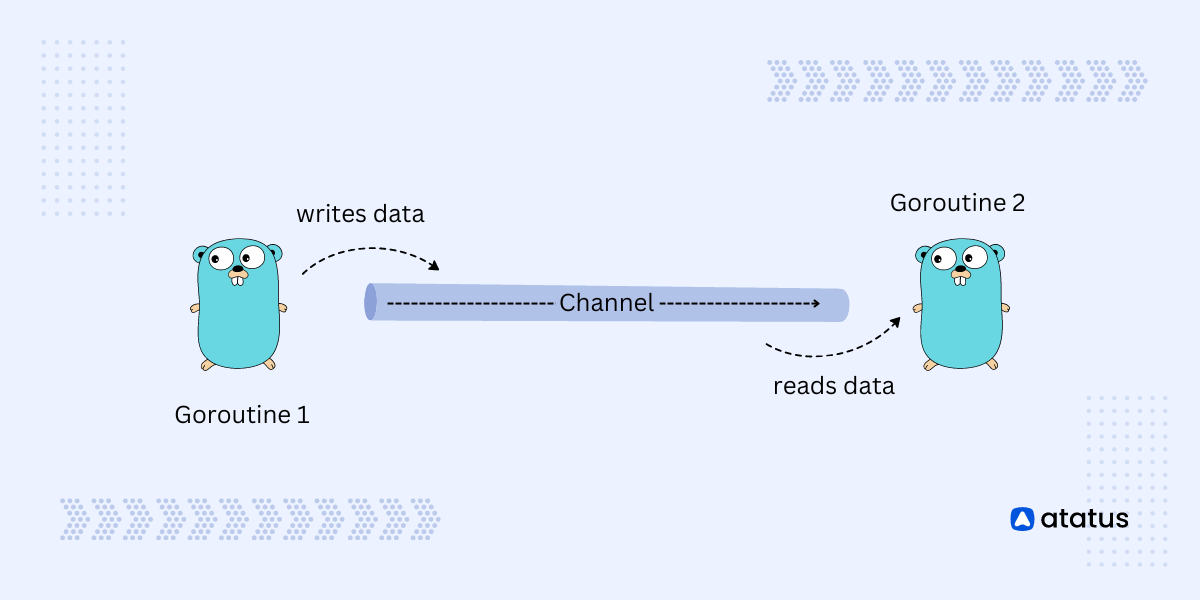
Channels
- Multiple Receivers, One Value: Even if multiple goroutines are listening to (or receiving from) the same channel, only one of them will receive a value each time a value is sent. The Go runtime scheduler ensures that each value sent on the channel is delivered to exactly one waiting receiver.
- Load Balancing: If multiple goroutines are listening to the same channel, they will take turns receiving values in a non-deterministic manner, depending on which goroutine is ready when the value is sent.
- Blocking Behavior: If no goroutine is ready to receive when a value is sent on an unbuffered channel, the sending goroutine will block until a receiver is available.
- Unbuffered Channels: Channels that block the sender until a receiver is ready, and block the receiver until a value is sent, ensuring synchronization between goroutines.
- Buffered Channels: Channels with a fixed capacity that allow multiple values to be sent without blocking the sender until the buffer is full, but the receiver blocks if the buffer is empty.
- Send-Only Channels: Channels that are restricted to only sending data, commonly used to enforce unidirectional communication from a goroutine or function.
- Receive-Only Channels: Channels that are restricted to only receiving data, ensuring that a goroutine or function cannot accidentally send data, often used in worker patterns.
Unbuffered Channels
An unbuffered channel in Go is a type of channel where communication happens directly between the sender and the receiver. When a value is sent to an unbuffered channel, the sender blocks (waits) until a receiver is ready to receive that value. Similarly, if a receiver is waiting to receive from an unbuffered channel, it will wait until a value is sent.
Advantages of Unbuffered Channels:
Guaranteed Synchronization: Unbuffered channels are a natural way to synchronize goroutines. The sender will always wait for the receiver, and vice versa, ensuring that they meet at the right time.
Simplifies Communication: Since unbuffered channels block both sending and receiving, they make it easier to reason about the flow of data in concurrent programs. There's no need to worry about managing a buffer or dealing with partial states of communication.
Coordination Between Goroutines: Unbuffered channels are often used when you need to coordinate or signal between goroutines. For example, they are commonly used in scenarios where one goroutine needs to wait for another goroutine to complete a task before proceeding.
Potential Downsides:
Blocking Behavior: The blocking nature of unbuffered channels can cause deadlock if not managed properly. For example, if there’s no receiving goroutine ready, the sender will block indefinitely, which can lead to a situation where no progress is made in the program.
Limited Throughput: Since unbuffered channels require both sides to be ready at the same time, they can limit throughput if there's a mismatch between the rate at which values are produced and consumed.
Not Suitable for Asynchronous Tasks: If you need to decouple the timing between the producer (sender) and the consumer (receiver), unbuffered channels are not ideal. In such cases, buffered channels or other concurrency patterns might be more appropriate.
We can create a channel using make() function. The syntax for creating channel :
To send a value to a channel, you use the <- operator. To receive a value from a channel, you also use the <- operator, but in the opposite direction.
Example] Below we create an unbuffered channel and send/receive data in 2 different goroutines. Both receive data in sync one after another.
NOTE : Use close(channelVariable) to close the channel after you’re done sending values, which is important to signal to receivers that no more data will be sent.
NOTE : When receiving from a channel, consider using the two-value form (msg, ok := <-ch) to check if the channel is closed. This allows you to handle cases where the channel has been closed gracefully.
Buffered Channels
Buffered channels in Go are a type of channel that allows you to send a certain number of values without needing to wait for a corresponding receiver ready to receive them immediately. Unlike unbuffered channels, where the sender blocks until a receiver is ready, buffered channels can store values until they are read.
Buffer Capacity: When creating a buffered channel, you specify its capacity (the number of values it can hold). For example,
make(chan int, 3)creates a buffered channel for integers that can hold up to three values.Non-blocking Sends: When the buffer is not full, sending a value to the channel does not block the sender. This allows goroutines to proceed without waiting for a receiver, increasing throughput in scenarios where sending and receiving rates differ.
Blocking Behavior: Once the buffer reaches its capacity, further sends will block until there is space available in the buffer (i.e., a value is received). Similarly, receives will block if the buffer is empty until a value is sent.
Advantages of Buffered Channels:
- Increased Throughput: Buffered channels can improve throughput by allowing a sender to continue sending messages without needing an immediate receiver.
- Decoupling of Producers and Consumers: They enable the producer and consumer to operate at different rates, helping manage workloads in scenarios where one side may be faster than the other.
- More Flexible Synchronization: Buffered channels provide a more flexible way to synchronize between goroutines compared to unbuffered channels.
NOTE : If the buffer is full and no goroutine is available to receive values, the sending goroutine will block, potentially leading to deadlock if not managed properly. If at least one receiver becomes ready to receive from the channel while the sender is blocked, the deadlock can resolve , However, if there are no receivers ready, the sender remains blocked indefinitely.
Unbuffered channels are ideal when you need immediate synchronization between goroutines, as the sender and receiver block until both are ready. They ensure tight coordination for tasks that require hand-offs.
Buffered channels, on the other hand, allow asynchronous communication by storing values in a buffer, letting the sender continue without waiting for an immediate receiver. They are best for decoupling the sender and receiver, especially in producer-consumer scenarios where tasks may need to be queued or processed at different speeds.
Select
The select statement in Go is used to handle multiple channel operations, allowing a program to wait on multiple channels and proceed with whichever one becomes ready first. It acts like a switch statement, but for channels.
The select statement is primarily used on the receiving side, where it waits for messages from multiple channels. It allows a goroutine to wait for data from several channels at once and proceed with the first one that becomes available.
NOTE : In case multiple channels are ready at the same time, one is chosen at random. This ensures that no channel is given priority.
Example] The select statement waits for a message from either channel1 or channel2. Since channel2 sends a message first (after 1 sec), it gets printed first.
NOTE : The select statement will block (waits) until one of the channels can proceed, unless a default case is provided, which prevents blocking.
Typically, select blocks execution until one of the channels is ready. However, if a default case is included, it prevents blocking and allows the program to continue immediately if no channels are ready.
The default case in a select statement is executed immediately if none of the other channels are ready. It prevents the select from blocking if all the channels are either unavailable or not ready to send/receive data.
When you include a default case, the program does not wait for any channel operation to complete. Instead, it executes the default case right away if no channels are ready. This is useful when you want to avoid blocking and continue with other tasks if no channel operations are ready.
Race Condition
This lack of control over execution order leads to inconsistent and unexpected behavior, which can be difficult to debug. The program might work as expected in one run and produce incorrect results in another due to race conditions.
Example] Since all goroutines access counter simultaneously without synchronization, this creates a race condition. The final value of counter is unpredictable because some increments might be missed due to race conditions.
To prevent race conditions in Go, you can use techniques like Mutex (with sync.Mutex) to lock and unlock critical sections of code, ensuring only one goroutine accesses shared data at a time. You can also use channels to safely synchronize data between goroutines without directly sharing memory.
Mutex (Mutual Exclusion)
Key Points about Mutex:
Lock and Unlock: A mutex provides two primary methods:
Lock(): This method is called before entering a critical section. If the mutex is already locked by another goroutine, the calling goroutine will block (wait) until the mutex is unlocked.Unlock(): This method is called after the critical section is executed. It releases the lock, allowing other goroutines to acquire it.
Ownership: A mutex is owned by the goroutine that locks it. Only the owning goroutine should unlock the mutex. If a different goroutine tries to unlock it, it will lead to a runtime panic.
Deadlocks: Care must be taken to avoid deadlocks, which occur when two or more goroutines are waiting indefinitely for each other to release their locks. To minimize this risk, ensure that locks are always acquired and released in a consistent order.
Performance: While mutexes are essential for preventing race conditions, they can introduce performance overhead due to locking and blocking. Therefore, it’s important to minimize the duration for which a mutex is held.
---------------------------------------------------------------------------------------------------------------


Comments
Post a Comment